 Welcome to Day 13 in the 31 Days of iOS. We just wrapped up a series on data storage and sharing data between different view controllers. Today we’re going to move on to something new: the TableView. The TableView is used to display a list of information. Many of the built in apps use this view type including Contacts, Mail, Notes, and more. In general the idea is that each row displays a single record of information and that each row appears the same. Tapping on a row usually opens whatever item is associated with it (i.e. in a details view). We’ll be starting with a brand new project, but if you’d like to follow along with the completed code, you can access it here.
Creating our project
Open up Xcode and choose File, New, Project. We’ll use a Single View Application and name it DayThirteen:
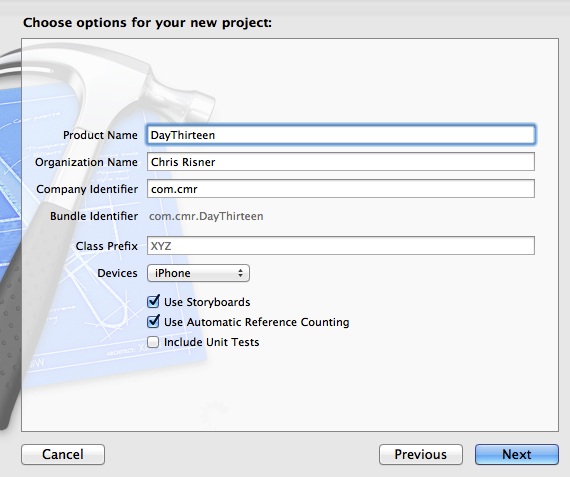
We’ve got the basic boilerplate project now.
Adding the TableView
Open MainStoryboard.storyboard. You should see a normal blank view. In the UI element selector in the bottom right of Xcode, find the Table View and drag it onto your view controller. Once you drop it, it should take up the whole view:
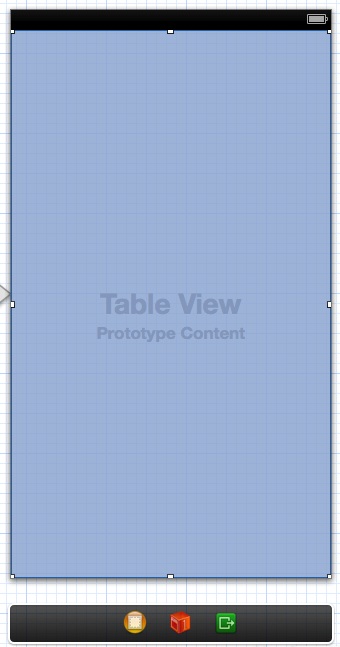
Next, control + click and drag from the Table View to the View Controller below it:

After you let go, you should see a popup appear allowing you to select dataSource and delegate. Pick one and then repeat and pick the other. If you run the app now, it will crash because you’ve told the Table View that it can call it’s source and delegate methods on the ViewController object, but we haven’t implemented them yet. We’re going to change the UI a bit more before we do that.
Adding a cell
Return to the UI element selector in the bottom right of Xcode and find the Table View Cell. Drag that onto your Table View in the UI and you should get this:
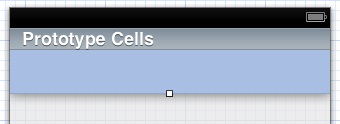
This allows us to customize our UI later on. In the Utilities panel switch over to the Attributes Inspector. Set the Identifier to Cell.
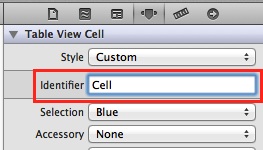
We’ll use this later in the code to help us find the cell. Now we can switch over to the code and start wiring our app up.
The Header file
Open up ViewController.h. Our changes here are minimal as all we need to do is make our class implement the UITableViewDelegate and UITableViewDataSource:
Now we can implement the class.
Handling the table methods
The first thing we need to do is create a data source. In most applications, we’d pull the data we’re displaying from a file, a database, or a network connection. For ease’s sake, we’re just going to use a NSArray we will initialize in our view’s viewDidLoad method:
Here we’re just putting NSDictionarys into our array. Now we can add the methods for UITableViewDataSource. We’ll star with numberOfSectionsInTableView:
For now we’re just hard coding that our table has 1 section. Sections are good for breaking up the data in your table. So for example, if we were displaying song names, we might have one section for each letter in the alphabet that has songs. Next up, we handle the numberOfRowsInSection method:
Since we only have one section we’ll return the number of items in our array. This means that each item in the array will populate a row in our table. If we were using the song analogy above, we might figure out which letter’s section it was asking for and then return the number of songs that start with that letter. The last method we need to implement before we run is cellForRowAtIndexPath:
We’re first calling dequeueReusableCellWithIdentifer to get a cell object. We’ll talk more about this method in a second. Notice that we’re passing Cell into this method. That was the identifier we used above when we set the Table View Cell Identifier. Next we’re pulling the NSDictionary from our array at the index that was sent into the method. Lastly, we use that NSDictionary’s name element to set the text value of cell.textLabel. We didn’t have to put this text label in the cell earlier, it’s just there by default. Now when we run our app, we should see our rows:
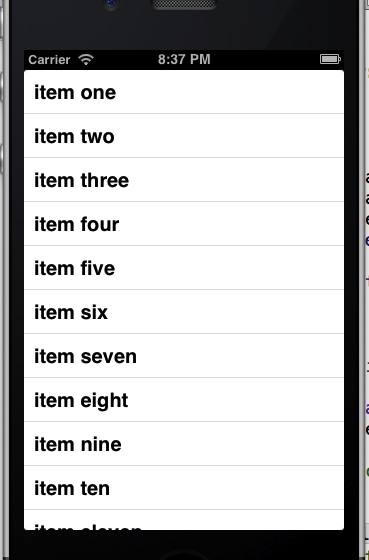
What’s this dequeueing nonsense?
Every cell that shows up on screen has to be allocated in memory. Imagine that your datasource isn’t 13 items like ours is right now, but 30,000 songs. If you had to allocate a cell for each of those 30,000 songs when you showed your TableView, your app would receive an out of memory error and crash very quickly. iOS handles this by only allocating enough cells for what fits on screen. So, when one row goes off the screen, instead of that cell being deallocated and a new cell being allocated, the cell leaving the screen is reused for the cell showing up. So in the example above, when cell one rolls off, it’s reused for cell thirteen. You get this without having to do anything thankfully. However, there is one thing to be aware of. If your cell has different UI elements and you don’t set (or reset) one when a cell is reused, it will maintain the values when it was previously used. So for example, if we were only setting the cell’s textLabel.text property if the name element in the NSDictionary had a value and itemThirteen didn’t have a name, it would show up as item one when you scroll up. You can test this by changing the cellForRowAtIndexPath method to only set the text for index’s less than 12:
Handling row taps
You have two options for handling row taps. One of them in the code side and the other in your storyboard. We’ll look at the code way first:
Here we’re implementing the didSelectRowAtIndexPath method that is part of UITableViewDelegate. This will now get fired whenever you tap a row. Once it’s done, you can use the tableView passed in to get access to the cell that was tapped or just go directly to your datasource if you want to. The alternative is to open your storyboard and control + click and drag from your cell to a different View Controller that you want to open when a row is tapped:
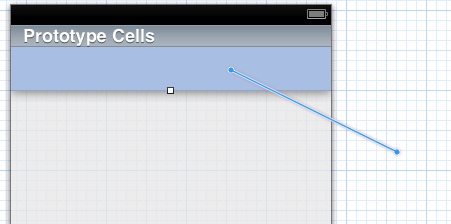
The advantage of doing it this way is that the logical flow of your application is handled within your storyboard and not in the code behind. However, if you need to pass data from the cell that was passed to your new View Controller, you’ll need to implement the prepareForSegue method in the originating ViewController class and set data properties on the destinationViewController.
Customizing the UI
Now that we’ve loaded our rows, let’s look at how we can change from using the default text lable. Return to MainStoryboard.storyboard. Drag two labels onto your prototype cell and then, using the Attributes Inspector in the Utilities panel, set the Tag property under View to be 1 and 2 (1 for the first label and 2 for the second):
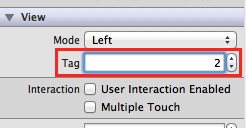
Now you can return to the cellForRowAtIndexPath and change how you set the UI:
Instead of using cell.textLabel, we get references to view’s inside of the cell by the tag. We then just set the text property on those. This approach can be used for setting any sort of UI element. Now run your app and you’ll see the name and the id for each cell:
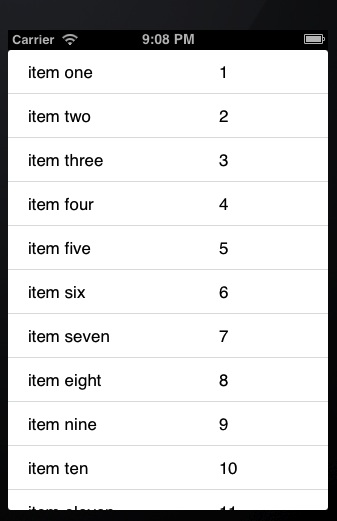
Conclusion
Today we saw a new way to display data: the TableView. This is a very powerful UI element and is used by many of the built in iOS apps. Furthermore, we looked at how to customize the UI. If you take a look around at other apps, you’ll see it’s possible to really customize your UI with the TableView. Also, not that you don’t have to add a TableView to a ViewController and add all of these methods yourself if you don’t want to. When you go to add a new file to your project, you can have your new class subclass UITableViewController instead of UIViewController. This will generate a view controller that already has the methods in it. Furthermore, you can add a Table View Controller to the UI in your storyboard instead of having to drag and drop a Table View yourself. You can check out the finished source code from today here.