
![]() Welcome to Day 9 in the 31 Days of iOS. In the preceding two articles we looked at how to perform network requests. You should now have the knowhow to do any sort of HTTP requests your applications may need. Today, we’re going to create a brand new project and take a look at some more delegate operations. Specifically we’re going to examine how to override text input as the user types into a text field. This is useful for validation and restricting user input. If you’d like to follow along with the completed code, you can access it here.
Welcome to Day 9 in the 31 Days of iOS. In the preceding two articles we looked at how to perform network requests. You should now have the knowhow to do any sort of HTTP requests your applications may need. Today, we’re going to create a brand new project and take a look at some more delegate operations. Specifically we’re going to examine how to override text input as the user types into a text field. This is useful for validation and restricting user input. If you’d like to follow along with the completed code, you can access it here.
Creating our project and handling the UI
We’re going to start with a brand new project. Open up Xcode and choose File, New, Project. We’ll use a Single View Application and name it DayNine:

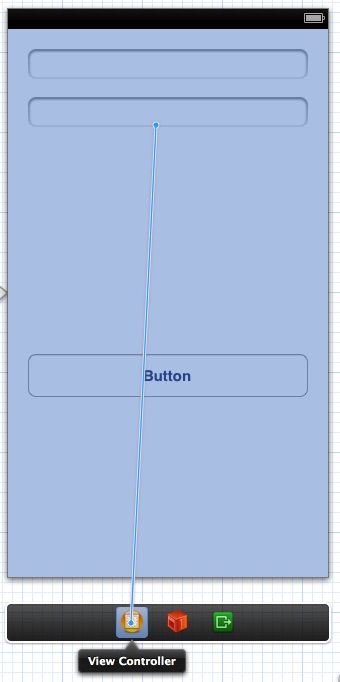
After that let’s handle the UI by opening MainStoryboard.storyboard. We’re going to drop two TextFields, a TextView, and a Round Rect Button onto our form. When you’re done, the view will look like this:

Notice the highlighted area in the screenshot is the TextView. I left it highlighted so you could see it because it doesn’t have any borders by default. Open up the Assistant Editor in the Utilities pane on the right side of Xcode. We need to control + click and drag from each TextField, TextView, and Button over to the .h file and generate outlets. We also need to generate an action for the button. When you’re done with all of those, you’re .h file will look like this:
Notice that we’ve also made ViewController implement both UITextFieldDelegate and UITextViewDelegate, we’ll go over why right now. Return to the storyboard and control + click and drag from each TextField and the TextView to the ViewController object beneath it:
When you let go, you’ll get a dialog menu that let’s you choose the delegate for each element. By selecting the ViewController as the delegate for the TextFields and the TextView, we’re saying that any delegate methods that those elements call will be handled by our ViewController. This is why we had to make ViewController implement UITextFieldDelegate and UITextViewDelegate. Now that we’ve finished the UI for now, let’s switch over to coding.
Coding the backend
Open up ViewController.m first. Both the UITextFieldDelegate and UITextViewDelegate protocols have several methods we can implement to override behavior on the UI elements. We’ll go through a few different scenarios to see what we can do. First, we’ll look at editing a text field’s text value when the user enters it for editing:
In this situation, we’ll implement the textFieldDidBeginEditing method. This method will be called as soon as the user taps into a text field (or progresses into one). Here we’re checking to see if the text field that triggered it was textFieldOne. If it was, we set the field’s text property to “Don’t edit me!”. This method also exists on the TextView (though with the name changed to textView…). Another method we can implement is textFieldShouldBeginEditing:
This method expects a BOOL to be returned which indicates whether or not the field can be edited. Here we’re checking to see if the field to trigger it was textFieldTwo and if so, if it’s text property is “No Change”. If it is, then you won’t be able to edit the field. Again this method also exists on the TextView. Two other methods that exist are textFieldShouldEndEditing and textFieldDidEndEditing. These methods are very similar. The second (DidEnd) allows you to make changes when a user is finished editing a field. The first (ShouldEnd) allows you to prevent a user from ending their editing of a field. So for example, if you didn’t want the user to leave a field if the data they had entered was invalid, you could do so like this:
Here we’re checking to see if the text entered is equal to “done” and if so, we won’t allow the user to stop editing the TextField. This can be a dangerous method to implement because you run the risk of trapping a user in editing mode. Unless you’re confident they’ll be able to figure out why you’re preventing them from leaving the text field, it may be best to avoid this.
Handling input as it’s entered
The previous scenarios are good to be aware of, however, one of the most common desires is to be able to check and control a text field (or view’s) text value as it’s edited (as opposed to when it starts or ends being edited). Thankfully, both TextFields and TextViews have a method for this: shouldChangeCharactersInRange. Let’s look at this in action:
This time we’re checking for the TextView. In this case, we’re making sure the TextView doesn’t allow more than 45 characters. This is very useful if you need to limit the amount of text that can be entered to match character limits in your data storage (i.e. if you’re going to save your data to a database and the field can only be 45 characters, this is how you can accomplish that). This method gives you the ability to validate input as it is entered. If for example, you’re expecting a phone number or an email address, you could validate the input against a regular expression each time the text is changed and set the TextField/TextView’s background color to red if it doesn’t pass to indicate a bad value.
Other methods
There are a couple other methods worth explaining. textFieldShouldReturn is called whenever the return key is hit on the keyboard and the user is in a TextField. textFieldShouldClear is called if the TextField has a clear button and the user presses it. textViewDidChange is called whenever your TextView is altered. textViewDidChangeSelection is called when the selection (the text area highlighted) is altered.
Conclusion
You should now know everything you need to to validate user input as it happens. You’ll have to decide what action to take when a user’s input isn’t valid though. Remember that when you do this, it’s important that the user understands what’s going on. If you’re checking to make sure a phone number or email address is valid while it’s being typed in (as mentioned above) the user would probably understand if the TextField turns red. However, if the field isn’t properly labeled as being for a phone number or email address so the user understands that, they may be lost and confused by your app. If you’d like to look at the final code from today, you can download it here.

2 Comments
Deyan Marinov
The tutorial is awesome!!
You make a little mistake, wrote to make application named DayEight, but this is Day 9.
Chris
Thanks Deyan. I've fixed it now.