Continuing in our 31 Days of Android series, we’ll talk about Android Virtual Devices (AVDs). Strictly speaking, you don’t need an Android phone or tablet to develop for Android. Instead, you can create AVDs and run them in an emulator. Unfortunately, the emulator is well known for being slow, displaying things differently than devices, and just being the bane of many developers. Prior to the release of Ice Cream Sandwich and the latest version of ADT, running the emulator for a tablet was nearly impossible. For most people out there (including myself) there just isn’t a way to get access to all of the different device types. This mostly means different screen sizes and densities, however, you also may want to test against hardware keyboards. I will say that if you can get access to enough devices, avoid the emulator. Provided you have installed all of the different Google APIs and SDK versions from yesterday’s entry in 31 Days of Android, you should be good to go with today.
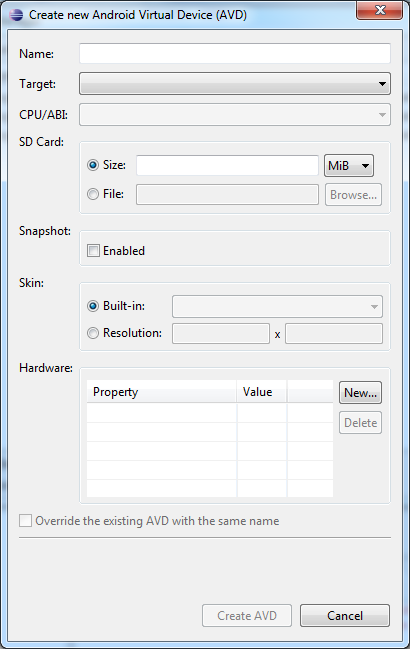
If you’re not already running Eclipse, go ahead and launch it. After doing so, go to the Window menu and choose AVD Manager. The manager won’t list any AVDs yet (unless you created some in the past) so now we’ll create some. Clicking New takes us to this window:

The name can be whatever you want. Since the platform and API level are visible in the AVD manager, you may want to name your AVD for the resolution you select or any other special setup you apply to the AVD. The vast majority of Android devices out there are still pre 3.0. You can view the current distribution of device versions on the Android developer site. Knowing this, if you want to put out an application that gets the most people possible, you’ll want to make it for and test it against at least 2.2 and up. This currently covers 87% of devices on the market. So if we want to create a 2.2 device, we can choose either “Android 2.2 - API Level 8” or “Google APIs (Google Inc.) - API Level 8”. The difference between the two is that the Google APIs version comes with a few extras. The most common thing the APIs version has that people use is access to Google Maps. If your app will use Google Maps, make sure you use an API version. I don’t know of a bad reason for using an API version so you may just want to use that either way. So once you’ve selected “Google APIs (Google Inc.) - API Level 8” you have the option of selecting size of the SD card. If you’re doing something where size is a factor you may want to set this. In my general usage and testing, I never have.
Snapshot is a relatively new feature that should allow you to boot your AVDs faster. Essentially what Snapshot does is save the state of your AVD whenever you shut it down. Then when you reboot it, it will start up much faster than the normal boot process. It does introduce some issues with restarting the AVD that requires you to uncheck a “Launch from Snapshot” checkbox in the AVD’s launch options though.
Next we have Skin. Skin allows us to quickly select a predefined screen size, such as the default WVGA800, or pick out a specific resolution. Most of the time I’ve gotten by with the Built-In Skins but if you need to test a specific device, you may need to branch out. In addition, you can install additional built in Skins for use. Here is one walkthrough on installing skins for the Nexus S and Nexus One (not the upcoming Galaxy Nexus). For my general testing I’ll make an AVD for WVGA800 and HVGA. This covers a high definition device and a medium definition device.
Lastly, you’ll see the Hardware options. When you pick a Target SDK and a Skin, some options will already be filled in (typically “Abstracted LCD density”, “Max VM application heap size”, and “Device ram size”). This area gives you the ability to specify whether GPS should work, whether you can use a camera, whether or not the device has a hardware QWERTY keyboard and more. Most of these settings are defaulted to options that make it easy to test a device with the functionality. So if you want to test how your app would run on a device that doesn’t have a hardware keyboard, camera, or GPS, then that is when you’d want to go in and add these settings to the Hardware area.
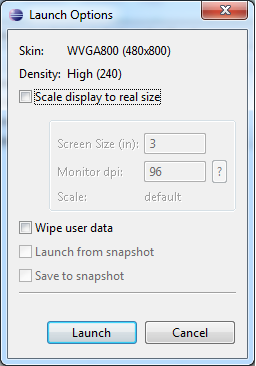
 Once you’ve filled that info out, you’re ready to hit Create AVD. Upon doing so, you’ll be taken back to the Android Virtual Device Manager. When you’re here, you can select your new AVD and click details to get more information. When you’re ready, click Start. You’ll next get the Launch Options screen. From here you can control scaling options to decrease (or increase) the size of the emulator. This doesn’t affect the DPI of the emulator but how much space the emulator takes up on your screen. If you’re developing on a smaller screen monitor or laptop, you may need to scale down any HDPI emulators because they won’t actually fit on the screen. Lastly, there are options to Wipe User Data to set the emulator back to a “new” state. There are two options for Snapshot here that have to do with the Snapshot option we discussed when creating the AVD. You should finally be ready so go ahead and hit Launch. And wait. As I’ve said before, the emulator is pretty slow. Using the snapshot mode should boost the speed of starting your emulators. Give it some time though, and you’ll have access to the emulator.
One thing to note is that the emulator won’t have any accounts set up by default and doesn’t have the Android Marketplace installed. This means that if you’re writing an application that needs to interact with other Marketplace installed apps, you won’t really be able to test on the emulator, at least not in an easy manner. It is possible to get the Android Marketplace onto an emulator image but it requires a bit of work and isn’t perfect. Just to reiterate, if you have access to devices, you’ll probably have an easier time testing on them.
If you haven’t already done so on your own, go ahead and create an AVD targeting Google APIs (Google Inc.) - API Level 8 with a Built-in Skin of HVGA and Snapshot enabled. If you want to have an easier time of following along later, name your AVD “hvga”.