Kicking things off in our 31 Days of Android series, we’ll talk about getting things set up for development. When you want to start developing for Android, you have a decision to make. You can use the Eclipse development environment which has integration with Android Development Tools or you can use the command line to create, compile, and package your Android apps. If you’re set on the IDE you want to use, and it isn’t Eclipse, you can do it, it’s just not as easy. For today we’ll just assume you’re going to use Eclipse.
When you go to download Eclipse, you’ll want to choose Eclipse IDE for Java Developers. The current version of Eclipse is 3.7.1 and is code named Indigo. If you already have an older version of Eclipse installed and it’s relatively recent, you can probably get away with using it. However, I have run into issues with one of the more advanced features not really working in older versions of Eclipse, so unless you’re set on staying with an older version, grab Indigo. Once you’ve pulled down Indigo (or opened your older version of Eclipse), it’s time to install the Android plugin for Eclipse.
The Eclipse plugin created by Google is called the Android Development Tools (ADT). The ADT takes all of the tools and capabilities that the Android SDK gives you in the command line and makes them easy to use from Eclipse’s GUI. Go ahead and fire up Eclipse. If this is the first time you launch, you’re going to be asked for a workspace to store projects in. You can use the default or enter a folder of your own choosing. Once you’re into Eclipse, go to the Help menu and then Install New Software. Click Add in the top right, then enter whatever you want for the name and this for the location: http://dl-ssl.google.com/android/eclipse. Note that the “Official” Google instructions say to use a HTTPS URL. I’ve never actually had this work and have always had to switch to HTTP. After clicking OK, you’ll go back to the previous window and you should see this:

Go ahead and check all of those boxes and choose Next. You’ll need to click next and accept some terms and conditions and then ADT will be installed and you’ll be asked to restart Eclipse. When Eclipse launches, you’ll be presented with a fantastic window. This window will ask you to either install the Android Software Development Kit (SDK) or choose an existing SDKs location. Prior to version 15 of ADT, you had to manually download the SDK and go into options in Eclipse to connect ADT to your SDK installation. Unless you’re just reinstalling Eclipse and you already have an up-to-date copy of the SDK ,I’d choose to install it:

If you only want to develop for the latest version of Android (4.0 / Ice Cream Sandwich at the time I wrote this), you don’t need to check the second box. However, if you want to support the majority of devices, make sure you check the 2.1 box as well. After proceeding, you’ll need to Accept some terms and install the SDK.
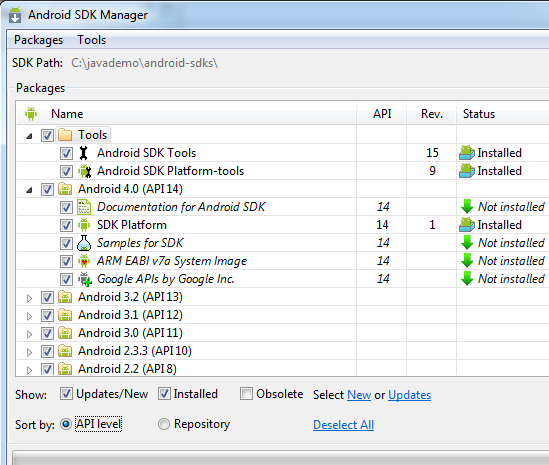
Provided that went well, you should still be in Eclipse and you should be nearly ready to create an emulator. From Eclipse choose the Window menu and then Android SDK Manager. This tool enables you to easily update your SDK and install different versions of the SDK as well as support for specific device types. While you don’t need to do this as you’ve already installed the latest SDK and 2.1 (if you followed the above), I would go ahead and check all the available boxes and install all available packages:

If nothing else, make sure you have installed the Android 2.2 (API 8) folder. There is some functionality we’ll play with later in the series that requires at least version 8 of the Google APIs. If you choose to install everything, it’s going to take a little while.
That’s it for today. You’re just about ready to get started with developing for Android. Next, we’ll look at creating Android Virtual Devices. You can read more about the install process here (just a warning, as of when this was written, some steps weren’t updated for v15 of the ADT).
4 Comments
Sam Calma
referencing this right now for something I'm testing for android!
Brent Connor
Someone may want to do a write-up on problems installing the Eclipse IDE. I had a problem getting it to recognize the Java JRE file (part of the JDK). I'm not even sure how I got it fixed. I had trouble finding any help with my troubled installation.
Colorrgrapes Praveen
Can i know what is the error and when you are getting.
amabualrub
Thanks man :D