
 Today we’re going to continue the 31 Days of Android by talking about the last two common layouts, the TableLayout and the FrameLayout. These may not be as common at the LinearLayout or the RelativeLayout but certainly serve their purpose. You can download the code we’re going to start with here.
TableLayouts are exactly what you’d expect from the name. You can use them to position child Views into rows and columns. If you’ve used HTML tables before, you should be able to pick this up very easily. The exception to them being like HTML tables is that you cannot span columns. To see the TableLayout in action, let’s look at the main.xml file in res/layout. Right now it’s root is a LinearLayout. You will need to change that to a TableLayout. Once you’ve done that, the xml should look like this:
<?xml version="1.0" encoding="utf-8"?>
<TableLayout xmlns:android="http://schemas.android.com/apk/res/android"
android:layout_width="fill_parent"
android:layout_height="fill_parent">
...
</TableLayout>
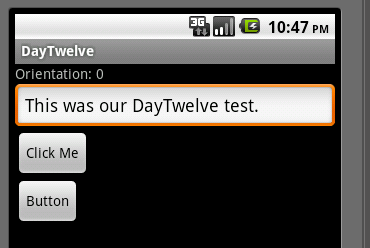
When you run your app, it will look like this:

There are a few things worth pointing out here. First, this doesn’t look that much different from when the root was a LinearLayout. The one thing that really does look different is the Click Me button. Where as before the button was only slightly larger than “Click Me” text, now it spans the whole screen. Even though the layout_width of the button is still set to wrap_content. This is a weird side effect of using a TableLayout. If you’re creating a TableLayout, you’re usually also going to wrap it’s children in TableRows. Go ahead and wrap all of the children of the TableLayout in those TableRows. When you’re done, your xml will look like this:
<?xml version="1.0" encoding="utf-8"?>
<TableLayout xmlns:android="http://schemas.android.com/apk/res/android"
android:layout_width="fill_parent"
android:layout_height="fill_parent">
<TableRow >
<TextView
android:id="@+id/lblTextViewOne"
android:layout_width="wrap_content"
android:layout_height="wrap_content"
android:text="@string/hello" />
</TableRow>
<TableRow >
<EditText
android:id="@+id/editText1"
android:layout_width="match_parent"
android:layout_height="wrap_content" >
<requestFocus />
</EditText>
</TableRow>
<TableRow >
<Button
android:id="@+id/button1"
android:layout_width="wrap_content"
android:layout_height="wrap_content"
android:text="@string/click_me" />
</TableRow>
<TableRow >
<LinearLayout
android:id="@+id/linearLayour2"
android:layout_width="wrap_content"
android:layout_height="wrap_content" >
<TextView
android:id="@+id/textView2"
android:layout_width="wrap_content"
android:layout_height="wrap_content"
android:text="@string/app_name" />
<Button
android:id="@+id/button2"
android:layout_width="wrap_content"
android:layout_height="wrap_content"
android:text="Button" />
</LinearLayout>
</TableRow>
</TableLayout>
When you run your app, it won’t look very much different (the EditText and first TextView won’t go all the way to the end of the screen). For the sake of really understanding what’s going on, remove the LinearLayout from the last TableRow so that it just contains a TextView and a Button. Now your view will look like this:

What’s happened is that each element in a TableRow belongs to a separate column. Outside of the last, each TableRow only has one element. The first column ends up being the width of the largest element (in this case the EditText and still oddly the first Button) and the second column ends up comprising the only send element any of the rows have, the second Button. The last important thing to talk about when it comes to TableLayouts is an attribute you put on the root layout element: stretchColumns and shrinkColumns. These two attributes can be used to stretch or shrink all or certain columns at run time. Since you may not know the width of certain elements at design time, you may end up needing to use these attributes. The syntax of the value that you set these attributes to is either a single column number, a comma separated list of column numbers, or an asterisk to signify all columns. In your view currently, the “Button” text is being cut off on the right side. Let’s look at some options we can use to fix this using stretchColumns and shrinkColumns. The first thing you might think to try is to say stretch column 1. Go ahead and do that and your xml should look like this:
<TableLayout xmlns:android="http://schemas.android.com/apk/res/android"
android:layout_width="fill_parent"
android:layout_height="fill_parent"
android:stretchColumns="1">
Now run your app and you won’t get quite what you were probably hoping for. In fact, things won’t look different at all. Column one is being told to stretch, but there isn’t any room for it to stretch. If you change the stretch to a shrink and specify column zero, things will start looking better:
<TableLayout xmlns:android="http://schemas.android.com/apk/res/android"
android:layout_width="fill_parent"
android:layout_height="fill_parent"
android:shrinkColumns="0">
Now run your app and you should see the button now fitting on the screen:

So here, you’ve told column one that it should shrink to allocate room for other columns. This gives column one the room it needs to expand. It’s important to remember that you can stretch and shrink columns as needed when you use a TableLayout though you may need to play around to get your desired result.
The FrameLayou
The last layout we’ll take a very quick look at is the FrameLayout. The FrameLayout is probably the simplest, and possibly least used, layout element you’ll run into. It’s intent is to be filled with a single child element that you can swap in and out. You can have multiple elements in a FrameLayout and the “later” children will be drawn over the “earlier” children. The most common example of this I’ve seen is putting an ImageView in as the first element and then adding TextViews or Buttons after. Let’s open up res/layout/second_layout.xml and change it to a FrameLayout. After you’ve changed the layout, you can also get rid of the orientation attribute that your LinearLayout had since the FrameLayout doesn’t use it. Now you should be left with this:
<?xml version="1.0" encoding="utf-8"?>
<FrameLayout xmlns:android="http://schemas.android.com/apk/res/android"
android:layout_width="fill_parent"
android:layout_height="fill_parent">
<TextView
android:id="@+id/textView1"
android:layout_width="wrap_content"
android:layout_height="wrap_content"
android:text="TextView" />
</FrameLayout>
When you run your application, you should see your TextView in the top left corner of the screen. To really see the FrameLayout in action, you need to add an ImageView as the first child of your layout. Go ahead and add an ImageView and set it to the only drawable we have in our project, ic_launcher. As a side note, the ic_launcher file is used as the app icon and is specified as an attribute of the application in the manifest file. When you’re done, your XML should look like this:
<FrameLayout xmlns:android="http://schemas.android.com/apk/res/android"
android:layout_width="fill_parent"
android:layout_height="fill_parent">
<ImageView
android:id="@+id/imageView1"
android:layout_width="match_parent"
android:layout_height="match_parent"
android:src="@drawable/ic_launcher" />
<TextView
android:id="@+id/textView1"
android:layout_width="wrap_content"
android:layout_height="wrap_content"
android:text="TextView" />
</FrameLayout>
If you run now, you’ll see the image but the text will still be at the top left. To fix this, add a layout_gravity attribute to the TextView and set it to center. Now when you run your app, you’ll have the text in the center of the image:

So by now you’ve played with the four big layout types: LinearLayout, RelativeLayout, TableLayout, and FrameLayout. New in Android 4.0 is the GridLayout which may be a simpler option than using some of the previously discussed layouts so if you’re going to develop for Ice Cream Sandwich, it’s worth reading about GridLayout.
