 Today we’re going to wrap up our first iOS client that connects to Windows Azure Websites. If you’ve been following along, then as of now we have an app that will display a list of shortened URL slugs and will allow the user to tap in to see more details on them. Today, we’re going to complete our app by giving the user the ability to add new shortened URLs from the app. You can download the code we left off with in part 4 here.
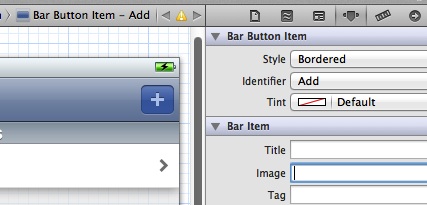
To start, let’s go to our storyboard and go to the view controller with our table view in it. This is where we’re going to want to add a button to create a new shortened URL. Drag a Bar Button Item from the control selector to the top right of the navigation bar in the view. When that’s done, in the Attributes Inspector, change the Identifier drop down to Add.

Now, like you did with the prototype cell, control click and drag from the Add button to the UrlDetailsViewController in the storyboard. When the dialog comes up to ask what kind of style you want to use, choose Push. Click on the segue that was generated to go between the button and the view controller and give it an identifier of “AddUrl”. Now, go to your UrlDetailsViewController in the storyboard and add a Bar Button Item to it’s right side. This time, choose an Identifier in the Attributes Inspector of Save. Open the Assistant Editor and control drag from the new button to your UrlDetailsViewController.h file to generate a new IBOutlet and an Action. Now, before we’re ready to specify what should be done in prepareForSegue, we need to make some changes to our classes. Open the UrlDetailsViewController.h class. We’re going to have our base ViewController do all of the heavy lifting, but in order to do that, we need to have a way of telling the ViewController class what happened in the UrlDetailsViewController class. For this, the delegate pattern will work great. Let’s add a new protocol to the class. In addition, we’ll add a new BOOL property to indicate if the view is editable, and we’ll make the view controller implement UITextFieldDelegate. When you’re done, your .h file should look something like this:
    @class UrlDetailsViewController;

    @protocol UrlDetailsViewControllerDelegate <NSObject>
    - (void)urlDetailsViewController:(UrlDetailsViewController *)controller didAddUrlWithSlug:(NSString *)urlSlug andFullUrl:(NSString *)fullUrl;
    @end

    @interface UrlDetailsViewController : UIViewController <UITextFieldDelegate>
        @property (nonatomic, weak) id <UrlDetailsViewControllerDelegate> delegate;
        @property (nonatomic, weak) NSString *urlSlug;
        @property (nonatomic, weak) NSString *fullUrl;
        @property (weak, nonatomic) IBOutlet UITextField *BmakUItxtUrlSlug;
        @property (weak, nonatomic) IBOutlet UITextField *txtFullUrl;
        @property (weak, nonatomic) IBOutlet UITextField *txtUrlSlug;
        @property (weak, nonatomic) IBOutlet UITextField *txtShortyUrl;
        @property (weak, nonatomic) IBOutlet UIButton *btnGoToUrl;
        @property (weak, nonatomic) IBOutlet UILabel *lblGoToUrl;
        @property (weak, nonatomic) IBOutlet UILabel *lblShortyUrl;
        @property (weak, nonatomic) IBOutlet UIBarButtonItem *btnSaveUrl;
        @property BOOL isEditable;
        - (IBAction)tapGoToUrl:(id)sender;
        - (IBAction)tapSaveUrl:(id)sender;
    @end
Now that the .h is done, switch over to the UrlDetailsViewController.m. First, synthesize the delegate and the new isEditable field:
    @synthesize delegate;
    @synthesize isEditable;
Next we need to edit our viewDidLoad method to handle if the view is editable or not:
    - (void)viewDidLoad
    {
        [super viewDidLoad];

        self.txtUrlSlug.delegate = self;
        self.txtFullUrl.delegate = self;
        //Turn on or off editability of text fields
        self.txtUrlSlug.enabled = self.isEditable;
        self.txtFullUrl.enabled = self.isEditable;
        self.txtShortyUrl.enabled = self.isEditable;

        if (self.isEditable == NO) {
            self.txtShortyUrl.text = [@"http://urlshortener.azurewebsites.net/"
                stringByAppendingFormat:urlSlug];
            self.title = @"URL Details";
            //Hide the Save bar button item
            [[self navigationItem] setRightBarButtonItem:nil];
            self.txtUrlSlug.text = urlSlug;
            self.txtFullUrl.text = fullUrl;
        } else {
            self.title= @"Add URL";
            self.btnGoToUrl.hidden = YES;
            self.lblGoToUrl.hidden = YES;
            self.lblShortyUrl.hidden = YES;
            self.txtShortyUrl.hidden = YES;
        }
    }
Note that we’re setting the enabled flag on the text fields to match if editability is turned on. Also, if this isn’t editable, then we are hiding the necessary fields at the bottom. Now let’s go back to ViewController.m’s prepareForSegue method. Here we need to handle telling the UrlDetailsViewController that it is editable if the user taps Add:
    -(void)prepareForSegue:(UIStoryboardSegue *)segue sender:(id)sender {
        if ([segue.identifier isEqualToString:@"ViewUrlDetails"])
        {
            UrlDetailsViewController *urlDetailsViewController = segue.destinationViewController;
            UITableViewCell *cell = (UITableViewCell *)sender;
            urlDetailsViewController.urlSlug = cell.textLabel.text;
            urlDetailsViewController.isEditable = NO;
            AppDelegate *appDelegate = (AppDelegate *)[[UIApplication sharedApplication] delegate];
            urlDetailsViewController.fullUrl = [appDelegate.urls objectForKey:cell.textLabel.text];
        } else if ([segue.identifier isEqualToString:@"AddUrl"])
        {
            UrlDetailsViewController *urlDetailsViewController = segue.destinationViewController;
            urlDetailsViewController.delegate = self;
            urlDetailsViewController.isEditable = YES;
        }
    }
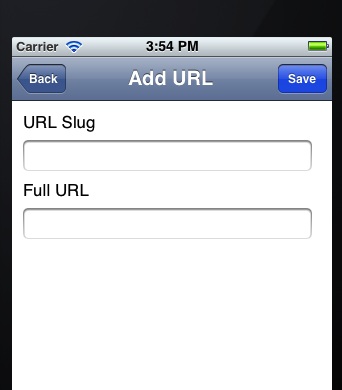
Now you should be able to run your app and click on the Add button and, when you do, you should be taken to the UrlDetailsViewController and it will be set up for editing:

Now, we need to wire up the UITextFieldDelegate methods and then handle the Save tap. In our database that we set up earlier in the series, we put specific length limits on the URL slug and the full URL. We need to have someway of restricting this in iOS to prevent a user from sending too much data. That’s why we are using the UITextFieldDelegate to check for text length whenever the user enters text into our text fields. Just add this to your UrlDetailsViewController and you will be good to go:
    -(BOOL)textField:(UITextField *)textField shouldChangeCharactersInRange:(NSRange)range
            replacementString:(NSString *)string {
        if (textField == self.txtUrlSlug) {
            NSInteger newTextLength = [textField.text length] - range.length + [string length];
            //if this is the URL Slug, limit it to 45 characters
            if (newTextLength > 45) {
                return NO;
            }
            return YES;
        }
        else if (textField == self.txtFullUrl) {
            NSInteger newTextLength = [textField.text length] - range.length + [string length];
            //if this is the full url, limit it to 500 charactes
            if (newTextLength > 500) {
                return NO;
            }
            return YES;
        }
        return YES;
    }
This is fairly straight forward and just checks to see if the text field sent in is either the txtUrlSlug field or the txtFullUrl field. Then it does the size check based off which field it is. Now, to implement the save method:
    - (IBAction)tapSaveUrl:(id)sender {
        NSString *newUrlSlug = self.txtUrlSlug.text;
        NSString *newFullUrl = self.txtFullUrl.text;

        //Check to see if this urlSlug has already been used
        AppDelegate *appDelegate = (AppDelegate *)[[UIApplication sharedApplication] delegate];
        id valueForSlug = [appDelegate.urls objectForKey:newUrlSlug];
        if (valueForSlug != nil) {
            UIAlertView *alert = [[UIAlertView alloc] initWithTitle:@"Failed to Create Shortened URL"
                                                            message:@"This URL Slug has already been
                                                            used.  Please use a different slug."
                                                           delegate:self
                                                  cancelButtonTitle:@"OK"
                                                  otherButtonTitles:nil];
            [alert show];
            return;
        }
        //Pass the details of this URL back to the ViewController
        [self.delegate urlDetailsViewController:self didAddUrlWithSlug:newUrlSlug andFullUrl:newFullUrl];
    }
Here, we check to see that the URL doesn’t already exist locally (note that if some other client inserted it on the server side after we had pulled down our data, we wouldn’t know). If it does exist, we show a UIAlertView. If it doesn’t, we pass the data back to the delegate for our UrlDetailsViewController. As you’ll recall (or if you look above) we set the delegate on our UrlDetailsViewController in the prepareForSegue method. First, go back to your ViewController.h and make the class implement UrlDetailsViewControllerDelegate as well as NSUrlConnectionDelegate.
    @interface ViewController : UIViewController <UITableViewDelegate, UITableViewDataSource,
        UrlDetailsViewControllerDelegate, NSURLConnectionDelegate> {
    @private
        BOOL _success;
        NSMutableData* receivedData;
    }
Note that we’ve also added a private NSMutableData object to our class. That will be used by the NSUrlConnection object later on. Open up your ViewController.m file and add the following method in:
    - (void)urlDetailsViewController:(UrlDetailsViewController *)controller didAddUrlWithSlug:
                                    (NSString *)urlSlug andFullUrl:(NSString *)fullUrl {

        // Create the request.
        NSMutableURLRequest *theRequest=[NSMutableURLRequest
                                         requestWithURL:
                                         [NSURL URLWithString:
                                         @"http://urlshortener.azurewebsites.net/api-add"]
                                         cachePolicy:NSURLRequestUseProtocolCachePolicy
                                         timeoutInterval:60.0];
        [theRequest setHTTPMethod:@"POST"];
        [theRequest addValue:@"application/json" forHTTPHeaderField:@"Content-Type"];
        //build an info object and convert to json
        NSDictionary* jsonDictionary = [NSDictionary dictionaryWithObjectsAndKeys:
                                        @"my_key", @"key",
                                        fullUrl, @"url",
                                        urlSlug, @"url_slug",
                                        nil];
        //convert JSON object to data
        NSError *error;
        NSData* jsonData = [NSJSONSerialization dataWithJSONObject:jsonDictionary
                                                options:NSJSONWritingPrettyPrinted error:&error];
        [theRequest setHTTPBody:jsonData];
        //prints out JSON
        NSString *jsonText =  [[NSString alloc] initWithData:jsonData
                                                    encoding:NSUTF8StringEncoding];
        NSLog(@"JSON: %@", jsonText);

        // create the connection with the request and start loading the data
        NSURLConnection *theConnection=[[NSURLConnection alloc] initWithRequest:theRequest delegate:self];
        if (theConnection) {
            // Create the NSMutableData to hold the received data.
            // receivedData is an instance variable declared elsewhere.
            receivedData = [NSMutableData data];
        } else {
            // We should inform the user that the connection failed.
        }

        AppDelegate *appDelegate = (AppDelegate *)[[UIApplication sharedApplication] delegate];

        //Add shortened URL locally
        [appDelegate.urls setObject:fullUrl forKey:urlSlug];
        NSIndexPath *indexPath = [NSIndexPath indexPathForRow:appDelegate.urls.count -1 inSection:0];
        [self.tableView insertRowsAtIndexPaths:
                        [NSArray arrayWithObject:indexPath]
                        withRowAnimation:UITableViewRowAnimationAutomatic];
        [self.navigationController popViewControllerAnimated:YES];
        [self.navigationController dismissViewControllerAnimated:YES completion:nil];
        [self.tableView reloadData];
    }
This is somewhat complicated so let’s step through it. First, we create our NSMutableUrlRequest and set the HTTP method and content type on it. Then we put our URL values into a dictionary which we serialize into JSON using NSJSONSerialiazation. That data is set to be the body of the request. Then, we initiate a NSUrlConnection with the request object and set it’s delegate to self. Lastly, we add the URL object to our AppDelegate’s collection, popping the UrlDetailsViewController off the stack, and reloading the data in the table view. We’re kind of assuming things will work here because we’re adding the URL object before we know it was successfully saved to the database. So that is something to consider. All that’s left, is to implement the NSUrlConnectionDelegate methods.
  #pragma NSUrlConnectionDelegate Methods

  -(void)connection:(NSConnection*)conn didReceiveResponse:(NSURLResponse *)response
  {
      if (receivedData == NULL) {
          receivedData = [[NSMutableData alloc] init];
      }
      [receivedData setLength:0];
      NSLog(@"didReceiveResponse: responseData length:(%d)", receivedData.length);
  }

  - (void)connection:(NSURLConnection *)connection didReceiveData:(NSData *)data
  {
      // Append the new data to receivedData.
      // receivedData is an instance variable declared elsewhere.
      [receivedData appendData:data];
  }

  - (void)connection:(NSURLConnection *)connection
    didFailWithError:(NSError *)error
  {
      // inform the user
      NSLog(@"Connection failed! Error - %@ %@",
            [error localizedDescription],
            [[error userInfo] objectForKey:NSURLErrorFailingURLStringErrorKey]);
  }

  - (void)connectionDidFinishLoading:(NSURLConnection *)connection
  {
      NSLog(@"Succeeded! Received %d bytes of data",[receivedData length]);
      NSString *responseText = [[NSString alloc] initWithData:receivedData encoding: NSASCIIStringEncoding];
      NSLog(@"Response: %@", responseText);
      NSError* error;
      NSDictionary* json = [NSJSONSerialization
                            JSONObjectWithData:receivedData
                            options:kNilOptions
                            error:&error];
      NSString *status = (NSString *)[json valueForKey:@"Status"];
      NSLog(@"Status response from creating URL: %@", status);
      if ([status isEqualToString:@"SUCCESS"]) {

      } else if ([status isEqualToString:@"Already Exists"]) {
          UIAlertView *alert = [[UIAlertView alloc] initWithTitle:@"Failed to Create Shortened URL"
                                message:@"This URL Slug has already been used.  Please use a different slug."
                                                         delegate:self
                                                cancelButtonTitle:@"OK"
                                                otherButtonTitles:nil];
          [alert show];
      } else if ([status isEqualToString:@"FAILURE"]) {
          UIAlertView *alert = [[UIAlertView alloc] initWithTitle:@"Failed to Create Shortened URL"
                                message:@"There was an error creating this shortened URL.  Please try again."
                                                         delegate:self
                                                cancelButtonTitle:@"OK"
                                                otherButtonTitles:nil];
          [alert show];
      } else {
          UIAlertView *alert = [[UIAlertView alloc] initWithTitle:@"Failed to Create Shortened URL"
                                message:@"There was an error creating this shortened URL.  Please try again."
                                                         delegate:self
                                                cancelButtonTitle:@"OK"
                                                otherButtonTitles:nil];
          [alert show];
      }
  }
If you’ve used NSUrlConnection before, these methods should all look fairly familiar. The only thing worth stepping through a little bit is the connectionDidFinishLoading method. In that method, we’re deserializing the JSON that comes from the server and then checking the status. If it was a success, we don’t do anything. If there was a failure, the URL already existed, or we get back any other response, we show an UIAlertView with a warning message. That’s all there is to it and now our client is able to add new shortened URLs. There’s ample room for improvement on some of the features here. For example, we’re not checking the validity of a full URL on the client side, but we are on the server side. It wouldn’t take much to implement the same check and present feedback to the user in a friendly way.
If you’ve stuck through it this far, we’ve completed a simple iOS client connecting to a Windows Azure Website written in PHP. Outside of a little PHP understanding, none of this required ever moving away from OSX, XCode, or a simple text editor. You can download the full source to this demo here.
For a free trial for Windows Azure Websites, sign up here.