
 In the previous article in this series, we walked through creating an Android app, adding a MapView to it, and displaying points of interest on it. When the user’s location changes and when the app first loads, we communicate with the PHP service, which we set up in the first article, to get all of the points of interest within a number of meters from a certain latitude and longitude. Today we’re going to look at adding new points of interest. This actually involves an interesting dance between the client application and the cloud. We’ll discuss that first.
If you haven’t already done so, you’ll need to go through part 1 in this series to set up a Windows Azure Website running the PHP service. To do this you will need to have a Windows Azure account. If you don’t already have a Windows Azure account, you can sign up for a free trial here. Once you’ve deployed that site, you can come back and proceed with this walkthrough.
If you would like to jump ahead and just pull down the source code, you can access it in this GitHub repository. Note that you’ll still need to follow the instructions in the readme and configure your app.
How do we add a point of interest
In order to upload an image or video and tie it to a point of interest in our backend, we have to communicate with two different server components: our Windows Azure Websites PHP service and Windows Azure Blob Storage. Let’s look at a diagram of the steps to do this and then discuss them:

The first thing we need to do is have our client app communicate with our service running in Windows Azure Website and request a Shared Access Signature (SAS).
A SAS is a way around needing to have the account name and key of our storage account on the local device. If you were to put the account name and key in your client app and someone was able to pull those details out, they could then upload and access whatever they wanted in your storage account. The way around this is by using the SAS. A SAS is created to give an application the ability to upload a file to a storage account without having the name or key. Instead, a server side component has the name and key and requests the SAS from the storage account. This SAS is a URL which expires after a certain period of time (chosen by the server side component) and gives a client application the ability to upload a single file.
So, our client app requests the SAS from our website. The website talks to our storage account and gets the SAS. The SAS is then returned to the client application. The client app can then use the SAS URL to upload a file. After that is done, we save the point of interest (with a reference to the URL of the item uploaded to storage) inside that point of interest. Let’s get to our code and see how we can accomplish this.
Let’s code
Let’s start by adding some new variables to Constants.java. Specifically, we need URLs for getting a SAS and uploading a point of interest. We also need to keep track of a container name for blob storage.
Remember you need to change “yoursubdomain” to whatever URL you set up in the first article in the series. Next we need to do is start storing the current location whenever it changes in the activity. Open up MainActivity.java and add a private variable that is a Location object:
private Location mCurrentLocation;
Then in the onLocationChanged method in the LocationListener, start storing the location into that variable:
Next, let’s add a new Android Activity to your project named AddPointOfInterestActivity. You can lead all of the defaults for this activity. When your’e done you should have a new activity and a layout file tied to it (I’m using the latest version of ADT which gives you a new activity wizard, as opposed to older versions which required you to manually create the class and layout file as well as modify the manifest). We’re not going to do any work in this activity yet, but we’ll come back to it. Instead, open up the res/menu/activity_main.xml. This class contains the menu options that appear when you tap the menu button inside our app. We’re going to add a new item here:
Now if you run the app and tap the menu button, you should see a new option appear:

Now let’s return to MainActivity and override the onOptionsItemSelected:
Here, you’re checking to see if the menu item tapped was the “Add Point” one, and if so, starting the AddPointOfInterestActivity. Notice that we’re passing the current location in as an extra. We’re also starting that activity with the startActivityForResult method. We’re doing that so that when we finish the AddPointsOfInterestActivity it will do a callback into MainActivity so that we can refresh the map. Before we move on to creating a new point of interest, let’s handle the callback that is fired when the new point of interest activity finishes by adding the onActivityResult method:
We first check the requestCode to see if it matches the value sent into startActivityForResult. We then check to see if the resultCode matches another value. This value will be returned from our new point of interest activity if we successfully added a new point. Normally we would have used a constant for these values but for ease of explanation, I’m just using numbers right in the code. Finally, if we did create a new point, we reload the points from the server.
The UI for Adding a new Point of Interest
Let’s open up the layout file that was generated for our activity. It should be something like res/layout/activity_add_point_of_interest.xml. This layout just has the default “hello world” message in it right now. Let’s change this UI to allow a user to add a new point of interest. We’ll need to give the user the ability to do three things: select an image, get a SAS, and save a point of interest. To do this, we will want a button for the user to select the image, an image view to show that image in, a button to trigger getting the SAS, a text view to show the SAS, and a button to trigger the save. We’re going to wrap this all in a ScrollView since we’re not sure how much room the user will have on their screen. When you’re done, the xml will look like this:
If you run your app now and tap the menu button and go to “Add Point” your new screen should look like this:

Now that the UI is done, we’ll do the code behind.
Coding adding the point of interest
Open back up AddPointOfInterestActivity.java. Let’s first add some private variables we’ll need:
You’ll see where these come in as we proceed. Next, we have the onCreate method:
The first thing we do is get references to all of our UI controls and keep track of the Activity we’re in. We then disable the “Get SAS” and “Save Point of Interest” buttons so the user can’t tap them until we’re ready. Finally we set some onClickListeners. When the user taps the “Select Image” button we are firing a local method named selectImage. The other two buttons show a progress dialog and then execute new tasks. Let’s look at the image selection first:
In selectImage we are creating a new ACTION_GET_CONTENT intent and telling it to select from images (this will fire the gallery). Again we’re starting the intent with startActivityForResult which let’s us catch it which is what we’re doing in onActivityResult. In the result method, we store the image URI as well as set the URI of the image view. Finally, we switch the buttons so the user can get the SAS. Now let’s look at the GetSASTask we saw above:
This task starts by calling the getSas method which is actually a method in the AddPointOfInterestActivity class. When getSas returns, we pass the blobImagePostString which goes to the postExecute method. postExecute will set the returned SAS URL to be the text of the text view in our UI as well as deactivating the “Get SAS” button (so the user can’t get a second one) and enables the “Save Point of Interest” button. In the getSas method, we create a URL using the kBlobSASUrl constant formatted with the container name (a container stores blobs (or files)), and the current time in milliseconds (which we’re using as the file name). We then use HttpURLConnection to post to the PHP service and get our SAS URL back. This is set to the blobImagePostString variable and the method completes (which goes back to the postExecute method above). The last thing we have to look at is the PostPointOfInterestTask:
Here we’re calling a method (part of the AddPointOfInterestActivity) named postPointOfInterestToServer. We return the result of that method which is sent to postExecute. If the result was “created” we return the result code that is expected back in MainActivity if an point is successfully created. If not, we figure out what the reason was and show a toast to alert the user. Let’s finish things off with the postPointOfInterestToServer method:
We’ve got a lot going on here so we’ll go step by step. We first check to make sure the image and location are valid. We then open up the image file and get the bytes for it. We then create a HttpURLConnection and write the image bytes to the SAS URL. Provided we get back a 201 response code, we then generate a JSONObject with all of our point of interest information in it including the coordinates, ID, type (image or video), URL, and description. We then use another HttpURLConnection to post to our PHP server to let it know we generated a new point of interest. We return the response message from that to the calling method (which passes it to the postExecute method seen above).
Running the App
When we run the app, we’ll set our location to be in downtown Seattle, near where we were yesterday. Currently there are three points of interest. We’re going to add a fourth. Let’s follow the flow of adding a new point of interest.
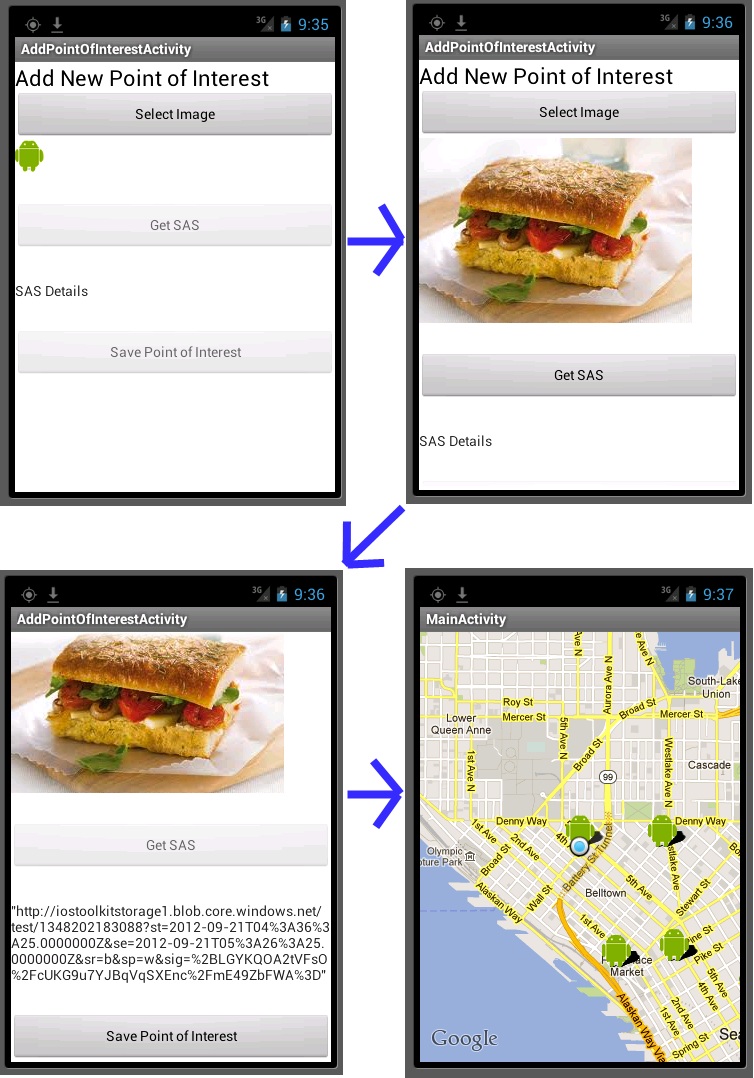
We select an image first. Then we get the SAS URL. Finally we post it (which handles both uploading the image to blob storage and the point of interest data to our service). With that done we return the user to the map and refresh the points of interest near our current location. Now we see that the original point from yesterday and our new point are showing up.
Conclusion
Today we finished our Android Geolocation app. In doing so, we made more connections to our PHP service running in Windows Azure Websites in addition to using Windows Azure Blob Storage for storing images. I hope this has proved informative and has given you some solid understanding of how to create Android applications with geolocation components powered by Windows Azure. As mentioned at the top, you can access the source code for the full version of this app on GitHub. Remember to configure the subdomains in the Constants.java file before trying to run it.
