
 In the first article in this series, we walked through creating a site in Windows Azure Websites and deploying a PHP web service to it. This PHP service exposed three important endpoints: getting a collection of points of interest, getting a shared access signature (for uploading files), and adding new points of interest. Today we’re going to build an Android client that is capable of displaying a map with these points of interest on it. We’ll also poll the user’s current location in the application so they will see all the points of interest around their current position. in the next few articles, we’ll continue to talk about how to add new points of interest.
If you haven’t already done so, you’ll need to go through part 1 in this series to set up a Windows Azure Website running the PHP service. To do this you will need to have a Windows Azure account. If you don’t already have a Windows Azure account, you can sign up for a free trial here. Once you’ve deployed that site, you can come back and proceed with this walkthrough.
If you would like to jump ahead and just pull down the source code, you can access it in this GitHub repository. Note that you’ll still need to follow the instructions in the readme and configure your app.
We’ll be using Eclipse for this tutorial though if you use a different IDE to work with Android, you should be able to follow along without too much trouble.
Creating the Android App
Let’s start by creating our new application in Eclipse. Go to File -> New -> Android Application Project. We’ll name our new application GeoAndroid:

You can leave the options for the Launcher Icon as the default or customize them if you want. In the Create Activity page, you can leave it as a Blank Activity (the default). Finally, you can use the defaults for the New Blank Activity as well. When you click finish, your app should be generated. If you run your app as is now, you should see something like this:

Now that we have our app, let’s work on the UI.
The User Interface
Open up the res/layout/activity_main.xml file. Currently there is only a TextView in the layout. Let’s get rid of that and replace it with two LinearLayouts each with two TextViews inside of them. The first two TextViews will show a latitude header and will show the actual latitude value. The second two TextViews will show a longitude header and the actual longitude value. You’ll also need to put a MapView beneath those LinearLayouts. When you’re done, the XML for your layout will look like this:
One important thing to point is that in the MapView xml, we see “ENTER YOUR API KEY” for the API key. This won’t work. Before it will, you’ll need to get a Google Maps API key. You can get a Maps API Key by signing up here. Once you have that key, make sure you enter it in your XML. If you run your app now, it will error out with the following:
E/AndroidRuntime(1410): Caused by: java.lang.ClassNotFoundException: com.google.android.maps.MapView
The reason for this is that your application doesn’t know that it needs to use the maps library. To tell the compiler that, you need to open the AndroidManifest.xml file. Add the following XML element INSIDE the application node:
<uses-library android:name="com.google.android.maps" />
Now you can run your app again, but it will fail again, though with a different error:
E/AndroidRuntime(1559): Caused by: java.lang.IllegalArgumentException: MapViews can only be created inside instances of MapActivity.
This is saying that your activity needs to be of type MapActivity to use a MapView. Open the src/com.msdpe.geoandroid/MainActivity.java file and change the class your activity extends from Activity to MapActivity (you’ll also need to add an import statement). Now if you run, your app will work, but the map won’t actually show up, just the map grid. In order for it to show the actual map, you need to add the android.permission.Internet to your manifest file. Go back to your manifest and put this between the uses-sdk node and application:
<uses-permission android:name="android.permission.INTERNET" />
Now when you run your app, you should see the map show up:

Before we continue on to the code, you should also add the android.permission.ACCESS_FINE_INTERNET.
<uses-permission android:name="android.permission.ACCESS_FINE_LOCATION" />
Plumbing Code
Before we work on the code to show our location and points of interest, we need to add some plumbing code. First, add a new class named Constants and leave the default subclass of java.lang.object. In this class we’re going to put a few constants we’ll use for URLs:
Make sure you replace the “yoursubdomain” with the URL of the site you created in the first article in the series. We’re going to add one more class named GeoItemizedOverlay and leave it with the same subclass. After it’s created, we’re going to change it to extend ItemizedOverlay<OverlayItem>. This class will be used to handle the items we display on the map:
Here we’re handling creating the overlay, adding items, and tapping those items. The only really interesting thing to point out is the onTap(int index) method. When the user taps an item on the overlay, we create a dialog with a title and description and two buttons. The first button when tapped, will launch the web browser with whatever URL has been set into the description. Later when we display our points of interest, we’ll use the URL tied to each one for that description. This gives us the ability to show whatever image is tied to a point of interest. The second button just closes the dialog.
Pulling points of interest and showing them
Now that we’re showing the map and have done our plumbing, let’s show the users current location and pull the near by points of interest. Open up MainActivity.java. The first thing we’re going to do is add some private variables:
Here we have an object for referencing the MapView and TextViews, an object to track our itemized overlay, a list of overlay objects (used to display each point), and a drawable we’ll use to store the image we want to draw at each point. Now let’s look at the onCreate method:
First we are getting references to our UI objects. We turn on the zoom controls on the map using setBuiltInZoomControls so the user can manually zoom in and out. We initialize the drawable to an image in our resources folder (I’m just using a little Android guy which you can download here). We fetch the collection of the MapView’s overlays and then add a new GeoItemizedOverlay. That overlay is used to display the points of interest. We’re also adding a MyLocationOverlay which we use to display only the user’s current location. For that overlay, we also call enableMyLocation so it knows that it should draw the user’s location on it. Lastly, we get a reference to the LocationManager which we’ll use a bit later.
Continuing in the onCreate method, we create a LocationListener which just calls the onLocationChanged method whenever it receives an updated location. That listener then calls the makeUseOfNewLocation method in our activity.
Finally, we ask the LocationManager to send updates from both the NETWORK_PROVIDER and GPS_PROVIDER to our LocationListener. If either of those don’t work, we let the user know via toast. We already added the permission required to get the user’s location to the Manifest file above, but if we hadn’t this code would not work. Next let’s look at the makeUseOfNewLocation method:
This method first sets the two TextView’s to show the latitude and longitude. It then creates a GeoPoint using the coordinates and centers the map on it (using the animateTo method on the map’s controller). We then call loadPointsFromServer to fetch the latest points of interest given our new location and call invalidate on the map which will cause it to redraw. Let’s finish things up and look at loadPointsFromServer:
The first thing I’m going to point out is that the network communication here is done on the MAIN THREAD! This is bad. So bad in fact that in later versions of ADT and Android, it won’t run. They really don’t want you doing network traffic on the main thread. For simplification purposes, I’m doing the code on the main thread but you should look at using either an IntentService or an Async Task to accomplish pulling the points of interest from the server, and then call invalidate on the map in the callback. The first thing we’re doing in the method is building our URL using the constant we added earlier and then tacking on parameters for the latitude, longitude, and the radius in meters that we want points from. We then hit the server using HttpUrlConnection and read the results back into a StringBuilder. This is turned into a JSONArray which we then loop through to grab the latitude, longitude, description, and url for each point of interest. We generate a GeoPoint from the position and create a new OverlayItem which is then added to the itemized overlay. That’s all there is to adding these points to our map.
Running the Application
Now if you run your application (on the emulator), you will just see the normal map initially. The reason for this is that the Android emulator can’t grab our position like the way a device can. Luckily, there are a couple ways to send the GPS coordinates to the emulator. The first way is to return to Eclipse and go to the Window menu and choose Open Perspective and DDMS (you may have to go to Other and find DDMS if it isn’t listed). With that don you’ll be taken to the DDMS tool. There is a lot that you can do with DDMS but we’re going to focus on setting the GPS coordinates of our device.
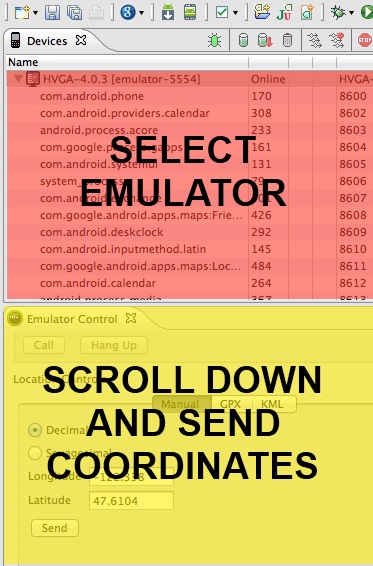
In the top left of the DDMS tool, you’ll be able to select the emulator (or device) image that you want to interact with. You don’t need to choose the specific process of your running application though, you can just select the emulator name. After that, scroll down in the Emulator Control panel until you get to Location Controls. Here you can set a latitude and longitude and then send it to your emulator. After doing so, the map will animate over to the spot we’ve entered and will attempt to refresh the points of interest:
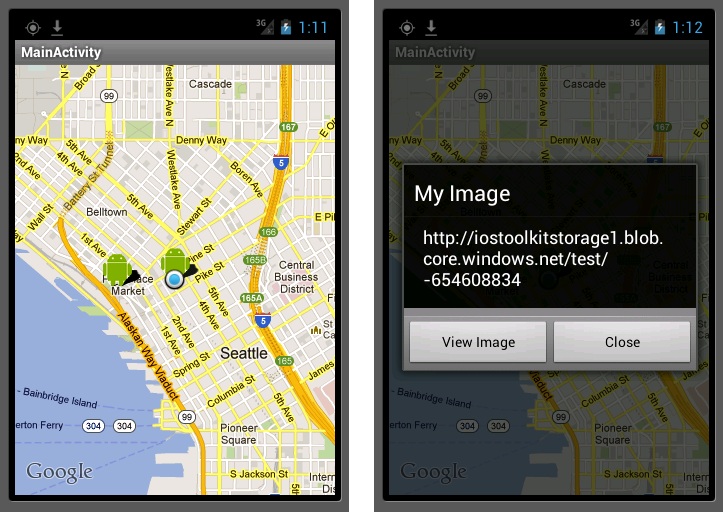
Now when I run and set my location to Seattle, the emulator shows the blue dot where I’m at and then pulls the near by points, which are shown with the little Android figure. If I tap on one of those points, an AlertDialog pops up giving us the ability to view the file attached to the point (the code for this was in the GeoItemizedOverlay class). In the next article we’ll discuss how to add these points of interest.
Conclusion
Today we walked through creating a simple Android application that will connect to a PHP service running in Windows Azure Websites and poll for geographical points of interest. We then display those points of interest as points on a map with more information provided when tapped. As I mentioned at the top, you can access the full version of this app on GitHub. Remember that you’ll need to configure the subdomains in the Constants class before trying to run it.
