
 The first article in this mini-series on creating geolocation apps with the backend hosted in Windows Azure Websites is going to be a walkthrough of the PHP code that we’ll host in Windows Azure. The PHP site will be simple and expose just a few methods. Prior to getting into the code for the service, we need to setup a new website in Windows Azure and set up our database. If you don’t already have a Windows Azure account, you can sign up for a free trial here. After that, you'll need to request access to the Websites preview feature here. If you want to bypass the whole below tutorial, you can access the code for the PHP site in GitHub. Let’s get started.
Creating our PHP Site

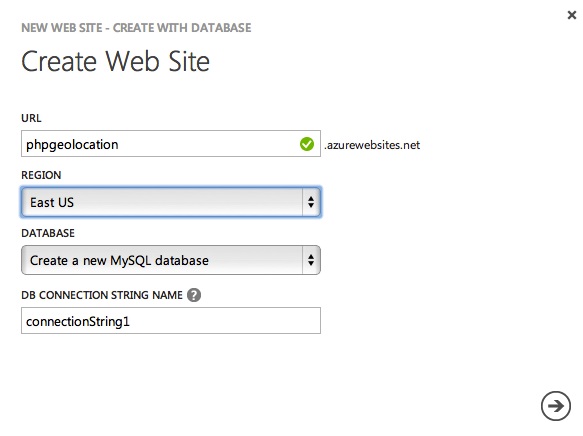
You’ll want to choose “Create with Database”. In the URL, you can enter anything you’d like. For the database, select “Create a new MySQL database” and then pick whichever region is closer to where you think your user base will be. When you’re done, the form should look like this:
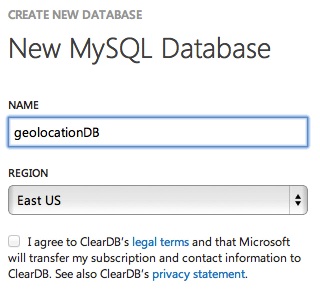
After hitting next, you’re given the option to name your database and choose a region for that. Make sure the region of your database is the same as your website. Since they’ll be talking to each other, you don’t want them to have to leave the DC.
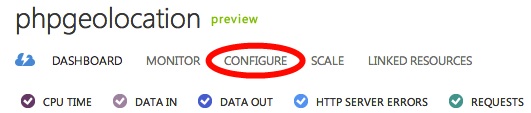
Once you’re done, click the checkmark and your site will be created. Within a few seconds, you should see your site go from starting to running in the site list. Click on your site and you’ll be taken to the dashboard. Here you’ll find a wealth of information. The first thing you’ll want to do is get the connection string information for your database, so click on the Configure link near the top:
Scroll down the page until you get to the “connection strings” section (you’ll have to click the “Show Connection Strings” link):

Either remember where to get that or copy it down for later. Now it’s time to set up Git publishing for your site. At the top, go back to Dashboard. On the mid-right, under “Quick Glance” you should see “Set up Git publishing”, click that. 
The page will say “Creating Git repository” for a few moments and then, it will finish and show you some important info. The first thing there will be your Git URL, followed by instructions on installing Git. Lastly, you’ll see how to create a local git repo wherever your files are and then how to add your new Windows Azure Website as a remote endpoint. Note that if the directory you have your files in is already a Git repo, you can (AND SHOULD) skip the “git init” step and proceed directly to adding the remote Windows Azure Git Repo to your existing repo. Once that is done, you can pull down this PHP code from GitHub. You can either download the zip or clone the Git repository locally. You’ll need to copy the contents of the source directory to a new directory so you can set up a proper git repo locally later on (since Git will treat the code you pull from github as it’s own repository, we want a new one with just the contents of source). You can host this website locally if you choose to, but it isn’t necessary to proceed. Before we configure the site, we need to download one third party library.
Downloading Silex
This web site uses the Silex framework which is a PHP micro-framework based off of Symfony2. All you really need to know if you’re not a PHP guru (like I am not) is that the site uses Silex to simplify some of the service related code. If you go to the Silex site and proceed to the download page, you can download the code in several ways. As this site was made a little while ago, it relies on the PHAR deployment method which as since been depreciated. For now, you can still download the PHAR here. After downloading that, place the PHAR in the following folder structure from your root: /vendor/Silex. So when you’re done, you should see this file in your source directory: /vendor/Silex/silex.phar. Now we can proceed with configuring the site:
Configuring the site
Before setting up Git on your side, you will need to make changes to one file. Open up the src/Geo/GeoCode.php file. In this file, you’ll see these lines:
   //Local
   private $db_server = 'localhost';
   private $db_user   = 'phptestuser';
   private $db_password = 'phptestuser';
   private $db_name     = 'shorty';
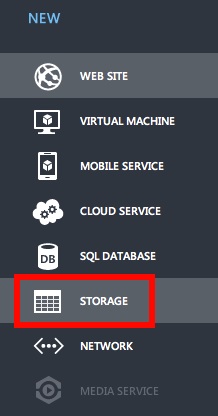
This might work if you set up MySQL locally, but not for the one hosted by Windows Azure. Go ahead and replace those values with the connection string information you got above and then save the file. For this demo, we’re also going to be using Blob Storage to store image and video files. In order to take advantage of that, let’s go back to the portal. Click on the new button at the bottom left and choose Storage:
Give your storage account a URL and pick the same datacenter that you set your site and MySQL database in above:
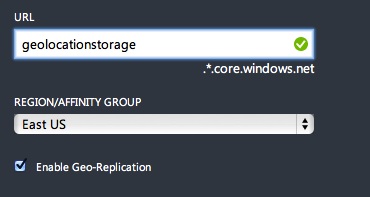
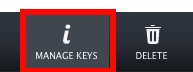
Again, remember to choose the same location for your storage account as you did for your website and database. If you don’t then every communication between your site and storage account will have to leave the datacenter which will rack up your bandwidth. After it’s been created, select your new storage account in the portal and go to Manage Keys at the bottom:
Once there, you’ll see the account name and keys to access your storage account:
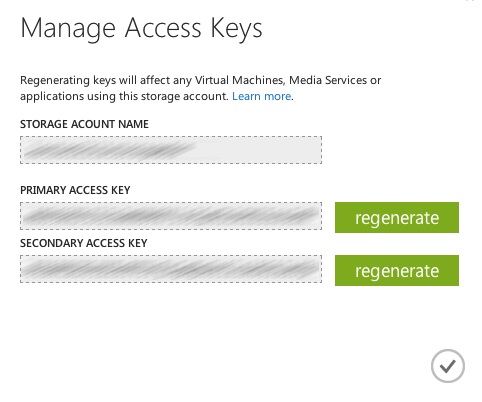
Copy the account name and the primary access key. You’ll need these to access the storage account from your PHP code. Go back to the code you downloaded and open src/app.php. Locate these lines and replace the values with your account name and key:
    //Define our storage account name and keys
    define("STORAGE_ACCOUNT_NAME", "accountname");
    define("STORAGE_ACCOUNT_KEY", "accountkey");
Now follow the instructions for setting up your git repository locally (remember these showed up after you went to “Set up Git publishing” above.

One thing to note is that if you haven’t set up deployment credentials yet, you won’t be able to push. Click the “Reset your deployment credentials” link at the bottom of the Git web page and after that you should be fine. Now when you go to your site (if you didn’t copy down the URL, go back to the dashboard in the Windows Azure portal and it will be on the bottom right) you should see the text “Hello geo home”. This is the only visual display our site really does. Everything else is behind web methods. There is one more step we need to complete before we dive into the code, and that is to set up our MySQL database.
Setting up MySQL
If you’re running OS X, you should find MySQL in /usr/local/mysql. If you don’t, go ahead and install it. Afterwards, open up a terminal window and navigate to /usr/local/mysql. You’ll then need to connect to your database like so:
$cd /usr/local/mysql
$mysql --host=hostname.cloudapp.net --user=userName --password=password databasename
Just replace the hostname, username, password, and databasename with values from your connection string. Once that is done, you can create your database table. Copy and paste this into the terminal and hit enter:
    CREATE TABLE 'geodata' (
      'Id' char(36) NOT NULL,
      'Type' smallint(6) DEFAULT NULL,
      'Description' varchar(200) DEFAULT NULL,
      'Url' varchar(400) DEFAULT NULL,
      'Location' point DEFAULT NULL,
      PRIMARY KEY ('Id')
    )
Your response should be something like “Query OK, 0 rows affected”. Your table is now created. Now we can look through the functionality that will power our mobile applications.
The PHP Code
Let’s first take a look at the index.php file in the root directory:
This file creates a new app using the src/app.php file and runs it. This is basically running a Silex app. Let’s next open the src/Geo/GeoCode.php file. You’ve already seen the variables at the top of this file which contain the connection string details. Let’s look at the getAllPointsOfInterest method next:
This method takes in a latitude, longitude, and radius however it doesn’t actually use them. This method actually returns ALL points of interest instead of ones for a specific location. You can see it’s accessing the database and selecting all points of interest with no conditional (WHERE) clause. The next, and more important method, is getPointsOfInterstInArea:
This method has the same parameters but actually uses them. The idea is that the calling application wants to know about all of the points of interest within Z meters of point X, Y. We’re doing something similar to the first method but our SQL query is much more complex. For unrelated reasons, I couldn’t put a function in my MySQL database so the query had to be done in the PHP code. You can read more about how this query works from where I got it, here. When we’re done, we put all of those points into an array and return it. The last method is addPOI:
This method takes in a description, type (whether it’s a video or image), URL (to the file in blob storage), latitude, longitude, and id (which is a GUID we create). It then saves that point into the database so the next time we query for points of interest, it can be returned. Let’s take a look at src/Geo/GeoCodeExtension.php next:
This file creates an easy way for us to access our geo code from our Silex application. In it, we’re creating an extension so whenever we reference $app[‘geo’] we get back an instance of the GeoCode class. Let’s take a look at the last important file, src/app.php. As you’ll recall from looking at index.php, this file is our actual application and is also the entry point for any calls into our web site. The first part of the file is the “bootstrapping” portion that actually sets up our app:
First we require a few files including the silex PHAR you downloaded earlier and a file from the old PHP SDK (see below) for accessing blob storage. We then create our Silex application and set up a reference to the GeoCodeExtension. Then, we set up a handler to decode any JSON based requests before they get into our app methods. Lastly, we have a couple variables for our storage account settings. The first method in our app definition is the method that displays our home page (the thing that says “hello geo home” when you go to the site in the browser):
Nothing very complex here but it does show you to set up a route using Silex. This says that any request to “oursite.com/” should go to this method. The next method handles retreiving a shared access signature (SAS):
A SAS is used when a client needs to upload something to our storage account but we don’t want the client to have access to the storage account name and key. This is important because if the name and key were in our mobile app code and someone decompiled our app (very easy in Android) they could then have free run of our storage account. This uses the old PHP SDK to request a SAS from our storage account and then returns that URL to the calling application. The next method handles finding points of interest:
This method gets the latitude, longitude, and radius from the query string parameters and then passes them through to the GeoCode class to find the POIs. After it fetches the POIs, it returns them to the calling application in JSON format. The next method is our pass through for adding new POIs:
This is similar to the previous method in that we’re pulling out the parameters and then calling GeoCode to do the work. We return a 201 response code to say that the point was saved or an error. The last bit of code is necessary for setting up our storage account:
This method just calls into the storage account to set up a container for blobs to be uploaded to. You MUST call this method (via the browser is fine) before you’ll be able to upload any blobs from the mobile clients. The way that uploading blobs work is that a blob goes inside a container. A container can have many different blobs. The mobile app code we’ll go over in future articles relies on a storage container named “test” so going to this URL will create that container so when we get to the mobile apps, it will be ready to go. Just remember, prior to working on the mobile apps, change this URL to match your site’s subdomain and view it in the browser: http://yoursubdomain.azurewebsites.net/api/Location/AddTextContainer. If it is a success, you should see a “Container created” message. You’ll only need to go to this once.
The “Old” SDK
If you look at the root folder of the source code, you’ll see a folder there named OldSDK. The reason for this is that, at the time of writing, the new PHP SDK for Windows Azure did not have hooks for connecting to Windows Azure Storage. The previous SDK did, however, have access to storage. At some point I’ll update the code base and this tutorial to use only the new PHP SDK.
Conclusion
Today we walked through creating a new Windows Azure Website, configuring a PHP website, and uploaded it to Windows Azure. We also looked at the code for this site which we’ll rely as a backend for the next few articles which will focus on creating mobile apps that connect to the service running in Windows Azure Websites. As a reminder, you can get a free trial for Windows Azure here.

6 Comments
HumaNature
do i have to use git for this to work?
I have tons of problems using git. I dont know how to get the proxyusername or the pwd nor the server and i cant do "$mysql --host=hostname.cloudapp.net --user=userName --password=password databasename" i type " --myDBname.cloudapp.net" and it tells me command does not exist.
When i try git push azure master i get an error with the proxy.
HumaNature
can you explain this pls
"If you’re running OS X, you should find MySQL in /usr/local/mysql. If you don’t, go ahead and install it. Afterwards, open up a terminal window and navigate to /usr/local/mysql. You’ll then need to connect to your database like so:
$cd /usr/local/mysql
$mysql --host=hostname.cloudapp.net --user=userName --password=password databasename"
i downloaded an sql server but i can use "--host=hostname.cloudapp.net --user=userName --password=password databasename" it would save me tons of time on the internet searching, thanks.
HumaNature
after pasting the mysql table, i get "Id' char(36) NOT NULL
and 'Type' smallint(6) DEFAULT NULL,' at line 1 . ERROR 1064
HumaNature
found the answer. The ' at the back of a variable should be `.
HumaNature
Something is wrong with your php code it does not show what you said...
it just gives me a blank white page, i tried with a php i created it seems to work fine with that one.
Chris
It's been quite a while since I first posted this so I can't guarantee everything is still accurate but I'm not sure why it wouldn't be working. I would look at the log files to see what might be happening.