
 Time for more of the 31 Days of Android! Today we’re going to pick up where we left off with Day 5 and our multiple activity application. Today we’re going to cover a couple things including one of the features that differentiates Android from it’s biggest competitor, iOS. This feature is the Menu button. The Menu button enables you to load an Options Menu which allows users to access basic activity actions and navigation options. Let’s take a look at how you accomplish this functionality. Just like last time we’re going to be working off of the code from yesterday’s example. Everything that was DayFive will now be DaySix and that should be the only change.
The first thing you have to do to add your Options Menu is create a new XML resource. This resource will contain the content of our actual menu. To do this, expand the res folder of your project in Eclipse. Then, right click the res folder and go to New -> Folder. Name the folder menu and click Finish. Once that is done, right click on the new menu folder and go to New -> Other. Choose Android XML File and click Next. Menu should be preselected as the Resource Type which means you just need to put in a File name. For today name the file "options_menu”. You’ll be taken to the graphic menu editor. Click Add and pick Item. This will create a new menu item. We’re fine with the default id but we need to set the Title. To do so, click the Browse button to the right of the Title textbox. We’re going to need new String resources so click New String. In the String textbox, enter “Activity One” and in the New R.string textbox enter “menu_one”. When that is done, click Ok and then Ok again. You need to add one more item so repeat that procedure and name the second item “Activity Two” and “menu_two”. Now we’re ready to put that menu into an Activity. Open up your DaySixActivity (or DayFiveActivity if you’re working off yesterday’s code) from the src/com.DaySix folder.
Here, you need to override the onCreateOptoinsMenu method from the Activity class. To do this easily, place your cursor at the closing curly brace at the end of the onCreate method. Hit Enter to get to a new line and hit Ctrl+Space. This should bring up intellisense and enable us to pick a method to override. Choose onCreateOptionsMenu and tap enter. You should now have the following code in our class:
1: @Override
2: public boolean onCreateOptionsMenu(Menu menu) {
3: // TODO Auto-generated method stub
4: return super.onCreateOptionsMenu(menu);
5: }
Here you’re going to get rid of the call to super.onCreateOptionsMenu and inflate the options_menu we just created. This is done by getting an instance of MenuInflacter from our Activity and passing in the id of the menu like so:
1: @Override
2: public boolean onCreateOptionsMenu(Menu menu) {
3: MenuInflater inflater = getMenuInflater();
4: inflater.inflate(R.menu.options_menu, menu);
5: return true;
6: }
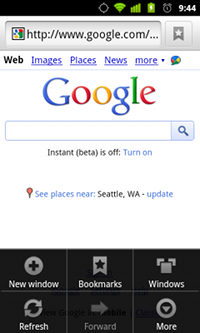
Now if you load your application (hit Ctrl+F11) and click the Menu button on the emulator (or a device) you should see your options menu appear:

This is great but now you need to actually handle clicking these menu buttons. To do so, you need to override another method in our DaySixActivity. This time you’ll add onOptionsItemSelected:
1: @Override
2: public boolean onOptionsItemSelected(MenuItem item) {
3: // TODO Auto-generated method stub
4: return super.onOptionsItemSelected(item);
5: }
The MenuItem that is sent into this method has an ItemId that will match one of your two menu options so we’ll check to see if they are equal and do something different depending on which one it is. In the example below, you’ll send an Intent if the user clicks "Activity Two” and do nothing if they click “Activity One”:
1: @Override
2: public boolean onOptionsItemSelected(MenuItem item) {
3: switch (item.getItemId()) {
4: case R.id.item1:
5: return true;
6: case R.id.item2:
7: startActivity(new Intent(getApplicationContext(),
8: ActivityTwo.class));
9: return true;
10: default:
11: return super.onContextItemSelected(item);
12: }
13: }
This is a very simple options menu but should give you an example of the sort of things you can do. Before I move on, I’d like to point out how to add icon’s to your options menu items. If you go back to the options_menu file and select either item1 or item2, you should see a textbox for Icon 2 rows beneath the title. Oddly, there is no Browse lookup for icons though it isn’t hard for you to specify the icon. To do so, you need to know the name of an image file you have in one of our drawable folders. You know that by default there is an image named ic_launcher.png in your drawable folders so you’ll use that. In the Icon textbox enter “@drawable/ic_launcher” then save your changes and rerun the application. Now when you tap Menu you should see (depending on where you put the icon):

The problem you have here is that when we go from the first activity to Activity_Two and click the Menu button, nothing appears. The code you added to show the options_menu was only in DaySixActivity and not in ActivityTwo. You could take the same code and put it into ActivityTwo but what happens when you need to make a change or when you want to add a third activity? Putting this code into several places isn’t very maintainable and isn’t a good idea in general. What you can do to solve this is override the android.app.Activity class, put your menu code in that, and then extend your current activities from this base class. We’ll do that now. In Eclipse right click on the com.DaySix package under the src folder and choose class. Just like when you created ActivityTwo, you’ll enter android.app.Activity as our Superclass and you’ll Name our new activity “BaseActivity”. Lastly, check the box for abstract and click Finish:

We’re making this class abstract because we’re not going to allow anyone to instantiate it, but will use it as a base class. Now, you can go back to DaySixActivity and ActivityTwo and change the type they extend from Activity to BaseActivity:
1: public class DaySixActivity extends BaseActivity {
2: ...
3: public class ActivityTwo extends BaseActivity {
4: ...
Now you can move all of your menu code out of DaySixActivity and into BaseActivity. I’ve added code to the onClick for men item1 so that it will load DaySixActivity. I’ve also made the current activity finish after triggering the load of a new activity:
1: public abstract class BaseActivity extends Activity {
2: @Override
3: public boolean onCreateOptionsMenu(Menu menu) {
4: MenuInflater inflater = getMenuInflater();
5: inflater.inflate(R.menu.options_menu, menu);
6: return true;
7: }
8: @Override
9: public boolean onOptionsItemSelected(MenuItem item) {
10: switch (item.getItemId()) {
11: case R.id.item1:
12: startActivity(new Intent(getApplicationContext(),
13: DaySixActivity.class));
14: //End the current activity
15: finish();
16: return true;
17: case R.id.item2:
18: startActivity(new Intent(getApplicationContext(),
19: ActivityTwo.class));
20: //End the current activity
21: finish();
22: return true;
23: default:
24: return super.onContextItemSelected(item);
25: }
26: }
27: }
Now when you run your application (Ctrl + F11) you can see the menu on both of your activities and you can go back and forth between them. Note though that the back button will not take you between the activities because you’re calling finish whenever you start a new activity. If you remove the calls to finish then you could back your way between the activities. Implementing a base activity of your own can help when you want to set a custom title, implement a shared menu, and many more things. You can download the sample code from today’s application here.
