 Now that you’ve installed our IDE and the Android SDK as well as created an AVD, you’re ready to continue our 31 Days of Android by creating our first Android application! In this application we’ll go through the boiler plate project template in Eclipse and enhance
 it’s its functionality a little bit.
If you haven’t done so already, start Eclipse. Once it has started, go to File -> New -> Other (or type Ctrl + N / Command + N). From there you can either find Android or type it in the filter text box at the top. You should see a slew of different Android options. Choose Android Project and click Next. Next, you’ll come to a Create Android Project window. The only thing you need to specify here is the Project Name. For this, name it DayFour.
You will then be asked to select a Build Target. If you installed all of the Android SDK versions as detailed in our first post, you should see quite a few. If not, you should at least see the most recent, 4.0. Go ahead and choose API Level 14 for Platform 4.0 with target name Google APIs. We’re not going to do anything 4.0 specific; however, it’s a good idea to make your applications able to run on the latest version of Android (we’ll get into this a bit more in a moment). Once selected, click Next.
Our last window for now is the Application Info wizard.Here you specify the Application Name again, the Package Name, if we want an initial Activity, and a Minimum SDK. Your package name has to be unique from all other applications available on the Android Marketplace as well as unique on the device the app is installed to. For now, name it com.dayfour. The Activity name should already be prefilled with DayFourActivity. Lastly you have the Minimum SDK. This value is going to be different from your Build Target in that it specifies the oldest version of the operating system your app can be installed on. You don’t want to limit yourself to only devices running 4.0 so instead your select the Google APIs version of 2.2 which means your app will be available to the majority of devices. Setting your Minimum SDK low and your Build Target high means that you can make use of features specific to higher versions of the OS but should make your app work with all the versions in between. While we won’t do so now, if you want to make an application that is capable of using advanced features but handling lack of access to those features, I would recommend reading up on it. When all is done your window should look just like this: 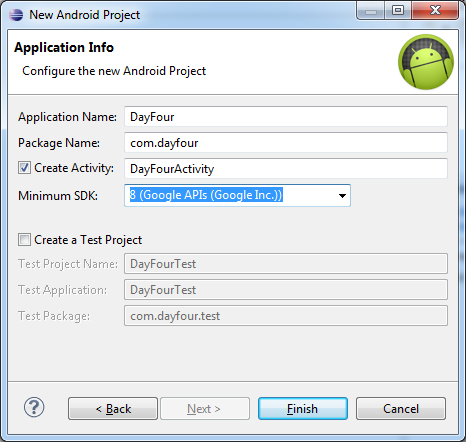
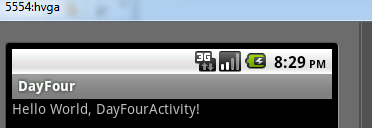
The last part deals with creating a Test Project. Down the road you should (maybe we will) look at adding tests to your Android project with a Test Project. For now we’ll skip it. Go ahead and click Finish. Your application should now be created. Before we run the project, let’s start the emulator. Go to Window -> AVD Manager. Pick the hvga emulator you created earlier and click Start. From there you should just be able to click Launch. If this is the first time you’ve started the emulator, it’s going to take a little while. Once the emulator is running, go back into Eclipse. Right click on your project DayFour in the Package Explorer (it should be on the left side in the default Eclipse orientation) and go to Run As -> Android Application. You should see some messages coming up in the Console about uploading and installing DayFour and then starting an activity. If you go back to your emulator you should now see the boiler plate app in action:
Let’s go back to Eclipse and take a look at some of the files that made this happen. First open up the AndroidManifest.xml file in the root directory. The manifest file contains app specific settings such as app version and minimum SDK version, the different permissions required, activities that can be run, services, broadcast receivers and more. Upon opening you’ll be taken to a graphic editor for the manifest. While it’s possible to do everything in the graphical view, click the AndroidManifest.xml tab on the bottom right of our view of the manifest. This will bring up an XML view of the file:
1: <?xml version="1.0" encoding="utf-8"?>
2: <manifest xmlns:android="http://schemas.android.com/apk/res/android"
3: package="com.dayfour"
4: android:versionCode="1"
5: android:versionName="1.0" >
6: <uses-sdk android:minSdkVersion="8" />
7: <application
8: android:icon="@drawable/ic_launcher"
9: android:label="@string/app_name" >
10: <activity
11: android:label="@string/app_name"
12: android:name=".DayFourActivity" >
13: <intent-filter >
14: <action android:name="android.intent.action.MAIN" />
15: <category android:name="android.intent.category.LAUNCHER" />
16: </intent-filter>
17: </activity>
18: </application>
19: </manifest>
At the top of our manifest you’re specifying your unique package name (com.dayfour), your app version code and version name, and the minimum SDK Version. After that, you have your application settings. At the top level you’re specifying our icon and label (don’t worry we’ll look at drawables and strings soon). Then, you have your activity. As you may recall from above, when you created the project, you told it to create an Activity as well and that is our DayFourActivity. The intent-filter stuff essentially specifies that this activity is what should launch when the app runs.
Now let’s look at those @string things. Back in Package Explorer, expand the res folder and then the values folder. You should see a strings.xml file. Go ahead and open that. Again you’ll get a graphical interface for editing the file. Go ahead and click the stings.xml tab in the bottom of the editor.
1: <?xml version="1.0" encoding="utf-8"?>
2: <resources>
3: <string name="hello">Hello World, DayFourActivity!</string>
4: <string name="app_name">DayFour</string>
5: </resources>
You should see two strings that were already created. If you look up above at the manifest where it shows @string/app_name, it’s referring to the app_name string seen here. This strings.xml file is basically a resource file. These are heavily used in Android to make it easier to localize your applications (and for other reasons you’ll see later). As an example, if you wanted to release your app in the US and in France. The default strings.xml file would contain English text. Inside of a res/values-fr/ folder we would have another strings.xml that would contain the French equivalent text. So going forward, if you want to add text to your UI or use it in your code behind, make sure you’re making use of these files.
Next expand the res/layout folder and open main.xml. Once again, you get a graphical view. I usually flip between the graphical interface and the xml one, but for now, click on the main.xml tab in the bottom of the editor.
1: <?xml version="1.0" encoding="utf-8"?>
2: <LinearLayout xmlns:android="http://schemas.android.com/apk/res/android"
3: android:layout_width="fill_parent"
4: android:layout_height="fill_parent"
5: android:orientation="vertical" >
6: <TextView
7: android:layout_width="fill_parent"
8: android:layout_height="wrap_content"
9: android:text="@string/hello" />
10: </LinearLayout>
We won’t really dig into this very much today. Suffice to say, the LinearLayout is a way of containing and organizing elements inside of it. The TextView is used to display a block of text. You’ll see again that we’re using a string resource to set our TextView’s text property.
Return to the package explorer and expand src -> com.dayfour and open the DayFourActivity.java file. Once there you should see this Java code:
1: public class DayFourActivity extends Activity {
2: /** Called when the activity is first created. */
3: @Override
4: public void onCreate(Bundle savedInstanceState) {
5: super.onCreate(savedInstanceState);
6: setContentView(R.layout.main);
7: }
8: }
You can see here that the DayFourActivity class is extending the Activity class (which is part of the Android SDK). We’re only overriding one method from the Activity subclass, the onCreate method. This method is called when the activity is created and also when the screen is rotated. We call the super.onCreate method so the Activity subclass can handle it’s plumbing and then we call setContentView. This method is passed R.layout.main. R is a way to refer to the res folder and is how we programmatically access the items in that folder (and it’s sub folders). Here we’re pulling the id for the main layout we looked at earlier.
The first change you’re going to make is to add a new string to our strings file and then set your TextView to use that string in the onCreate method. Let’s first add a string to strings.xml named test_one:
<string name="test_one">This was our DayFour test.</string>
Now let’s go back to our main.xml layout file. The problem with the layout as it is, is that there are no ids in our views. Add an id to the TextView like so:
android:id="@+id/lblTextViewOne"
Now that your TextView has an id, we can now access it from the back end. Make sure you’ve saved the file (Ctrl + S or Command + S). Go back to the DayFourActivity file. The first thing you need to do is get a reference to the TextView. This is done by calling the base Activity’s findViewById method. This method takes in an int which is the id of your layout element, R.id.lblTextViewOne. This method returns a generic view so you need to cast it to a TextView. When you’re done you should have something like this:
TextView lblTextViewOne = (TextView) findViewById(R.id.lblTextViewOne);
You’ll likely see a red squiggly line under the TextView lines. If you hover over any of them, you’ll see a popup that says “TextView cannot be resolved to a type”. The reason for this is that you need to import the library that contains TextView. While hovering over with the popup, you should see a link that says Import ‘TextView’ (android.widget). You can click that or conversely you can hit Ctrl+Shift+O which will attempt to resolve all missing imports. Next we need to set our TextView’s text property to be your new string.
lblTextViewOne.setText(R.string.test_one);
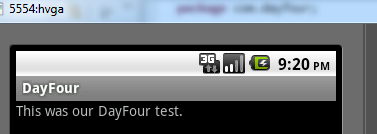
You should be ready to run the app again. Right click on DayFour and choose Run As -> Android Application or click Ctrl + F11. We should now see our updated text:
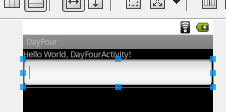
Next you’ll add an EditText control to our view. You might also think of EditText as a textbox. Go back to the main.xml and, if you’re still in XML view, click the Graphical Layout tab. On the left side of the view is a folder structure for all the different View controls. You want to expand the Text Fields folder. This contains an assortment of differently configured EditText controls. You’ll use the top one with “abc” in it. Click on that and drag it over to the view and drop it underneath the text that says “Hello World. DayFourActivity”:

Once you’ve done that, it should look like this:
If you wanted to, you could go in and change properties on the field but we’ll leave the defaults for now. Let’s go back to your DayFourActivity.java. Below where you set the text for lblTextViewOne let’s get the EditText and set it to the same string value:
1: EditText editText1 = (EditText) findViewById(R.id.editText1);
2: editText1.setText(R.string.test_one);
Here you’re getting and casting your view and then setting it’s its text property. Let’s go ahead and run the application again (Ctrl + F11) and see what we get:
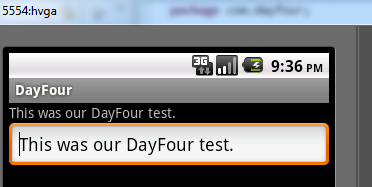
Now, let’s add another string, add a button, and set the text of that button in the layout. Go to the strings.xml and add a new string named “click_me”:
<string name="click_me">Click Me</string>
Go back to our main.xml. Expand the Form Widgets folder on the left side so you can see the buttons. Click the Button with the “Button” text and drag it below our EditText. Once you’ve done that, the view should look like this:
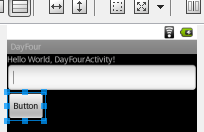
Now, we want to change the text on the button from “Button” to our new string “click_me”. We can do that in one of two ways. We could go to the xml view and change the text property from “Button” to “@string/click_me" or you can right click on the button in the graphical interface and go to Edit Text. This will allow you to choose between the available strings and you can select click_me.
The last thing we’re going to do today is add a click handler to our button which will set the TextView that came with the project to whatever is in the EditText. To do this, go back to the DayFourActivity.java. Below where you pulled out your EditText and set it’s text, you’ll do the same thing with the button and then you’ll assign it an anonymous click listener (i.e. one defined on the fly in our method). When done you should have something like this:
1: Button button1 = (Button) findViewById(R.id.button1);
2: button1.setOnClickListener(new OnClickListener() {
3: public void onClick(View v) {
4: // TODO Auto-generated method stub
5: }
6: });
Now since you’re defining this OnClickListener inside of your DayFourActivity’s onCreate method you can access any member variables of DayFourActivity. Unfortunately you declared your TextView and EditText inside the onCreate method. In order to fix this, you need to move the declaration of editText1 and lblTextViewOne to up above the method. Your code should now look like this:
1: public class DayFourActivity extends Activity {
2: private TextView lblTextViewOne;
3: private EditText editText1;
4:
5: /** Called when the activity is first created. */
6: @Override
7: public void onCreate(Bundle savedInstanceState) {
8: super.onCreate(savedInstanceState);
9: setContentView(R.layout.main);
10:
11: lblTextViewOne = (TextView) findViewById(R.id.lblTextViewOne);
12: lblTextViewOne.setText(R.string.test_one);//
13:
14: editText1 = (EditText) findViewById(R.id.editText1);
15: editText1.setText(R.string.test_one);
16:
17: Button button1 = (Button) findViewById(R.id.button1);
18: button1.setOnClickListener(new OnClickListener() {
19: public void onClick(View v) {
20: // TODO Auto-generated method stub
21: }
22: });
23: }
24: }
Now you can access lblTextViewOne and editText1 inside your OnClickListener. Your last bit of code will be to set your TextView’s text property to the EditText’s text property. Now your OnClickListener will look like this:
1: button1.setOnClickListener(new OnClickListener() {
2: public void onClick(View v) {
3: lblTextViewOne.setText(editText1.getText());
4: }
5: });
Now when we run our app and enter text into our EditText and then click our button, it should alter the TextView at the top of the view:
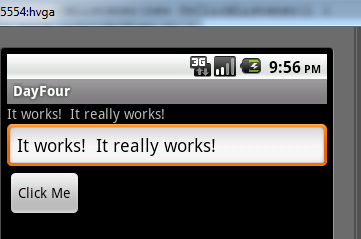
Congratulations, you just finished your first event driven application. Plus you have a basic understanding of what files are present in an Android application and how things are structured. From here we’ll grow and expand this application when convenient and create new projects when necessary. If you’d like to download the final code for this example, you can grab it here.