 As we continue the 31 Days of Android, we’ll talk about how you can add things to the Notification bar. The notification bar is at the top of phone devices and at the bottom for tablet devices and normally shows the time, battery meter, WIFI / wireless signal strength indicator, and an alarm indicator. These are all at the top right on a phone device and on the bottom left on tablets. Individual applications can add notifications to this bar which show up at the top left on phones and the bottom right on tablets. When you receive emails or a calendar appointment shows up in the top left, these are examples of notifications. Thankfully, your applications can easily add notifications to this bar. Today we’ll go through how to do this. We’ll start with some sample code that already has a few Views added and you can grab that source code here.
Creating your first Notification
Just creating a notification isn’t very complicated. Let’s go ahead and create one now. Open up the DaySixteenActivity and locate the onClickListener for button1. For now, you’ll just add code to create the notification in this listener. Step one is to get an instance of NotificationManager:
String notificationService = Context.NOTIFICATION_SERVICE;
NotificationManager notificationManager =
(NotificationManager) getSystemService(notificationService);
Similar to when you got a WindowManager instance so you could detect the display orientation, here you’re getting an instance of the NotificationManager. This isn’t something that you have to create or set up in your applications but something that Android handles and you only need to reference. Next you need to create a new instance of Notification and specify an icon, text, and the time to show in the notification:
Notification notification = new Notification(R.drawable.ic_launcher,
"Hello Notification!", System.currentTimeMillis());
Here you’ve passed in the ic_launcher icon ID to use as the icon of the Notification. If you try to pass in zero, your Notification won’t show up. Next you are passing in a String that will show up ONLY in the Notification bar. You could pass in any String you want but here you’re just doing “Hello Notification!”. If you were to pass in a String that is too long and won’t fit, it will be broken into several lines which will show up sequentially (hence the variable is named tickerText). Lastly you’ve specified the current time. This means when the Notification shows up, it will have a timestamp of right now. The reason you send a timestamp is so that if the user’s device isn’t active when the Notification is sent, it will still show the time when you wanted it to. This means that you can set your Notification for the past or the future. The past makes sense because your app could only be triggered to send a Notification after the phone has been asleep, so it might want to notify the user that a message was received in the past. Why you might want to specify a future time (knowing that the Notification will still show up now) I’m not sure. Next you need to create an Intent for the activity that will be called when the notification is tapped and use it to create a PendingIntent.
Intent notificationIntent = new Intent(getApplicationContext(), DaySixteenActivity.class);
PendingIntent contentIntent = PendingIntent.getActivity(getApplicationContext(), 0,
notificationIntent, 0);
notification.setLatestEventInfo(getApplicationContext(), "Notification Title",
"Notification Text", contentIntent);
PendingIntents are used to specify an action that can be performed later on your application’s behalf by another application. You can read more about Pending Intents here. Here you’re creating an Intent for the current Application and Activity. Then the Notification you previously created has it’s latest info set. Here you’ve passed in a title and text which is used when you the user pulls down on the Notification bar. Last, you pass in the PendingIntent. Last you tell the NotificationManager to show the Notification:
notificationManager.notify(1, notification);
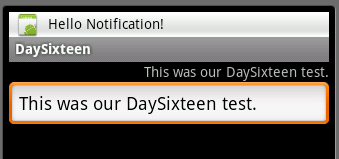
Now when you fire your application up and click the button in the middle of the screen, a moment later your Notification will show up in the Notification bar:

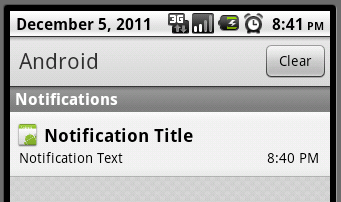
A moment later the text will disappear and the time will come back to the top right corner. The icon will stay behind. If you click the button again, you won’t see another notification right now. The reason for this is the 1 you passed in to the notify method above. This is an identifier that ensures you don’t show the same notification twice. If you were to change the ID and send the same notification again, it would also show up and you would have two icons at the top left. Very important to note is that if you changed the text values of the notification, then it would show up and replace the one you had previously sent. Since you’re not changing any values here, nothing new shows up. This is how the Gmail program’s notification always has the latest number of new emails you have but there is only one visible Notification. The program keeps sending a Notification with same ID. Go ahead and drag down on your Notification bar and you’ll see the title and text you used in the setLatestEventInfo method:

If you click the Notification the Notification bar will roll back up and it won’t look like anything is happening. This isn’t true though. When you click the Notification the PendingIntent is used to call the notificationIntent you created before. Since you passed in DaySixteenActivity.class, it’s firing a new instance of DaySixteenActivity. You can test this by entering text into the EditText near the top and then clicking the Notification again. The EditText will be restored to what was showing initially (“This was our DaySixteen test.” if you’re following along). If you hit back, that Activity will dismiss and you’ll be back at the one where you edited the text. Also, the Notification never went away like you think it would.
Clearing the Notification
For now, you could tap “clear” in the Notification pull down to remove notifications. However, you’re probably use to having Notifications going away when you tap on them. Let’s look at how to accomplish that. The easiest way to dismiss the Notification when the user taps them is to set a property on the Notification object before you pass it to the notify method. The flags field is a bit field that allows you to set several options. In this case, you just want to add FLAG_AUTO_CANCEL to it like so:
notification.flags |= Notification.FLAG_AUTO_CANCEL;
Now when you call notify and then tap on your Notification, it will go away. There are a few other flags you can use but we will discuss them later. Another way you can clear Notifications is by calling the NotificationManager’s cancel and cancelAll methods. cancelAll will clear all notifications from your app. cancel on the other hand, takes in an ID and will only remove the Notification from your app that matches the ID. So if you add this code to your DaySixteenActivity’s onCreate method, it will handle clearing the Notification without having to set the flags as described above:
String notificationService = Context.NOTIFICATION_SERVICE;
NotificationManager notificationManager = (NotificationManager) getSystemService(notificationService);
notificationManager.cancel(1);
You’re calling the ID specific method here but you could always change this to cancelAll.
Getting Fancy with Lights and Sounds
In addition to showing an icon in the notification bar, you can also trigger sounds, vibrations, and lights. I’ll explain how to do it but I would be wary of assuming user’s want to have a sound or a vibration played. If you use any of these options, I highly suggest giving the user the ability to turn them off.
To play the device’s default sound, you add a constant to the Notification’s defaults property just like you did with flags:
notification.defaults |= Notification.DEFAULT_SOUND;
You could also specify a sound to play by setting the Notification’s sound property like so:
notification.sound = Uri.parse("file:///myfilepath/mysound.mp3");
If you’ve added the DEFAULT_SOUND to the defaults property then it will override any sound you set. To make the notification cause a vibrate you add a different constant to the defaults:
notification.defaults |= Notification.DEFAULT_VIBRATE;
Alternatively, just like sound, you can do a custom vibration by setting the Notification’s vibrate property:
long[] vibration = {0,100,100,100};
notification.vibrate = vibration;
The array you pass in can be as long as you want it to be and is in the format of {delay, length of vibration, delay, length of vibration, …}. So in the case above, you’re saying to not delay, vibrate for 100 ms, delay for 100 ms, and then vibrate for 100ms. Again, if you’ve set the default vibration, it will override any custom vibration.
If you want to add flashing lights you can make use of another defaults value:
notification.defaults |= Notification.DEFAULT_LIGHTS;
Here you’re telling the Notification to play the default lights configuration. Again, you can override this to show a custom light show, if it’s available. This is done by specifying a ledARGB, ledOnMS, and ledOffMS. Then you need to set a property on flags like we did above for clearing the Notification:
notification.ledARGB = 0xffff0000;
notification.ledOnMS = 1000;
notification.ledOffMS = 1000;
notification.flags |= Notification.FLAG_SHOW_LIGHTS;
Here you’re specifying that the light should be red and it should be on for 1 second and then off for 1 second. Just like the sound and vibration, if you’ve set the default lights, it overrides the custom lights.
A few other flags
There are a few other flags you can set in addition to FLAG_AUTO_CANCEL.
- FLAG_INSISTENT - This will repeat the audio until the user takes action.
- FLAG_ONGOING_EVENT - This means the application is still running even if it's in the background (think the music player or call indicator).
- FLAG_NO_CLEAR - Indicates the notification shouldn't be cleared when the user taps "clear" in the Notification bar.
A Final Word about Notifications
Much like using a custom Layout for a Toast that we discussed yesterday, you can use a custom Layout for a Notification as well. You can read more about providing a custom UI for your Notifications here.
Here we’ve created a Notification as the result of a button click. This would be very unusual behavior for an application. Typically they are generated via a background service, something that is running but not directly touched by the user. Most commonly you see this with applications that receive messages from “the cloud”. As an example, when the Gmail app receives a notification that you have an email, it creates a Notification. Another example is the Calendar. Even if you’re not connected to the Internet (which you’d have to be to get new email notifications) the Calendar service will create Notifications when you need to be reminded of an event.
You can download the latest example code from today here.
Talk about how you probably only want to use from a background service like C2DM.