
 We left off working on our iOS client for the URL Shortener able to display all of the URL slugs that were saved on the server. Today we’re going to continue on by giving the user the ability to tap into a slug and see the details on that URL. You can download the code that we left off from here.
If you run the app right now, you’ll see that you can tap on an individual item in our table view and it will become highlighted, but nothing happens. Let’s first wire that up to open a new view controller. Open the MainStoryboard.storyboard and click on the only view controller there. In the menu, go to Editor -> Embed In -> Navigation Controller. Once that is done, you should see the nav controller show up in the storyboard and point to your view controller.

Now that that is done, we need to edit our table view in order to be able to wire up a tap on an individual cell from the storyboard. Zoom in our your view controller (not the nav controller) and drag a Table View Cell from the control selector to your table view. You should end up with something that says “Prototype Cell” at the top of your table view. While cell is still highlighted, go to the Attributes Inspector and set the Identifier property to “Cell”. This will match up with the identifier we’re using in our code (specifically in the cellForRowAtIndexPath method).

The last thing you’ll want to do is change the Accessory property to be “Disclosure Indicator” in the Attributes Inspector right beneath Identifier. Now when you run the app, you’ll see the Navigation Bar at the top, you’ll be able to tap on items, but still, nothing happens. Now it’s time to change that. Go back into your storyboard and drag a new View Controller from the control selector onto the work space. Then, highlight your prototype cell (you may need to zoom in to properly highlight it), and control click and drag from your cell to the new view controller. In the dialog box that comes up, choose Push. Now, when you run your app and tap on an item, you should see the screen transition to your new view controller. There is a little bit of plumbing we need to do now before we can start displaying information on the view controller though. First, in the storyboard, highlight the circular thing that is connecting the table view controller and the new view controller (this represents a Segue). When you do, you’ll be able to set an Identifier for the segue. Do that and call it “ViewUrlDetails”. This is how we can check for this segue in our code behind.

Now, in the Project Navigator, add a new Objective-C class to your project. Name it UrlDetailsViewController and make it extend from UIViewController. Now, go back to your storyboard and select your new view controller and in the Identity Inspector, set the class to be UrlDetailsViewController. Now, if you run the app, nothing will be different from a user perspective, however, we’ve laid the groundwork to do what we need to do in our code. Open up the UrlDetailsViewController.h file and add the following:
    @property (nonatomic, weak) NSString *urlSlug;
    @property (nonatomic, weak) NSString *fullUrl;
Then in your UrlDetailsViewController.m file, you will need to synthesize these properties:
    @synthesize urlSlug;
    @synthesize fullUrl;
Now, open up your ViewController.m file and add the following method:
    -(void)prepareForSegue:(UIStoryboardSegue *)segue sender:(id)sender {

    }
This method will be called whenever a segue is about to occur. So, when a user taps on a cell and the “ViewUrlDetails” segue is called, this method will fire. Now, what we need to do inside of prepareForSegue is check to see what the segue that triggered the method call is. If it was the one we labeled as “ViewUrlDetails” then we want to set the urlSlug and fullUrl properties we created above. So, the method should change to this:
    -(void)prepareForSegue:(UIStoryboardSegue *)segue sender:(id)sender {
        if ([segue.identifier isEqualToString:@"ViewUrlDetails"])
        {
            UrlDetailsViewController *urlDetailsViewController = segue.destinationViewController;
            UITableViewCell *cell = (UITableViewCell *)sender;
            urlDetailsViewController.urlSlug = cell.textLabel.text;
            AppDelegate *appDelegate = (AppDelegate *)[[UIApplication sharedApplication] delegate];
            urlDetailsViewController.fullUrl = [appDelegate.urls objectForKey:cell.textLabel.text];
        }
    }
Now we’re finally ready to start putting a UI in place. For today, our UI will consist of a few labels, text fields, and a button. Here’s what my UI looks like:
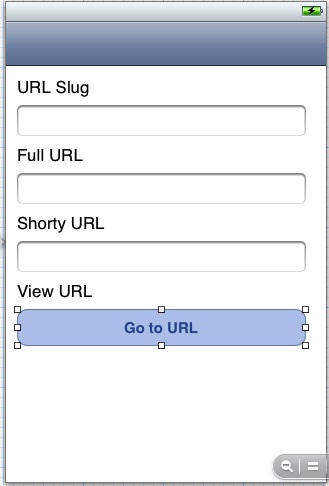
We’re using text fields for the data here because in the next article, we’ll reuse this view for adding new URLs as well. For now, the text fields will all be disabled so we can use them to display data but not to edit it. Once you’ve generated your UI, use the Assistant Editor to control drag the controls to your .h file and create outlets and actions. We’re going to create a few more things than we need so we can use them later when we make things editable. You’ll need outlets for all of the text fields, the button, and the bottom two labels. You’ll need an action only for the button.
    @property (weak, nonatomic) IBOutlet UITextField *txtUrlSlug;
    @property (weak, nonatomic) IBOutlet UITextField *txtFullUrl;
    @property (weak, nonatomic) IBOutlet UITextField *txtShortyUrl;
    @property (weak, nonatomic) IBOutlet UIButton *btnGoToUrl;
    @property (weak, nonatomic) IBOutlet UILabel *lblGoToUrl;
    @property (weak, nonatomic) IBOutlet UILabel *lblShortyUrl;
    - (IBAction)tapGoToUrl:(id)sender;
The last thing we need to do is load up the data in the view controllers viewDidLoad method and handle button clicks. Let’s handle viewDidLoad first:
    - (void)viewDidLoad
    {
        [super viewDidLoad];
        self.txtUrlSlug.text = urlSlug;
        self.txtFullUrl.text = fullUrl;
        self.txtShortyUrl.text = [@"http://urlshortener.azurewebsites.net/" stringByAppendingFormat:urlSlug];
        self.title = @"URL Details";
    }
Here we’re just setting the text property for the different text fields and then setting the title on the navigation bar. Lastly, we have our tapToGoToUrl method:
    - (IBAction)tapGoToUrl:(id)sender {
        NSURL *url = [ [ NSURL alloc ] initWithString:
                      [@"http://urlshortener.azurewebsites.net/" stringByAppendingFormat:urlSlug] ];
        [[UIApplication sharedApplication] openURL:url];
    }
Now when you run your application and tap on a URL in the table view, you’ll have all of the data loaded into the details controller and when you click on the button, you’ll be taken to the URL Shortening site.

You can download the code we finished today with from here. In the next, and final article on the iOS client, we’ll alter the URL Details view controller so that we can add new URLs using our web service end points.
For a free trial for Windows Azure Websites, sign up here.
