
 By now, we’ve gone through creating a new PHP site in Windows Azure as well as gone over the code for a URL Shortening service running in Windows Azure. Now it’s time to get to our mobile clients. We’ll start by looking at the mobile client. The functionality exposed by our website is very simple: we can list all of the URLs that have been shortened, get details on a specific one, add new ones, and go to a shortened URL and be redirected to the full URL (for testing purposes the site will just print out the full URL that matches the slug you go to for now). So naturally, we want the same functionality to exist in our app. When the app starts, we want to see a list of the URLs. If the user taps on one, we want to show them the details and give them the ability to go to the full URL. Finally, we want to give them a way to add a new shortened URL. Let’s dive into XCode and get started. One thing to note, I’m doing this in XCode 4.3.3. If your version is newer or older, things may be a little bit different.
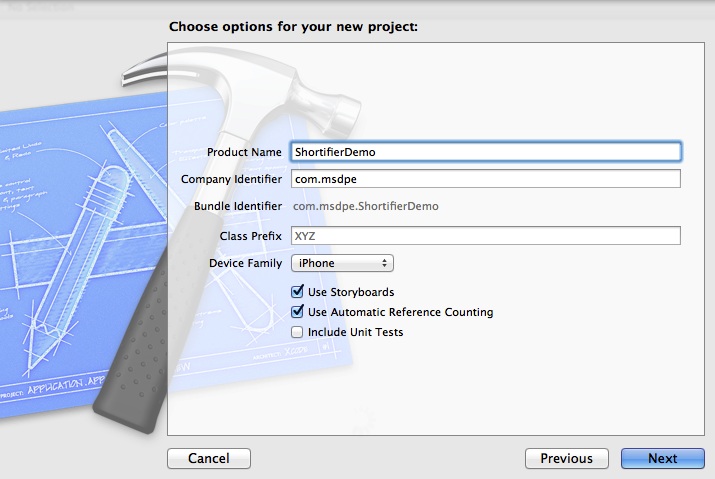
Open up XCode and choose to create a new Project. For today, a Single View Application will be fine. I’ll name my project ShortifierDemo, make it for iPhone only, and use storyboards. You don’t have to make any of the same choices for this to work, it’s just what we’ll to for demo purposes.
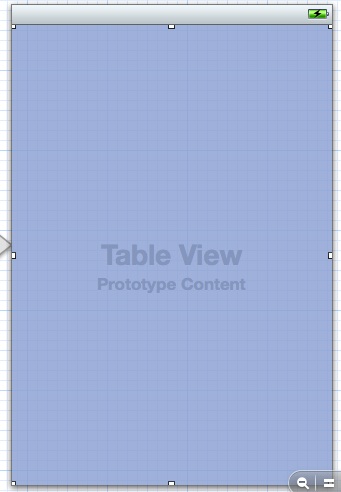
After clicking Next, and picking the location for your project, you should have a new app ready to go. Running the app at this point will just present you a white screen in the simulator. The first thing we’re going to do is pull down all of the existing URLs and present them to the user. The best way to do that will be to use a table view. Open the MainStoryboard.storyboard and locate your view controller. In the bottom right control picker, find table view (not table view controller) and drag a table view onto your view controller. You should be left with something looking like this:
Now you need to tie that to your view controller code. In the top right of XCode, click the button to “Show the Assistant editor” (also affectionately known as the button that looks like a tuxedo or an alien face). Now you should be able to hold down Control, click on and then drag from the table view to the code inside your ViewController.h file. Let go of the mouse when the pointer is inbetween the @interface and @end tags and you’ll be prompted to name your IBOutlet. For now just name it something like tableView. Your code should now look something like this:
    @interface ViewController : UIViewController
    @property (weak, nonatomic) IBOutlet UITableView *tableView;

    @end
While you have that open, go ahead and add a private Bool named success and make ViewController implement UITableViewDelegate and UITableViewDataSource. When you’re finished, you’re code will look like this:
    @interface ViewController : UIViewController <UITableViewDelegate, UITableViewDataSource> {
    @private
        BOOL _success;
    }
    @property (weak, nonatomic) IBOutlet UITableView *tableView;

    @end
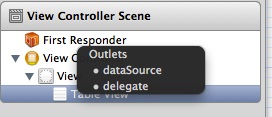
You can close out the assistant editor now. Before you leave the storyboard, there are two more things you need to do. Control click the table view again, but this time drag and drop to the View Controller on the View Controller Scene. When you do, you should see that the table view has two outlets: dataSource and delegate. Click on one of them and then drag drop and click on the other so they are both selected:
Now you’ve connected your table view to your view controller and vice versa. Lets open up the AppDelegate.h file next. We are going to store the URLs that come back from the server on the AppDelegate so we can access them from several different places, so add a NSMutableDictionary named urls here (why NSMutable? We’ll want to add to it later):
    @interface AppDelegate : UIResponder <UIApplicationDelegate>

    @property (strong, nonatomic) UIWindow *window;
    //We're using a MutableDictionary so we can add a URL Slug to it
    //without having to pull all new data
    @property (strong, nonatomic) NSMutableDictionary *urls;

    @end
Now go to your AppDelegate.m file and synthesize the urls property:
    @implementation AppDelegate

    @synthesize window = _window;
    @synthesize urls;
Now the only thing left to do is modify the ViewController.m file so open that up. When the view loads, we want to pull data down from the server, so look at your viewDidLoad method and add this code to start an asynchronous queue to pull down the URLs:
    - (void)viewDidLoad
    {
        [super viewDidLoad];
        //Hit the server for URL data
        dispatch_queue_t backgroundQueue = dispatch_get_global_queue(DISPATCH_QUEUE_PRIORITY_DEFAULT, 0);
        dispatch_async(backgroundQueue, ^{
            NSData* data = [NSData dataWithContentsOfURL:
                            [NSURL URLWithString: @"http://urlshortener.azurewebsites.net/api-getall"]];
            [self performSelectorOnMainThread:@selector(fetchedData:)
                                   withObject:data waitUntilDone:YES];
        });
    }
Here we’re telling the background queue to fetch whatever is at that URL and when done, call fetchedData with the results. So next we’ll need to handle that method.
  - (void)fetchedData:(NSData *)responseData {
      //parse out the json data
      NSError* error;
      NSDictionary* json = [NSJSONSerialization
                JSONObjectWithData:responseData

                options:kNilOptions
                error:&error];

      NSString* status =[json objectForKey:@"Status"];
      NSLog(@"status: %@", status);
      _success = [status isEqualToString:@"SUCCESS"];

      //If we successfuly pulled the URLs, show them
      if (_success) {
          NSDictionary* urls = [json objectForKey:@"Urls"];
          NSLog(@"urls: %@", urls);
          AppDelegate *appDelegate = (AppDelegate *)[[UIApplication sharedApplication] delegate];
          appDelegate.urls = [urls mutableCopy];

          [self.tableView reloadData];
      } else {
          //Otherwise, show an error
          UIAlertView *alert = [[UIAlertView alloc] initWithTitle:@"Error"
                      message:@"There was an error loading the URL data.  Please try again later."
                     delegate:self
            cancelButtonTitle:@"OK"
            otherButtonTitles:nil];
          [alert show];
      }
  }
Here we’re deserializing the json data into an NSDictionary. We’re checking to make sure the Status that comes over is SUCCESS and, if it is, we’re pulling out the URL data from the dictionary, setting the AppDelegate’s urls property to be equal to it (actually a mutable copy) and finally telling the table view to reload it’s data. If pulling the data was not a success, we’re showing a UIAlertView. If you run the app now, you’ll see in the debug console that we’re outputting the URLs that come back from the server but nothing is showing up. That’s because we haven’t implemented the UITableDataSource methods. Let’s do that now. The first two methods we need to implement tell the table view how many sections and rows it has:
  - (NSInteger)numberOfSectionsInTableView:(UITableView *)tableView
  {
      return 1;
  }

  - (NSInteger)tableView:(UITableView *)tableView numberOfRowsInSection:(NSInteger)section
  {
      // Return the number of rows in the section.
      AppDelegate *appDelegate = (AppDelegate *)[[UIApplication sharedApplication] delegate];
      return [appDelegate.urls count];
  }
We’re not going to do anything fancy with sections so we’ll just use one. To get the number of rows, we get access to the AppDelegate and get a count from the urls property. The last method we need to implement right now is tableView cellForRowAtIndexPath:
    - (UITableViewCell *)tableView:(UITableView *)tableView cellForRowAtIndexPath:(NSIndexPath *)indexPath
    {
        static NSString *CellIdentifier = @"Cell";
        UITableViewCell *cell = [tableView dequeueReusableCellWithIdentifier:CellIdentifier];
        if (cell == nil) {
            cell = [[UITableViewCell alloc] initWithStyle:UITableViewCellStyleDefault
                    reuseIdentifier:CellIdentifier];
            cell.accessoryType = UITableViewCellAccessoryDisclosureIndicator;
        }

        NSLog( @"Indexpath %i", [ indexPath row ] );
        AppDelegate *appDelegate = (AppDelegate *)[[UIApplication sharedApplication] delegate];
        NSArray *keys = [[appDelegate.urls allKeys] sortedArrayUsingSelector:
                        @selector(caseInsensitiveCompare:)];
        NSString *key = [keys objectAtIndex:[indexPath row]];
        cell.textLabel.text = key;

        return cell;
    }
Here we’re attempting to dequeue a reusable cell if the user has been scrolling up and down the list. If we can’t get a reference to an existing cell (to reuse it’s memory) then we allocate a new one and set it’s accessory type to be the disclosure indicator. Next, we pull out the AppDelegate again, get all of the keys from the urls property, and index into those keys to set the text label. Now when you run your app, after just a second, you should see URLs:

That’s all for today. In the next article we’ll go over what happens when you tap on one of the URL slugs and see the details. Last, we’ll go over adding a new URL. You can download the completed source from today’s coding here.
For a free trial for Windows Azure Websites, sign up here.
