
![]() Welcome to Day 4 in the 31 Days of iOS. In yesterday’s article, we built our first iOS app! The app was simple and just allowed the user to enter some text, tap a button, and then update a label with the text. While simple, building this app showed a few important different areas of Xcode including your first look at storyboards and the Assistant Editor in addition to understanding where the entry point for an application is. Today we’re going to build upon what we created yesterday by adding a second view controller to our app and looking at a couple different ways to display it in storyboards. In a later article, we’ll talk about displaying a view controller from the code. You can download the code we’re going to start with (from yesterday’s article) here. If you’d like to follow along with the completed code, you can access it here.
Welcome to Day 4 in the 31 Days of iOS. In yesterday’s article, we built our first iOS app! The app was simple and just allowed the user to enter some text, tap a button, and then update a label with the text. While simple, building this app showed a few important different areas of Xcode including your first look at storyboards and the Assistant Editor in addition to understanding where the entry point for an application is. Today we’re going to build upon what we created yesterday by adding a second view controller to our app and looking at a couple different ways to display it in storyboards. In a later article, we’ll talk about displaying a view controller from the code. You can download the code we’re going to start with (from yesterday’s article) here. If you’d like to follow along with the completed code, you can access it here.
Adding some buttons
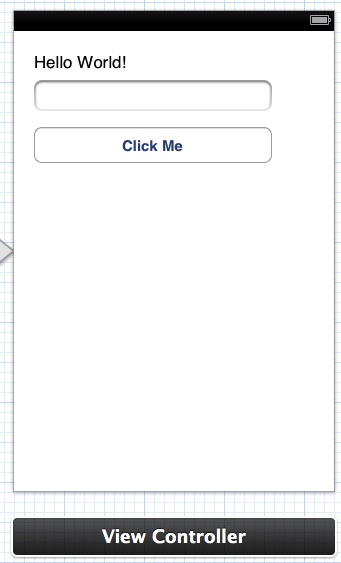
The first thing we’re going to do today, is add some buttons to our View Controller. Eventually we’ll wire these up to show new view controllers. After you’ve opened your project in Xcode, open MainStoryboard.storyboard. The view we’re starting out with looks like this:
We’re going to do a few different things to our view. First, drag another Round Rect Button and set it’s title to “Show New View”. After that’s done, select the view (click anywhere in the whitespace of the view) and go to the Editor menu and choose Embed In -> Navigation Controller. A Navigation Controller is a very common navigation technique in iOS development. If you are in an app with a blue bar near the top, there’s a good chance you’re looking at a Navigation Controller. This is very useful when you have a hierarchy of views where you might tap something in one view and descend into another view where you want to have a back button to return to the first. In this instance, you’d have a back button at the top left of the navigation bar on the second view. We’ll see exactly what this looks like soon. Before we look at our view, drag a Bar Button Item to the top right of the navigation bar. When done, your storyboard will look like this:

On the left you see the Navigation Controller that was created when we embedded our view in it. On the right is our updated view. Notice the blue bar at the top. This is the Navigation Bar with the Bar Button Item at the top right (we left it’s Title as “Item”).
Adding a new View Controller
Next let’s add some new files. Go to the File menu and choose New -> File. In the dialog that comes up, make sure you choose Cocoa Touch from the iOS area and then pick Objective-C class:

You can name the class SecondViewController and leave it’s subclass as UIViewController. Hit next and choose where you want the files to be. Let’s take a look at the code that’s generated. Here’s SecondViewController.h:
The header class is completely empty with the exception of it extending UIViewController. SecondViewController.m has a bit more content:
The three methods here are necessary when implementing a UIViewController. We don’t have to alter these at all to get the view controller to work. Let’s return to our storyboard and tie in the new view controller.
Adding a view controller into the storyboard
After reopening the storyboard, drag a View Controller from the utility pane’s UI element selector onto the storyboard workspace. Switch over to the Identity Inspector in the top of the utility panel and choose SecondViewController from the Class dropdown:

Now the view controller in the storyboard is tied to the SecondViewController class. Next we’ll look at two methods for displaying the new view controller
Displaying a modal
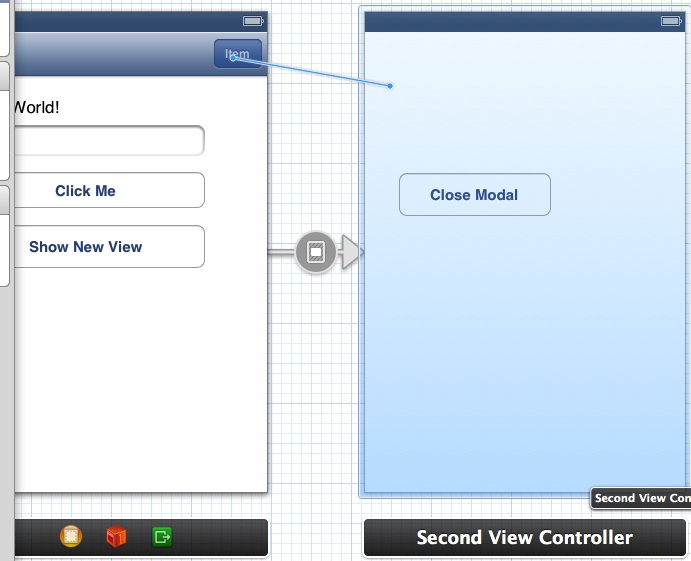
Return to MainStroyboard.storyboard and control + click and drag from the “Show New View” button over to the second view controller:

When you release the mouse, you’ll have the Segue Action Selector:
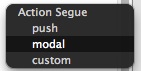
We’re going to choose modal for now, but I’ll explain the differences soon. First, let’s talk about Segues. A segue defines how you transition from one view controller to another. After selecting modal you’ll see that the two view controllers are connected by an arrow with a circle in the middle:

The circle with the icon in it represents the segue. If you click on the segue and go to the Attributes Inspector at the top of the Utilities pane, you’ll see that you can give the segue an Identifier, change the style (if we didn’t actually want Modal we could switch it here), as well as change the type of transition (if we wanted to cross dissolve or flip horizontal) if you don’t like the default. We don’t need to change these for now, but the Identifier property will be used in a future article. Now if you run your app and tap on the “Show New View” button, the second view controller will load. Unfortunately, we haven’t included any way to close that view. Let’s do that now.
Closing a modal
Return to the storyboard and add a new Round Rect Button to your SecondViewController. You can give it a Title of “Close Modal” for now. After that, open the Assistant Editor (the middle button above the “Editor” text in the top right of Xcode) and control + click and drag from the button to your controller code. We want to create a new Action for when the user taps the button:

After clicking Connect, the code for SecondViewController.h should look like this:
Now let’s switch over to SecondViewController.m and wire this method up. Getting rid of our modal is actually very easy:
All we have to do is call dismissModalViewController on self (so on SecondViewController). Now when you run your app and hit the “Show New View” button, you should see the new button on the screen. Tapping that should return you to the first view controller.
Pushing a new view
Let’s look at a different way of showing SecondViewController. Here we’re going to make use of the navigation bar and the Bar Button Item we added earlier. Go to your storyboard and control + click and drag from the button on the navbar (it still says “Item” unless you changed it) over to the second view:
For this one, we’ll choose Push from the segue action selector. Now, run your app and tap the bar button item. You’ll be taken to the second view controller. Notice that when you are, a Back button has been added to the navigation bar automatically. When you tap this, you’ll be returned to the first view controller:

If you try tapping the “Close Modal” button when you’re on the second view controller now, it won’t do anything. The reason is that we’re specifically calling dismissModalViewController. Since the view controller wasn’t loaded as a modal, nothing happens. If we were to change the code for the “Close Modal” button to this:
Then it would return to the first view controller just like when we push the Back button though it would no longer close the modal.
Conclusion
Today we looked at two different ways to display different view controllers from storyboards: as part of a navigation hierarchy and as a modal. We also covered how to dismiss a view controller presented as a modal and one pushed onto a navigation hierarchy from our code. We’ll next look at how to programmatically present a view controller and how to pass data between our view controllers when we’re using segues and storyboards. You can download the final code for today from here.
