 Yesterday we wrapped up talking about persistence in the 31 Days of Android. Today we’re talking about something that is related to persistence and can actually be used to persist data, sort of: Content Providers. Content Providers are able to store and retrieve data from other applications. Android comes with a number of built in Content Providers for common data types such as audio, video, images, contacts, calendar (as of 4.0), and more. In addition, you can create your own Content Providers. That’s a bit beyond what we’ll cover today but it is something I may cover in the future. Today we’ll start by looking at the Contacts Content Provider but we’ll also show some examples of using another provider at the end. You can download the sample code we’re starting with today here.
Adding Contacts Manually
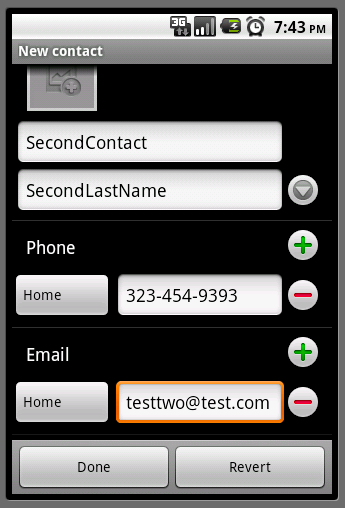
Since you want to pull contact data, you need to add a few contacts first. This is actually a bit more involved than you might think because before you can add contacts, you need to have an account set up on the emulator (note that if you’re running on your own device, you probably already have an account and contacts on it, so you might be able to skip this step). Start by tapping the Menu button and go to Settings and choose Accounts & Sync. If there aren’t any accounts under Manage Accounts tap the Add Account button at the bottom. Follow the steps to add a Google account to your emulator / device and return to the Home screen. This time, tap the App Tray button at the bottom center of the emulator and choose the Contacts application. Hitting Menu now should allow you to choose New contact. You’ll need to choose the account you added and then you’ll be at the contact entry screen. Go ahead and fill this out and create a contact:

When you’re done, tap Done to save the contact. Create at least two contacts before proceeding. Note that after you hit Done, you may not see your contacts on the emulator. If you’re not, tap Menu and choose Display Options. Then at the bottom under Choose contacts to display, expand your account and ensure All Accounts is checked.
Getting at the Data
If you’re experienced with using a SQL database (like SQLite for Android) then accessing the data through a Content Provider shouldn’t seem that weird. You have to execute a query against a specific table, can specify which columns you want returned, which selection criteria (WHERE clause) you want to use, and how you want the results ordered. In this case, instead of listing a table name, you instead pass a URI. The built in providers define constants that you can use to specify these URIs. These are some examples of the predefined constants:
- android.provider.ContactsContract.Contacts.ContentURI
- android.provider.MediaStore.Audio.EXTERNAL_CONTENT_URI
- android.provider.CalendarContract.Events.CONTENT_URI
The first provider is for Contacts. The second to last is the URI for externally stored audio media. The last one is new from Android 4.0 and is the URI for calendar events. Again, the URI specifies the source of the information you’re accessing. Let’s take a look at how to pull out all of the contacts you’ve saved in your app. Open the src/com.daytwentyfive/DayTwentyFiveActivity.java class and find button1’s onClickListener. Here you can add the code to query the contacts. For now you can just pull all rows back and not pass any selection criteria. We’ll deal with those later. After you pull the data, you should loop through it and join the names together:
button1.setOnClickListener(new OnClickListener() {
public void onClick(View v) {
Uri contactsUri = ContactsContract.Contacts.CONTENT_URI;
Cursor cursor = managedQuery(contactsUri,
null,
null,
null,
null);
if (cursor != null && cursor.getCount() > 0) {
StringBuilder sb = new StringBuilder();
while (cursor.moveToNext()) {
sb.append("Name-");
sb.append(cursor.getString(cursor.getColumnIndex(
ContactsContract.Contacts.DISPLAY_NAME)));
sb.append("\n");
}
lblTextViewOne.setText(sb.toString());
}
else {
lblTextViewOne.setText("Couldn't find any contacts");
}
}
});
First you’re getting a reference the Contacts URI. Then you’re doing a managed query which just passes in the URI. Since nothing else is specified, it will pull back all of the contacts and will use whatever default order there is. After that, provided some contacts are found, you’re looping through them and pulling out the DISPLAY_NAME for each. The managedQuery method you are using is specific to the Activity class. Calling it means that the Activity that it is called from will handle the life cycle of the Cursor (unloading and reloading when necessary). Now when you run your app and tap the button, your app will crash. If you look in LogCat, you’ll see the following error:
java.lang.SecurityException: Permission Denial: reading com.android.
providers.contacts.ContactsProvider2 uri
content://com.android.contacts/contacts from pid=5529, uid=10055
requires android.permission.READ_CONTACTS
Getting access to contacts REQUIRES you to get permission. Open your app’s AndroidManifest.xml file and add the READ_CONTACTS permission to it:
<uses-permission android:name="android.permission.READ_CONTACTS"/>
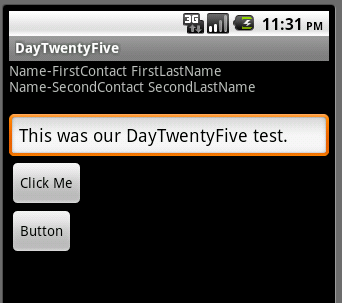
Now when you run your app and tap the button you should see the names of the contacts put into the TextView at the top of the screen:

Limiting the Columns Selected
Previously you were pulling back every column of data that is available in the Contacts.CONTENT_URI. This was happening because the second parameter to managedQuery was null. This parameter takes in a String array of column names that either limits the data returned, if passed, or means all data will be returned if null. Let’s say you only wanted to pull back the display name, number of times contacted, the last time contacted, and whether or not each contact was a favorite. Your code would then look like this:
String[] projection = new String[] {
ContactsContract.Contacts.DISPLAY_NAME,
ContactsContract.Contacts.TIMES_CONTACTED,
ContactsContract.Contacts.LAST_TIME_CONTACTED,
ContactsContract.Contacts.STARRED
};
Cursor cursor = managedQuery(contactsUri,
projection,
null,
null,
null);
Your projection array is created using constants also exposed by the ContactsContract provider like the CONTENT_URI.
Using a Sort Order
Using a sort order is very simple and is handled by passing something into the last parameter for managedQuery. Let’s say you want to fetch the contacts ordered by the time they were most recently contacted with the most recently contacted being first. Your managedQuery call would look like this:
Cursor cursor = managedQuery(contactsUri,
null,
null,
null,
ContactsContract.Contacts.LAST_TIME_CONTACTED + " DESC");
Conversely if you wanted them in reverse order, so the contact that hasn’t been contacted in the longest time was first, you would change DESC to ASC.
Inserting to a Content Provider
Being able to pull data from a provider is great. However, many content providers will also give you the ability to add, update, and delete data. Prior to getting into the code, let’s cover the permission required first. Much like reading contacts, making changes to contacts requires a new permission be added to the manifest file. Open your manifest and add:
<uses-permission android:name="android.permission.WRITE_CONTACTS"/>
Now, go back to your src/com.daytwentyfive/DayTwentyFiveActivity.java class and locate the button2 onClickListener. Here you’ll add the code to save a new contact. Prior to Android 2.0, inserting was pretty simple. As of 2.0 though, the Contacts stuff was reworked a little bit and inserting a new contact via code is slightly more complicated. Here’s the code you’ll want to add to your listener to insert a new contact:
Uri newContactUri;
ArrayList<ContentProviderOperation> ops = new ArrayList<ContentProviderOperation>();
int rawContactInsertIndex = ops.size();
ops.add(ContentProviderOperation
.newInsert(RawContacts.CONTENT_URI)
.withValue(RawContacts.ACCOUNT_TYPE, null)
.withValue(RawContacts.ACCOUNT_NAME, null).build());
ops.add(ContentProviderOperation
.newInsert(ContactsContract.Data.CONTENT_URI)
.withValueBackReference(Data.RAW_CONTACT_ID,
rawContactInsertIndex)
.withValue(Data.MIMETYPE,
StructuredName.CONTENT_ITEM_TYPE)
.withValue(StructuredName.DISPLAY_NAME,
"New Contact Name").build());
ContentProviderResult[] res = getContentResolver()
.applyBatch(ContactsContract.AUTHORITY, ops);
newContactUri = res[0].uri;
This is actually relatively complicated and I won’t go through each line. The important part though is that you’re calling newInsert and you’re setting the display name to “New Contact Name”. Then you’re calling applyBatch to execute all of the operations you’ve added to the ContentProviderOperation.
The result of applyBatch is an array of ContentProviderResult. In the scenario above, you’re interested in the first result. The result property you’re interested in is uri. If you were to print out the uri property you’d get something like this:
content://com.android.contacts/raw_contacts/6
Note the 6 at the end which is the ID of your new contact (in your case it might not be 6 but a different integer). If you hit the first button again, you should see your new contact’s name added to the list of contacts. If you hit the second button again you’d get a different ID returned. I believe that Android is inserting multiple contacts but treats them as the same person since they all have the same name and no differentiating details (i.e. different phone numbers, addresses, etc).
Updating Records in a Content Provider
Updating is going to be pretty similar (and messy) to the insert:
ops.clear();
ops.add(ContentProviderOperation
.newUpdate(RawContacts.CONTENT_URI)
.withValue(RawContacts.ACCOUNT_TYPE, null)
.withValue(RawContacts.ACCOUNT_NAME, null).build());
ops.add(ContentProviderOperation.newUpdate(ContactsContract.Data.CONTENT_URI)
.withValue(StructuredName.DISPLAY_NAME, "Updated contact name")
.withSelection(Data.RAW_CONTACT_ID + "=?", new String[] {newContactId})
.build());
res = getContentResolver().applyBatch(ContactsContract.AUTHORITY, ops);
Here you’re doing the same thing with the ACCOUNT except it’s a call to newUpdate and then calling newUpdate on your contact. New this time those is the call to withSelection. This call specifies what the update selection criteria is. Notice that you’re using the newContactId that you retrieved earlier after the insert.
Deleting Records in a Content Provider
Deleting raw contacts seems to be a bit more difficult (as I haven’t figured it out yet). If I do get it figured out I’ll update it here. If you happen to read this and know the correct way to delete a raw contact, let me know and I’ll add it and credit you with figuring it out.
Querying the Media Store
So far we’ve just looked at querying contacts. As pointed out earlier in the article, there are other ContentProviders already built into Android, including ones to check for media. The following will query the external storage media directory for audio files:
Cursor musiccursor = managedQuery(
MediaStore.Audio.Media.EXTERNAL_CONTENT_URI,
null, null, null, null);
This will retrieve all of the track s on external storage. If you wanted all of the ones on internal storage, you could change EXTERNAL_CONTENT_URI to INTERNAL_CONTENT_URI. Once you execute this query, you can then loop through the Cursor and pull out information on each track like this:
while (musiccursor.isAfterLast() == false) {
int music_column_index = musiccursor.getColumnIndexOrThrow(MediaStore.Audio.Media.ARTIST);
String artist = musiccursor.getString(music_column_index);
music_column_index = musiccursor.getColumnIndexOrThrow(MediaStore.Audio.Media.TRACK);
int trackNumber = musiccursor.getInt(music_column_index);
music_column_index = musiccursor.getColumnIndexOrThrow(MediaStore.Audio.Media.ALBUM);
String album = musiccursor.getString(music_column_index);
music_column_index = musiccursor.getColumnIndexOrThrow(MediaStore.Audio.Media.DATA);
String filepath = musiccursor.getString(music_column_index);
music_column_index = musiccursor.getColumnIndexOrThrow(MediaStore.Audio.Media.TITLE);
String title = musiccursor.getString(music_column_index);
music_column_index = musiccursor.getColumnIndexOrThrow(MediaStore.Audio.Media.DURATION);
String duration = musiccursor.getString(music_column_index);
musiccursor.moveToNext();
}