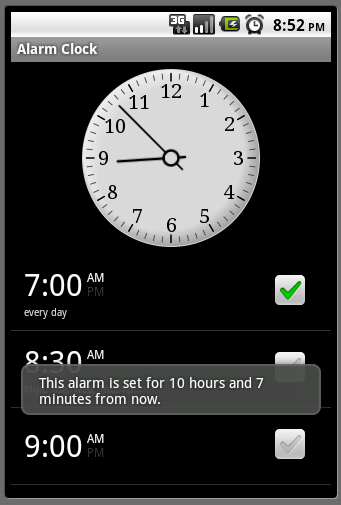
 In today's entry in the 31 Days of Android series, we’re going to look at Toasts. A toast is a simple pop-up notification that will inform users of something. To see an example of a toast in action, open up the Alarm & Timer application and set an alarm. When you do so, a toast appears saying that an alarm has been set and for how long from now it’s set. These toasts appear for a limited time and don’t offer any sort of user interaction. You can download the code we’re going to start with today here.
Adding your first toast
To create a new Toast, you call a static method on the Toast class named makeText. There are two different makeText methods. One of them takes in a String that can be from any source you want. The second expects a String resource ID. If your Toast is not showing anything dynamic, remember that the best method for accessing String data is the resource files (for localization and consistency purposes). Go ahead and add a call to each version of the method to your button1 onClickListener:
Button button1 = (Button) findViewById(R.id.button1);
button1.setOnClickListener(new OnClickListener() {
public void onClick(View v) {
lblTextViewOne.setText(editText1.getText());
Toast.makeText(getApplicationContext(), "This is a toast!", Toast.LENGTH_LONG).show();
Toast.makeText(getApplicationContext(), R.string.app_name, Toast.LENGTH_SHORT).show();
}
});
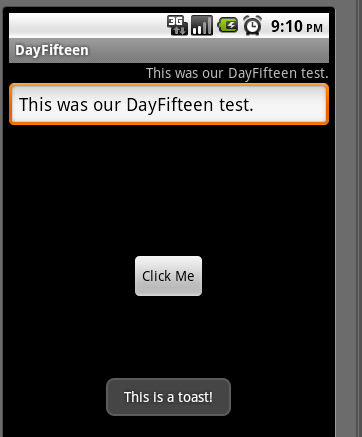
Now when you run your app and tap the “Click Me” button, you’ll see a Toast appear at the bottom of your screen for a second and then that one will disappear and you’ll see a second one:

Let’s look at each call to makeText. You’re passing in the Application Context for both of these method calls. You could have passed in the Activity context if you had access to it. Since your calls to makeText were in the onClickListener you didn’t have access to it (though you could have created a member variable on DayFifteenActivity and set it to the current activity prior to the onClickListener if you wanted to). As mentioned before, one of the methods is taking in a String and the other takes in a Resource ID. The last parameter passed in is an integer for how long the Toast should show up. You might think you could pass in any amount of time in milliseconds here but that isn’t the case. You can only pass in Toast.LENGTH_LONG or Toast.LENGTH_SHORT. LENGTH_LONG corresponds to 3.5 seconds and LENGTH_SHORT is 2 seconds. It might be possible to override Toast to show it for shorter or longer periods of time, but I think the intention is to keep these sort of notification similar from app to app. Lastly, since makeText returns a Toast object you call show to make it appear on the screen.
It’s worth noting out that once you’ve called show on your Toast, it does not show up immediately. The first call to show appears first and then any other calls will appear in sequential order after that. In this way, you’re prevented from showing multiple Toasts but only getting the last one on screen.
The default location for a toast is, as demonstrated above, the bottom of the screen. You do have the ability to alter this but it requires a little more work. Let’s change the second call to makeText to handle this. First you need to remove the show call at the end and store the results of makeText. When you do this, you’ll have a Toast object to work with. Using the Toast object you can alter the duration and the text that you specified in the constructor. More important is that you can set a margin, alter the gravity, and change the view used. Both margin and gravity can be used to alter the position. So if you wanted to put the toast at the top of the screen, you’d pass in Gravity.TOP. If you wanted it to be in the center, you’d pass in Gravity.CENTER. Go ahead and make these changes and your click listener should now look like this:
button1.setOnClickListener(new OnClickListener() {
public void onClick(View v) {
lblTextViewOne.setText(editText1.getText());
Toast.makeText(getApplicationContext(), "This is a toast!", Toast.LENGTH_LONG).show();
Toast myToast = Toast.makeText(getApplicationContext(), R.string.app_name, Toast.LENGTH_SHORT);
myToast.setGravity(Gravity.CENTER, 0, 0);
myToast.show();
}
});
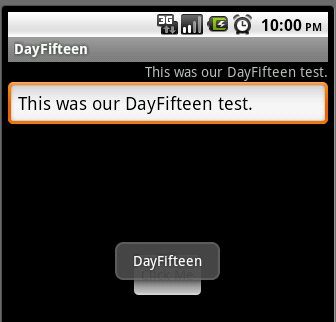
Now when you run your app and the second Toast appears, you should see it in the center:

If you wanted to make a slight adjustment to where the toast appears, the second and third parameters to setGravity will offset it for you.
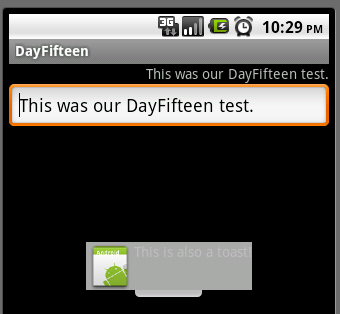
So now you know how to make Toasts appear and how to change where they are located and how long they show up. The last useful thing to know about them is that you can change their appearance. The setView method on the Toast object is used here. To do this, you need to create a new layout first. To do so, right click on the res/layout folder and go to new—>Other. Choose Android XML Layout File. You can leave it as a LinearLayout and name the new layout “toast_layout”. In this layout you could put just about whatever you want. Remember that you can’t have any user interaction so putting Buttons wouldn’t make sense. For now, add an ImageView and a TextView to your new layout:
<LinearLayout xmlns:android="http://schemas.android.com/apk/res/android"
android:layout_width="fill_parent"
android:layout_height="fill_parent"
android:orientation="horizontal"
android:id="@+id/newToastLayout"
android:background="#FFAAAAAA">
<ImageView
android:id="@+id/imageView1"
android:layout_width="wrap_content"
android:layout_height="fill_parent"
android:src="@drawable/ic_launcher" />
<TextView
android:id="@+id/textView1"
android:layout_width="wrap_content"
android:layout_height="fill_parent"
android:text="TextView" />
</LinearLayout>
You’ve already set the ImageView to be the ic_launcher icon but you still need to set the TextView’s text and use it to set the Toast’s view. To do this, go back to your DayFifteenActivity. In order to generate a view programmatically, you need to get an instance of LayoutInflater and inflate the layout by resource ID. Then you can find views within it just like you do with a normal activity via the findViewById method. When you’ve pulled out the TextView and set it’s text property, you can then pass it in to the setView method. Your new toast code should look like this:
Toast.makeText(getApplicationContext(), "This is a toast!", Toast.LENGTH_LONG).show();
Toast myToast = Toast.makeText(getApplicationContext(), R.string.app_name, Toast.LENGTH_SHORT);
myToast.setGravity(Gravity.CENTER, 0, 0);
LayoutInflater inflater = getLayoutInflater();
View toastLayout = inflater.inflate(R.layout.toast_layout,
(ViewGroup) findViewById(R.id.newToastLayout));
TextView toastTextView = (TextView) toastLayout.findViewById(R.id.textView1);
toastTextView.setText("This is also a toast!");
myToast.setView(toastLayout);
myToast.show();
Now when you run your app, your second toast will look like this:

Toasts are a simple and great way to get information to users. Now you should have knowledge to show them when you want, for how long you want, and make them appear how you want them to. You can download the final code from today’s app here.