 A couple weeks ago at a DevCamp in London, I gave a presentation on connecting mobile clients to Windows Azure Websites. Today I’d like to start covering some of the details of that talk.
Prior to Windows Azure Websites
Briefly, I’d like to cover the approach taken prior to Windows Azure Websites. Before being able to quickly and easily deploy a new website to Windows Azure, we instead would deploy Cloud Services to Windows Azure. If you were using the Windows Azure iOS Toolkit or the Windows Azure Android Toolkit, then you were more than likely using a Cloud Ready Package as your backend. These Cloud Ready Packages were prebuilt .NET web apps made for Windows Azure. They provided access to things like the Access Control Service (ACS) and Windows Azure Storage (blobs, queues, tables). They worked, and continue to work, very well if that is all you need them for. However, if you want to grow beyond the cloud ready package defaults, you’re in a bit of a pickle. You can certainly download the source code used to compile the Cloud Ready Packages (part of the Windows Azure Toolkit for Windows Phone), however, to enhance this at all, you need to know .NET. Furthermore, you’re going to need to be running Windows and Visual Studio. As an Android or iOS developer, that might be scary. That may be downright unlikely. Fortunately with Windows Azure Websites, we can move to a paradigm that doesn’t necessitate using .NET if you don’t want to.
Windows Azure Websites
With the release of Windows Azure Websites, it is now possible to create PHP and Node.js websites hosted by Windows Azure. Using Windows Azure Websites gives you access to many things including MySQL, MSSQL, caching, CDN, and Storage. In addition, you can deploy via FTP, Git, and TFS. It really is amazing how quickly you can get up to speed with Windows Azure Websites. If you’d like to do a full walk through of setting up a new Windows Azure Website, you should check out this hands on lab on GitHub which will walk you through the basic set up and publishing of a site. In addition, this tutorial on WindowsAzure.com will walk you through setting up a PHP site with a MySQL backend. The good news is that if you go through the second tutorial, you really won’t see a lot of new stuff in the backend I’m going to use for the URL Shortener in this article. It’s a PHP website with a MySQL backend as well. Prior to getting into the code, I would like to thank @Kehpin for the foundation of this application. It’s an adoption and slight modification to the URL Shortener he created using the Silex framework for PHP.
Creating our PHP Site

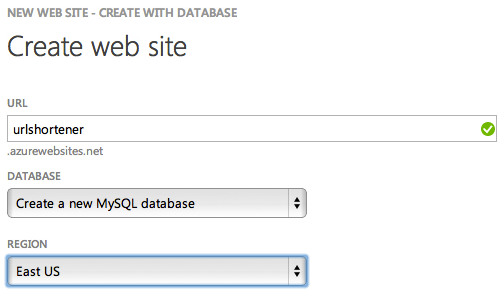
You’ll want to choose “Create with Database”. In the URL, you can enter anything you’d like. For the database, select “Create a new MySQL database” and then pick whichever region is closer to where you think your userbase will be. When you’re done, the form should look like this: 
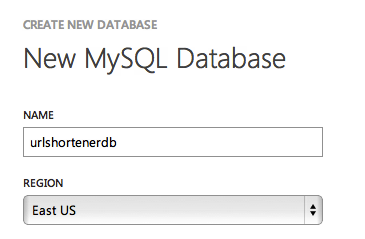
After hitting next, you’re given the option to name your database and choose a region for that. Make sure the region of your database is the same as your website. Since they’ll be talking to each other, you don’t want them to have to leave the DC. 
Once you’re done, click the checkmark and your site will be created. Within a few seconds, you should see your site go from starting to running in the site list. Click on your site and you’ll be taken to the dashboard. Here you’ll find a wealth of information. The first thing you’ll want to do is get the connection string information for your database, so click on the Configure link near the top: 
Scroll down the page until you get to the “connection strings” section:

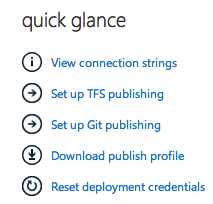
Either remember where to get that or copy it down for later. Now it’s time to set up Git publishing for your site. At the top, go back to Dashboard. On the mid-right, under “Quick Glance” you should see “Set up Git publishing”, click that. 
The page will say “Creating Git repository” for a few moments and then, it will finish and show you some important info. The first thing there will be your Git URL, followed by instructions on installing Git. Lastly, you’ll see how to create a local git repo wherever your files are and then how to add your new Windows Azure Website as a remote endpoint. Note that if the directory you have your files in is already a Git repo, you can (AND SHOULD) skip the “git init” step and proceed directly to adding the remote Windows Azure Git Repo to your existing repo. Once that is done, you can pull down this PHP code. Go ahead and unzip that and, if you’re familiar with hosting a site locally, put the files in a directory you’re hosting. If you’re not familiar, that’s ok and we’re going to mostly bypass that step. One thing to note, whether you’re familiar with Apache or IIS (both web hosting servers), there is a .htaccess and a web.config file in the root folder. If you don’t know what those are, they are both configuration files. They accomplish the same task which is to tell the server that all requests should go to index.php. The .htaccess is specific to Apache, and the web.config is specific to IIS.
Before setting up Git on your side, you will need to make changes to one file. Open up the src/Khepin/UrlShortener.php file. In this file, you’ll see these lines:
   //Local
   private $db_server = 'localhost';
   private $db_user   = 'phptestuser';
   private $db_password = 'phptestuser';
   private $db_name     = 'shorty';
This might work if you set up MySQL locally, but not for the one hosted by Windows Azure. Go ahead and replace those values with the connection string information you got above and then save the file.
Now, if you’re putting the files into a folder that is already a Git repo, skip the “git init” part and just add and commit your files to the repo. Otherwise, do the “git init” and then follow along with the add and commit. When that is done, add your remote and push.

One thing to note is that if you haven’t set up deployment credentials yet, you won’t be able to push. Click the “Reset your deployment credentials” link at the bottom of the Git web page and after that you should be fine. Now when you go to your site (if you didn’t copy down the URL, go back to the dashboard in the Windows Azure portal and it will be on the bottom right) you should be greated by a “Welcome to Shorty” message. There will be a link to view available URLs but, if you click on it, it won’t work right. The reason for this is that we haven’t set up the MySQL database yet. In order to do that, first ensure you have MySQL installed. If you’re running OS X, you should find MySQL in /usr/local/mysql. If you don’t, go ahead and install it. Afterwards, open up a terminal window and navigate to /usr/local/mysql. You’ll then need to connect to your database like so:
$cd /usr/local/mysql
$mysql --host=hostname.cloudapp.net --user=userName --password=password databasename
Just replace the hostname, username, password, and databasename with values from your connection string. Once that is done, you can create your database table. Copy and paste this into the terminal and hit enter:
  CREATE TABLE 'url' (
  'Id' int(11) NOT NULL AUTO_INCREMENT,
  'Name' varchar(45) NOT NULL,
  'Url' varchar(500) NOT NULL,
  'CreateDate' timestamp NOT NULL DEFAULT CURRENT_TIMESTAMP,
  PRIMARY KEY ('Id'),
  UNIQUE KEY 'Id_UNIQUE' ('Id')
  )
Your response should be something like “Query OK, 0 rows affected”. Your table is now created. Now if you go back to the website and click on the link to view your URLs, you won’t get an error but you won’t see anything. You still need to save a URL. To quickly add a new URL for testing, change the subdomain of this url to match your site:
http://subdomain.azurewebsites.net/add/my_key/ms?url=http://microsoft.com
If everything goes ok, you’ll get a success message and when you view the URLs you’ll now see that MS is the shortened version of http://microsoft.com. Huzzah! You can see it running live right now here. Site no longer running.
In the next article, we’ll briefly go over the code you just pushed to the server. Then, we’ll get to the fun stuff: our mobile clients!
For a free trial for Windows Azure Websites, sign up here.
- Android (79) ,
- .Net (34) ,
- Azure (83) ,
- Microsoft (8) ,
- Mobile (100) ,
- Phone (44) ,
- Programming (54) ,
- Web (39) ,
- iOS (71)
3 Comments
Oce CM4521
It's my 1st visit here.I am glad to read this nice article.This blog is very well written and I appreciate your efforts.. Keep up the good work.
online list management
It's so much important for me. I love this things.
Davis Delaney
This is very informative..and digestive as well even for the beginners like me....