 Today we’re going to wrap up our first Android client that connects to WIndows Azure Websites. If you’ve been following along, then as of now we have an app that displays a list of shortened URL slugs and will allow the user to tap in to see more details on them. Today we’re going to complete our app by giving the user the ability to add new shortened URLs from the app. You can download the code we left off with in part 7 here.
Let’s start by changing the default menu that was created when we created our project (again this is the latest version of ADT. If you are using an older version, a menu may not have been created for you. If you aren’t sure how to add a menu to your application, take a look at this article about options menus and base activities). Go in your res/menu/activity_main.xml file and change it from the default settings to this:
    <menu xmlns:android="http://schemas.android.com/apk/res/android">
        <item android:id="@+id/menu_add_url"
            android:title="Add URL"
            android:orderInCategory="100"
            android:showAsAction="never" />
    </menu>
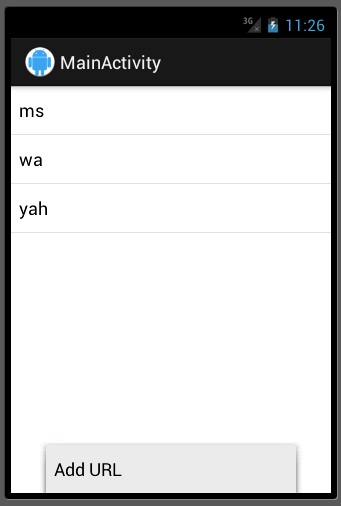
For brevity, we are putting the text for the Title right in the XML file. We really shouldn’t be doing this. Instead we should be using the strings.xml resource file so localization is easy to do. If you run your app and hit the menu button on the main activity, you should see the “Add URL” option appear at the bottom:

Now we need to wire that up to do something. We already have the UrlDetailsActivity which has most of the controls we’d need to create a new shortened URL. We should be able to reuse that activity for adding new URLs with some slight additions and modifications. Let’s look at the menu click listener first:
    @Override
    public boolean onOptionsItemSelected(MenuItem item) {
        switch (item.getItemId()) {
        case (R.id.menu_add_url):
            Intent urlDetailsIntent = new Intent(getApplicationContext(),
                    UrlDetailsActivity.class);
            urlDetailsIntent.putExtra("AddingNewUrl", true);
            startActivityForResult(urlDetailsIntent,1);
            return true;
        default:
            return super.onOptionsItemSelected(item);
        }
    }
This isn’t much different from what we do when a user taps on a URL slug. We’re creating a new Intent for the UrlDetailsActivity and we’re passing in an extra before we start it. Specifically, we’re passing in a new extra named AddingNewUrl. One minor difference is that here we’re calling startActivityForResult instead of startActivity. This let’s Android know that we’re expecting to get a message passed back when the UrlDetailsActivity finishes. Here I’m just using “1” as the code, but you’d probably want to define a constant somewhere and use that instead. Now let’s go ahead and go back to the other spot in MainActivity where we’re creating this intent and add our new extra there, but set it to false:
        ...
        //Load the details intent for this specific slug
        Intent urlDetailsIntent = new Intent(getApplicationContext(),
            UrlDetailsActivity.class);
        urlDetailsIntent.putExtra("UrlSlug", tv.getText().toString());
        //We need to get the Full URL somehow and send it as an extra
        urlDetailsIntent.putExtra("FullUrl",
                mUrlMap.get(tv.getText().toString()));
        urlDetailsIntent.putExtra("AddingNewUrl", true);
        startActivity(urlDetailsIntent);
        ...
We’ve just added the new extra here, other than that it is the same as what we were doing in the last article. Before we leave MainActivity, let’s implement a handler for when a result is passed back to the activity:
    @Override
    protected void onActivityResult(int requestCode, int resultCode, Intent data) {
        if (requestCode == 1) {
            final Intent serviceIntent = new Intent(Intent.ACTION_SYNC, null,
                    getApplicationContext(), UrlFetchService.class);
            // put the specifics for the submission service commands
            serviceIntent.putExtra(UrlFetchService.RECEIVER_KEY, mReceiver);
            serviceIntent.putExtra(UrlFetchService.COMMAND_KEY, UrlFetchService.PERFORM_SERVICE_ACTIVITY);
            //Start the service
            startService(serviceIntent);
        }
        else
            super.onActivityResult(requestCode, resultCode, data);
    }
If onActivitiyResult is called and the requestCode matches what we expect to get back from urlDetailsActivity (1) then we are repeating the code to pull the URLs from the server. Since the code to start our serviceIntent is the exact same as what happens in the onCreate method, this would be a good opportunity to refactor that code out into a separate method (if you download the source, you’ll see that has been done). Now we’re ready to start making changes in UrlDetailsActivity. First, we’ll add a new private field to track if we’re adding a new URL or not:
private boolean mIsAddingNewUrl;
Then in the onCreate after we get the Intent, we’ll pull that extra out and change what we’re doing according to that field’s value:
        ...
        //Get extra data from intent
        Intent intent = getIntent();
        mIsAddingNewUrl = intent.getBooleanExtra("AddingNewUrl", false);

        if (mIsAddingNewUrl) {
            TextView lblShortyUrl = (TextView) findViewById(R.id.lblShortyUrl);
            TextView lblGoToUrl = (TextView) findViewById(R.id.lblGoToUrl);
            lblShortyUrl.setVisibility(View.GONE);
            mTxtShortyUrl.setVisibility(View.GONE);
            lblGoToUrl.setVisibility(View.GONE);
            mBtnGoToUrl.setVisibility(View.GONE);
        } else {
            final String urlSlug = intent.getStringExtra("UrlSlug");
            final String fullUrl = intent.getStringExtra("FullUrl");
            //Set our text fields and disable them
            mTxtUrlSlug.setText(urlSlug);
            mTxtUrlSlug.setFocusable(false);
            mTxtFullUrl.setText(fullUrl);
            mTxtFullUrl.setFocusable(false);
            mTxtShortyUrl.setText("http://urlshortener.azurewebsites.net/" + urlSlug);
            mTxtShortyUrl.setFocusable(false);

            mBtnGoToUrl.setOnClickListener(new OnClickListener() {
                @Override
                public void onClick(View v) {
                    //Fire intent to view URL in web browser
                    Intent webIntent = new Intent(Intent.ACTION_VIEW);
                    webIntent.setData(Uri.parse
                            ("http://urlshortener.azurewebsites.net/" + urlSlug));
                    startActivity(webIntent);
                }
            });
        }
        ...
So if we are adding a new URL, we hide the Shorty fields and the “Go to URL” button. If we aren’t adding a new URL, then everything is the same. This is great, but we need to add a Save button to be used when adding. Let’s add that button at the bottom of our activity_url_details.xml file:
    ...
            android:text="Go To URL" />
        <Button
            android:id="@+id/btnSaveUrl"
            android:layout_width="match_parent"
            android:layout_height="wrap_content"
            android:text="Save URL" />
    </LinearLayout>
After that, go back to UrlDetailsActivity.java and add a new private member variable for this button. In the onCreate, where we are getting references to the other UI controls, get a reference to the new button and store it in the private variable. Then in the conditional, if we aren’t adding a new URL, hide the button:
        ...
        mTxtShortyUrl.setFocusable(false);
        mBtnSaveUrl.setVisibility(View.GONE);
        mBtnGoToUrl.setOnClickListener(new OnClickListener() {
        ...
If we are adding a new URL, let’s add a onClickListener and call a method to save the URL:
        ...
        mBtnGoToUrl.setVisibility(View.GONE);
        mBtnSaveUrl.setOnClickListener(new OnClickListener() {
            @Override
            public void onClick(View v) {
                SaveUrl(mTxtUrlSlug.getText().toString(), mTxtFullUrl
                        .getText().toString());
            }
        });
    } else {
    ...
Now we just need to implement that method. It turns out, we won’t do very much from this method. We don’t want to lock the UI thread by doing the network communication on it (as of API9, you actually throw an exception if you try). So, instead, we’ll create an AsyncTask and have it process the saving for us:
    protected void SaveUrl(String urlSlug, String fullUrl) {
        new AddUrlTask(this).execute(urlSlug, fullUrl);
    }
The AddUrlTask class is a private class within UrlDetailsActivity. First we have the constructor for it:
    private class AddUrlTask extends AsyncTask<String, Void, String> {

        private Activity mContext;

        public AddUrlTask(Activity activity) {
            mContext = activity;
        }
        ...
We need a reference to the calling activity later on, so our constructor takes that in. The stuff to the left of the extends AsyncTask dictates how the header for the doInBackground method will look. Here we’re saying that it will take in and return a String.
        @Override
        protected String doInBackground(String... params) {
            JSONObject jsonUrl = new JSONObject();
            try {
                jsonUrl.put("key", "my_key");
                jsonUrl.put("url_slug", params[0]);
                jsonUrl.put("url", params[1]);
            } catch (JSONException e) {
                Log.e("UrlDetailsActivity", "Error creating JSON object: "
                        + e.getMessage());
            }
            Log.i("UrlDetailsActivity", "JSON: " + jsonUrl.toString());

            HttpURLConnection urlConnection = null;
            try {
                URL url = new URL("http://urlshortener.azurewebsites.net/api-add");
                 urlConnection= (HttpURLConnection) url//
                        .openConnection();
                urlConnection.setDoOutput(true);
                urlConnection.setDoInput(true);
                urlConnection.setRequestMethod("POST");
                urlConnection.addRequestProperty("Content-Type", "application/json");
                urlConnection.setRequestProperty("Content-Length", "" +
                           Integer.toString(jsonUrl.toString().getBytes().length));
                byte[] bytes = jsonUrl.toString().getBytes("UTF-8");
                //Write JSON to Server
                  DataOutputStream wr = new DataOutputStream (
                              urlConnection.getOutputStream ());
                  wr.writeBytes(jsonUrl.toString());
                  wr.flush ();
                  wr.close ();
                //Get response code
                int response = urlConnection.getResponseCode();
                //Read response
                InputStream inputStream =
                        new BufferedInputStream(urlConnection.getInputStream());
                BufferedReader bufferedReader =
                        new BufferedReader(new InputStreamReader(inputStream));
                StringBuilder stringBuilderResult = new StringBuilder();
                String line;
                while ((line = bufferedReader.readLine()) != null) {
                    stringBuilderResult.append(line);
                }
                JSONObject statusObject = new JSONObject(stringBuilderResult.toString());
                String status = statusObject.getString("Status");
                return status;

            } catch (IOException e) {
                Log.e("UrlDetailsActivity", "IO Exeception: " + e.getMessage());
                e.printStackTrace();
                return "IOERROR";
            } catch (JSONException e) {
                Log.e("UrlDetailsActivity", "JSON Exception: " + e.getMessage());
                e.printStackTrace();
                return "JSONERROR";
            } finally {
                urlConnection.disconnect();
            }
        }
The params it takes in is actually an array of strings. So first, we pull the URL slug and full URL out of there. Next we build our JSONObject with those fields as well as the key. We create a HttpURLConnection and set it’s content type, HTTP method, content length, and specify that we’re doing both input and output. We then open the connection and write out to it. Then we read in the response. Finally, we put the response data into a JSONObject and return the Status field from that JSON. Lastly, in onPostExecute we have access to the UI again and can update it:
        @Override
        protected void onPostExecute(String status) {
            //Do something with result
            if (status.equals("SUCCESS")) {
                Toast.makeText(getApplicationContext(),
                        "URL Created Successfully", Toast.LENGTH_SHORT).show();
                mContext.finishActivity(1);
                finish();
            } else if (status.equals("Already Exists")) {
                Toast.makeText(getApplicationContext(),
                        "A URL with this SLUG already exists", Toast.LENGTH_SHORT).show();
            } else {
                Toast.makeText(getApplicationContext(),
                        "There was an error creating the Shorty URL(1): "
                        + status, Toast.LENGTH_SHORT).show();
            }
        }
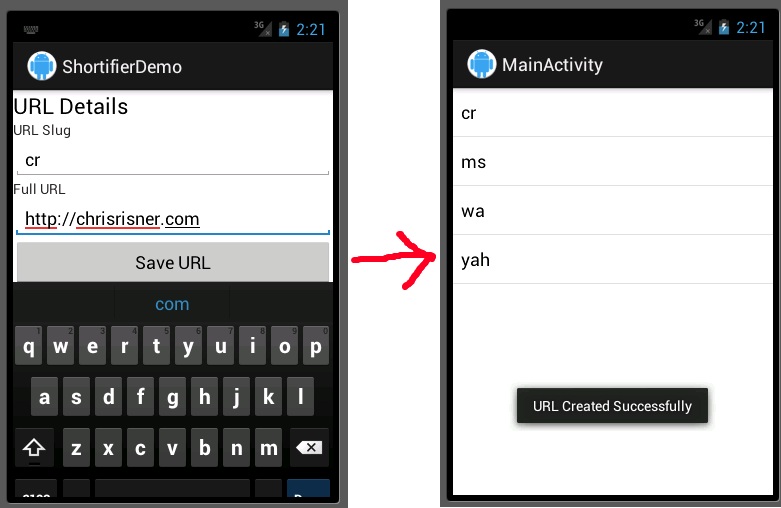
Here, if things were successful, we show a toast to let the user know that and then finish the activity with the requestCode we used earlier (1). Finally, if it wasn’t a success, we show a toast with a different message and don’t finish.

And that does it, our client is complete. There is a lot of room for improvement in this app. We’re not doing any validation on the URL slug or the full URL so the user could easily enter something that wouldn’t be valid on the server side (remember the web service runs a regex against the full URL to make sure it’s valid). There isn’t anyway to refresh the URLs on the list view (you could easily do this from another menu option if you wanted). However, the core functionality and integration with our Windows Azure Website is there. You can download the completed code from our Android client here.
For a free trial for Windows Azure Websites, sign up here.