
READ THIS FIRST
Update: 3-4-2016: If you're finding this blog and looking for information related to Azure Mobile Services, I'd strongly recommend checking out Azure Mobile Apps. Azure Mobile Apps is a new version (consider it a v2) of Azure's mobile backend support. All of the same features of Azure Mobile Services are there, with a lot of other very cool features to go along. You can read more about Azure Mobile Apps, and how to transition from Azure Mobile Services, here.Update 3-7-2015: While this approach does work, the most recommended way to store image files in conjunction with Mobile Services is to use Blob Storage. You can read a walkthrough of how that works here.
![]() Windows Azure Mobile Services have been blowing up in popularity since the release a few weeks ago. One of the questions I’ve received most frequently is if there is anyway to store images in Mobile Services. The answer to this is a little bit yes and a little bit no. Before proceeding, if you haven’t already taken a walk through of Mobile Services, I’d highly recommend reading through my earlier post on connecting Android to Windows Azure Mobile Services. The code I’ll show later in this article will build off the sample built in that post. If you want to skip all of the explanation, you can download the code for this sample from the savingImages branch in GitHub. If you decide to go right to the code, I would HIGHLY recommend reading the Disclaimer first.
Windows Azure Mobile Services have been blowing up in popularity since the release a few weeks ago. One of the questions I’ve received most frequently is if there is anyway to store images in Mobile Services. The answer to this is a little bit yes and a little bit no. Before proceeding, if you haven’t already taken a walk through of Mobile Services, I’d highly recommend reading through my earlier post on connecting Android to Windows Azure Mobile Services. The code I’ll show later in this article will build off the sample built in that post. If you want to skip all of the explanation, you can download the code for this sample from the savingImages branch in GitHub. If you decide to go right to the code, I would HIGHLY recommend reading the Disclaimer first.
Update: I finally had the time to create a sample that connects Mobile Services to Blob Storage which is a much better approach for storing images with Mobile Services. The way this works is that you request a Shared Access Signature (SAS) URL from your Mobile Service, the service talks to blob storage to generate the SAS and then returns it to your app, and then your app can upload the image bytes to the SAS URL safely. I'm leaving this post up for posterity but going forward I would highly recommend you follow the approach explained here (the Android client is linked from this article).
JSON and Binary Data
JSON, the data format that Mobile Services uses to send data across the wire, does not natively support binary data types so you can’t post JSON as a column in the JSON you send to the server. If you try, you’ll get back this from your post to the server:
"code":400,"error":"The value of property 'columnName' is of an unsupported type."
What is interesting is that if you manually connect to the SQL database that stores the data for you mobile service (using either SQL Server Management Studio or the Manage button in the Windows Azure portal) there isn’t anything to stop you from adding columns of unsupported types to the database. When I first wanted to look at storing an image in the database for Mobile Services, the first thing I tried was adding a Varbinary column to my table and pulling that down into my client. This actually works, kind of. When you query the table from your Android app the Varbinary column comes back looking like this in the JSON:
{"0":1,"1":35,"2":0,"3":0,"4":0,"5":0,"6":0,"7":0,"8":0,"9":0,"10":0}
So you’re literally getting an array back of the bytes. As you can imagine, this wouldn’t really be ideal for taking and then reconstructing into an image. The bigger problem, though, is that you can’t post image data back to the server in the same format (you’ll get the error mentioned above). However, in trying this, I struck on another idea which does work.
Disclaimer
While the method I’m about to describe will work, I wouldn’t recommend it unless you know what you’re doing. You’re better off with hosting a service in Windows Azure Websites which will get you a Shared Access Signature (SAS) for secure uploading to Windows Azure Blob Storage and then saving the blob’s URL to your Mobile Services database. If you’d like to take a look at doing this, you can read this series about mobile geolocation apps which talks about getting a SAS URL from a PHP service (running in Windows Azure Websites) and then uploading the image. The debate about whether or not you should even store image data in a database is much to large to even be touched upon here but hopefully with this disclaimer in mind, you’ll know how to proceed.
The Solution
The solution I’m going to explain today is to use a varchar (string) column to store the base 64 encoded string representation of an image in the Mobile Services database. Since Mobile Services is more than capable of handling string type data, it will treat this as such and now even realize it’s storing image data. We’re going to be basing our code off of the sample mentioned above. You can grab the code without any of the changes we’re about to do from the master branch of this GitHub repository.
Changing the UI
The first thing we need to do is alter our user interface to facilitate the images. Open up res/layout/activity_todo_details.xml. We’re going to add an ImageView to the bottom of the xml and a new button for selecting images right above the “Mark Todo Complete” button. When you’re done, the XML will look like this:
With that done, we just need to wire things up in the backend.
Picking an Image
Open src/com.msdpe.mymobileservice/TodoDetailsActivity.java. Let’s start by adding private variables to our class to store a reference to the new button and ImageView as well as something to track the image URI:
After that we can go into onCreate and set those variables.
We’re also checking to see if we should hide the “Pick Image” button (when the user views a todo item that was previously created). Next let’s add an onClickListener to the “Pick Image” button to make it call another method:
The pickImage method creates an ACTION_GET_CONTENT intent and tells it we’re looking for “image/*”. We start this using startActivityForResult so it knows that we expect to do some processing when it’s done. This will load the gallery so the user can select an image. When they’re done, we’re going to need to handle it in the onActivityResult method:
Here we check to make sure the requestCode matches what was sent in previously (you’d probably want to define a constant for this instead of using an in-place number). After that, we get the URI for the image selected and use that to set our private variable as well as the URI of the ImageView (which will cause the image to appear). Now when we run our app and hit “Pick Image” and select something, we should see it appear:

Saving images
Now that we’re able to select images, let’s save them. Go to the saveTodo method. Here we want to get the bytes for the image and base 64 encode it before sending it over to the SaveTodoTask, if there was an image selected of course.
Note that we have to use a contentResolver in order to get access to the file’s absolute path and then it’s bytes. Once we do, we can read that into a byte array and then encode it using the Base64 library. The next method we need to look at (and the last for saving) is the doInBackground method in the SaveTodoTask class. We’re just going to modify the beginning of this method to handle adding the image data into the JSON object we send to the server, if necessary:
We’re using the column name “coltest” here though you could name this anything you want (thanks to Mobile Service’s dynamic schema). Now if you run your app and select an image prior to saving a new todo item, you shouldn’t see anything function any differently as before. Let’s fix that by showing the images.
Loading images
To load images, we need to first jump over to TodoListActivity.java. In the onCreate method, alter the list view’s onClickListener so that when it creates the intent to open TodoDetailsActivity, it also sends over whatever is in the “coltest” column:
One important thing to note here is that there is a size limitation to how much data you can send over in an intent. If you try to send over to much, you may see an error in your console that says “FAILED BINDER TRANSACTION”. If this happens, try using a smaller image. If you did need a way to use larger images, you could use a static field on the activity class or look at storing the data in a custom Application class. Let’s hop back over to TodoDetailsActivity.java and finish loading the image. The only thing left to do is alter the onCreate method so that if an existing todo is being loaded, we attempt to set the image if necessary:
If the “image” extra was sent over, we using Base64 to decode it into a byte array. We then create a bitmap using the BitmapFactory and use that to set the ImageView.
Running the app
When you run your app, you should be able to select an image and then save your todo item. When you tap back into that todo item, you should see the image along with the title:

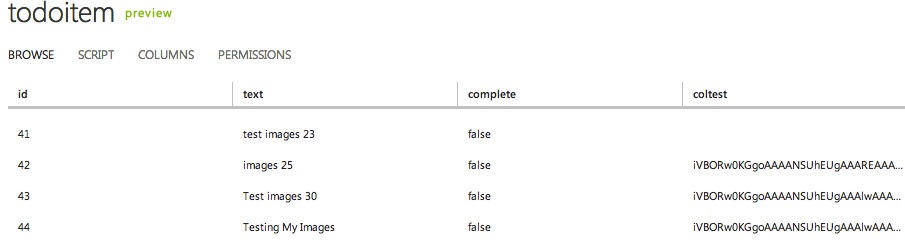
Additionally, if we log into the Windows Azure portal and go to our mobile service’s data page and view our table data, we can see that the string representation of our data is showing up in “coltest”:
Conclusion
Today we walked through one way to store images with Windows Azure Mobile Services. As noted in the disclaimer, this technique shouldn’t be used without some consideration. If you do decide to use it, one way you could mitigate long load times (you may have noticed this sample running slower due to the data being returned when it selects all of the todos) is to only select the non-image columns when you are pulling data for the TableView and select the full todo item (including the image) when the user taps into a todo. This still doesn’t solve some of the problems like increased database bandwidth and size, but it is a way of solving the problem. You can access the completed source code for this demo under the savingImages branch of this GitHub repository (just remember that you’ll need to configure your app in the Constants.java file).

20 Comments
Albert
Thanks for the great tutorial. When I install the app, it generates two application icons. However, deleting one, deletes the other one as well. Is there a specific reason for this? Or is there a quick fix?
Chris
Hi Albert. So when you install the application to an emulator or a device, you see it twice in the app list? This sounds like it may be an issue with the emulator as I don't think there was anything different about this app then any other with Android that only installs one version to the emulator.
Albert
When I installed the application to the emulator, I only saw one app icon, but when I installed the app to my phone, two icons showed up on the app list. One of the icons opens an empty version of the app that could not refresh or add new tasks. The other icon opened the app with all the functions working. When I deleted the app icon for the app that didn't do anything, both apps were deleted.
Chris
Sounds like an issue on your emulator. I've never seen that before when deploying any Android apps.
angel
Hi. i would like to ask where do i get my subdomain from? i only managed to see my app key and master key
angel
i downloaded the source code and attempt to run on my android emulator. However when it managed to run, all i see a is blank UI with a header and nothing else.
Chris
The subdomain is the name of your mobile service. You can also access the full url if you go to the Dashboard area in the Windows Azure Portal after selecting your Mobile Service.
Chris
I recommend not following the approach outlined in this article and instead following the one found here instead: http://chrisrisner.com/Mobi.... I've updated the statement at the top to point people in that direction instead of trying to store byte data in Mobile Services.
angel
thanks for your reply. So i assume that all the 3 url links are the same?
angel
thanks. shall try it out and get back to you.
Chris
Sorry, which 3 url links?
angel
sorry. i think i have mixed up the tutorial link.
I have sent you an email. Is there any way i can message you? maybe like facebook? because i am facing difficulties in integrating my application together.
Chris
Let me take a look at your email and get back to you.
Justin Adkins
Any idea how to do all of this in C# on Windows Phone 8?
Chris
The bulk of the code found here will work for you: http://code.msdn.microsoft....
hira aftab
how can we do that in windows phone 8 same as using mobile services?
Chris
Take a look at the comment right below yours or take a look at this article: http://azure.microsoft.com/...
Rizo Xuxochrist
Hi!! Thanks for your tutorials!! they are awesome!!
I have a dbout: I have downloaded your full code and tested the app on two phones (android 4.1.2 and 4.2) but I can´t see the loaded image on none of them (nothing appears), and when I click the "Mark ToDo Complete" button it sends me this error: "there was an error updating the Todo: 400"
Could you help me please?
Thanks!!!
Chris
I would strongly suggest ignoring this code and looking at my samples that show using Azure Mobile Services as a proxy to talk to Blob storage and upload image files to that. http://chrisrisner.com/Andr...
Dogiparthi Praneeth
it is throwing an error help me
java.lang.IllegalStateException: Couldn't read row 0, col -1 from CursorWindow. Make sure the Cursor is initialized correctly before accessing data from it.