
In the recent past, I’ve had to send instructions over to a few different people on how to get an Android Virtual Device (AVD) up and running and install an APK for testing or demoing purposes. For the majority of these people, there really was no need for them to install Eclipse and have to figure out how to load an Android project into it, compile it, and push it on to an AVD. Thankfully, it’s entirely possible for these people to avoid having to install Eclipse. It does require some (questionably) more manual work, but I’ve outlined the steps below to accomplish this. Note that these instructions will work the same on Windows, OS X, or Linux, the only difference is the directory the SDK is unzipped / installed to and the command line calls. I’ll try to outline below where things are different from the given Windows step.
- Go to http://developer.android.com
- Click link to Download
- Choose the EXE installer (this will install into C:\Program Files (x86)\Android\android-sdk by default. Note that in OS X / Linux, you’ll actually get a zip which you can unzip anywhere you choose (I usually put it under a code folder in my personal directory)
- I would recommend downloading before you install. If you run the installer and don’t already have a JDK installed, it will prompt you to install it and then exit. This means you need to find the temporary file if you don’t know where it’s auto-downloaded to.
- Run the installer
- If you’re prompted to install a JDK now, follow the instructions on the installer
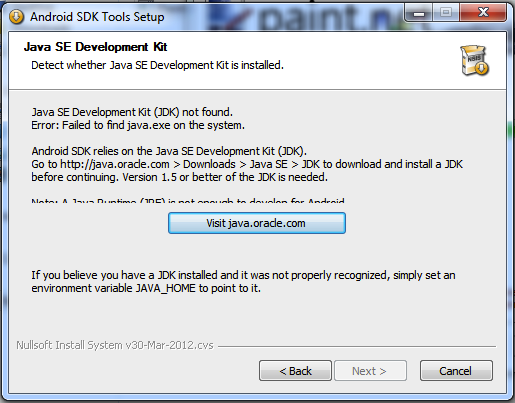
- You’ll probably need to restart the installer after installing the JDK.
- When the installer finishes, it will start the SDK Manager by default, allow it to do so.
- The SDK Manager will launch and start poll to get a list of packages you can install.
- This will allow you to install different versions of the SDK. This is necessary for emulating different version of the Android OS.
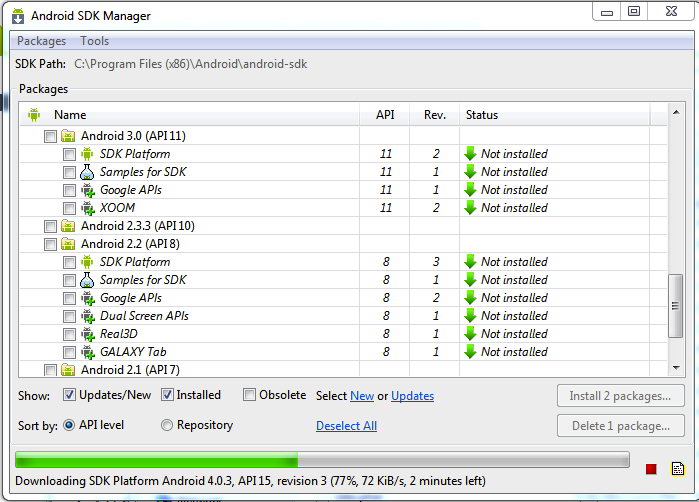
- Depending on which versions of Android your application supports, you may need to install several different SDKs.
- SDK Platform is the base SDK. If you want to run a non-Google version of Android, you can stick with just SDK Platforms
- Google APIs enhance the base SDK Platform for each version and are required to run some specific features (Google Maps, C2DM (now Cloud Messaging), etc).
- Samples for SDK are only necessary if you’re going to install sample apps.
- The rest of the packages are different specific system images. For example, if you wanted to develop against a Xoom image, there is one you can download from there (most of these special images REQUIRE you to have a login with the manufacturer’s portal to install).
- For now, download at least the SDK Platforms and Google APIs you think you’ll need. For example, if I wanted to download the 4.0.3 emulator image and the 2.2 emulator image, I would grab the following:
- Android 4.0.3 (API15) / SDK Platform
- Android 4.0.3 (API15) / Google APIs
- Android 2.2 (API8) / SDK Platform
- Android 2.2 (API8) / Google APIs
- Note that if you have trouble either getting the list of packages or installing a package, you can try going to the Tools menu and then Options. In the Options window, under “Misc”, there is an option to “Force https://... sources to be fetched using http://”. Sometimes in the past I’ve had issues (probably firewall problems) getting things through https. This usually fixes it.
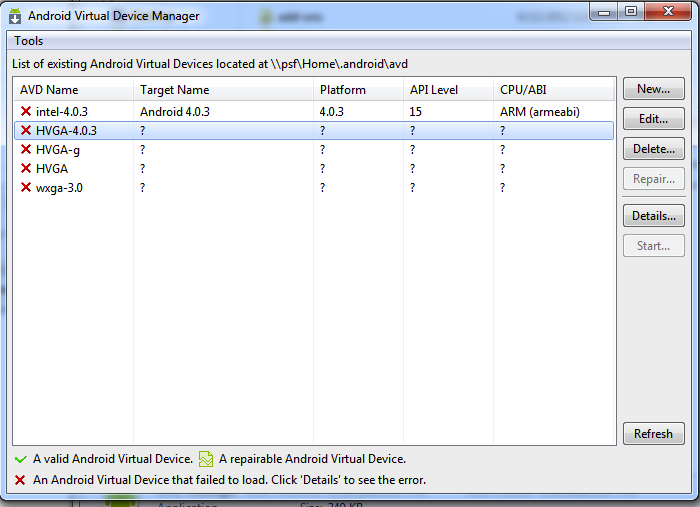
- Once you’ve installed the packages, you have two options to create Android Virtual Devices (AVDs). In the SDK Manager, go to the Tools menu and choose “Manage AVDs”. Alternatively, you can navigate to C:\Program Files (x86)\Android\android-sdk and open the “AVD Manager”.
- The New button in the top right will enable you to create a new AVD. Here is a filled out form to create a new 4.0.3 emulator image:
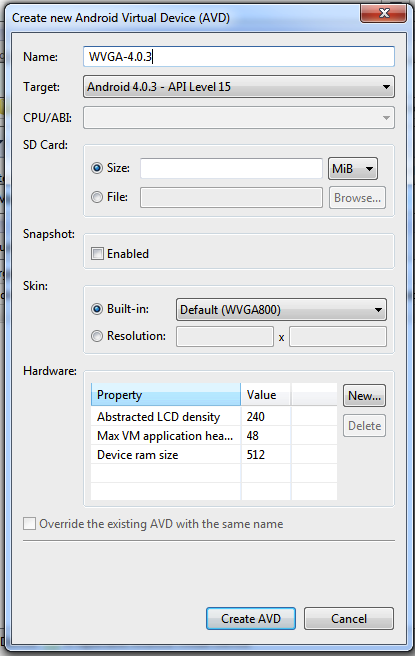
- Note that if you’re going to do something which requires an SD card (like save images from the browser so you can access them in the gallery) you’ll need to set a size in the SD Card field when you create it, or use the AVD Manager to go back and edit the AVD.
- You should now be able to start the AVD. Now you just need to be able to access it and install program files (APKs) onto it.
- Open a Command Prompt (go to the start menu and type in “Command Prompt”, it will come up) (for OS X, you want to start the Terminal and calls below should start with a “./”).
- Navigate to the Android Platform Tools directory (C:\Program Files (x86)\Android\android-sdk\platform-tools)
- If you’re not familiar with the Windows Command Line, type in “cd C:\Program Files (x86)\Android\android-sdk\platform-tools” and hit enter.
- If you type in ADB and hit enter, you’ll see a lot of text flash by. ADB is the program you’ll use to do most of your interaction as far as installing and uninstalling apps on the emulators go. It’s command line driven and not the easiest thing to use, but it still gets you out of having to install Eclipse.
- ADB stands for Android Debug Bridge and it’s meant to be used as a command line driven debug tool for Android emulators (and devices). Using it you can terminal into the emulator image while it is running to do many different things.
- If you run a command that should affect an emulator / device (such as installing an APK) and there are multiple devices connected, you’ll get this error: “error: more than one device and emulator”. You must then use the -s <serial number> parameter to specify which device you want the command to affect. So, the install command below would become “adb -s <serial number> install <filename>.apk
- Some of the simple commands ADB can do (remember to start your command with “./” in OS X):
- adb devices // lists all currently connected / running devices / emulators
- adb install <filename>.apk // installs an apk to the only connected device
- It’s worth it to note that if the same version of an APK is already installed, you won’t be able to install it again and will get “Failure [INSTALL_FAILED_ALREADY_EXISTS]”
- adb uninstall <package> // uninstalls a specific package on the only connected device
- Here, the package name is NOT the same thing as the name of the APK file you used to install from. This is the actual package of your application, such as com.google.example.
- adb pull <remote> <local> // Copies a file or directory from the computer (remote) to the device (local)
- There are many other things you can do with ADB as described here. There is an additional utility you can use which makes many of the debug commands easier.
- DDMS (Dalvik Debug Montior Service) is a debug tool which offers a plethora of information.
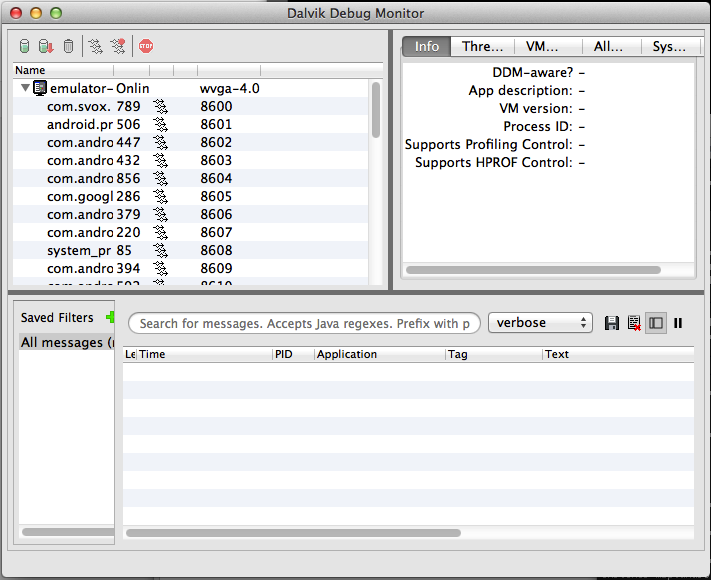
- After starting DDMS, you’ll see a list of the devices / emulators running in the top left with all of their running processes beneath them.
- Once you’ve selected a device, you’ll see a debug log in the bottom half of the screen. This is called LogCat. You can add filters to LogCat (left side of the bottom half of the screen) to view only logs for specific things (such as for a specific app).
- The top right portion of the screen allows you to see specific information on a device / selected process. In addition, using the “Emulator Control” tab, you can set specific network statuses on a device, fake an incoming phone call, or even set the phone to be at a specific location (for GPS testing).
That should be enough to get you started with testing APK files out on an emulator or a device.

5 Comments
copier parts
Wow!
Excellent read, I just passed this onto a colleague who was doing a little research on that. And he actually bought me lunch because I found it for him smile So let me rephrase that.
Николай Филипов
Um, where/HOW do I see the virtual device actual screen? (Display)
Chris
Open the Android Virtual Device Manager, select a device, and then hit the Start button on the right side of the window.
Balaji Raghav
Can we generate virtual load for android application using emulator? Tanx in advance
Chris
What type of load? Load on backend services or load on the device (i.e. lots of tapping)?