
 In the previous article in this series, we walked through creating an iOS app, adding a mapview to it and displaying points of interest on it. When the user’s location changes and when the app first loads, we communicate with the PHP service we set up in the first article, to get all of the points of interest within a number of meters from a certain latitude and longitude. Today we’re going to look at adding new points of interest. This actually involves an interesting dance between the client application and the cloud. We’ll discuss that first.
If you haven’t already done so, you’ll need to go through part 1 in this series to set up a Windows Azure Website running the PHP service. To do this you will need to have a Windows Azure account. If you don’t already have a Windows Azure account, you can sign up for a free trial here. Once you’ve deployed that site, you can come back and proceed with this walkthrough.
If you would like to jump ahead and just pull down the source code, you can access it in this GitHub repository. Note that you’ll still need to follow the instructions in the readme and configure your app. One final note: this walkthrough was done with iOS 5 and the Map View element provided by it. I haven’t tried running it on an iOS6 beta yet and that does have new mapping capabilities. This steps described below may need to be altered slightly to work with iOS 6 maps.
How do we add a point of interest
In order to upload an image or video and tie it to a point of interest in our backend, we have to communicate with two different server components: our Windows Azure Websites PHP service and Windows Azure Blob Storage. Let’s look at a diagram of the steps to do this and then discuss them:
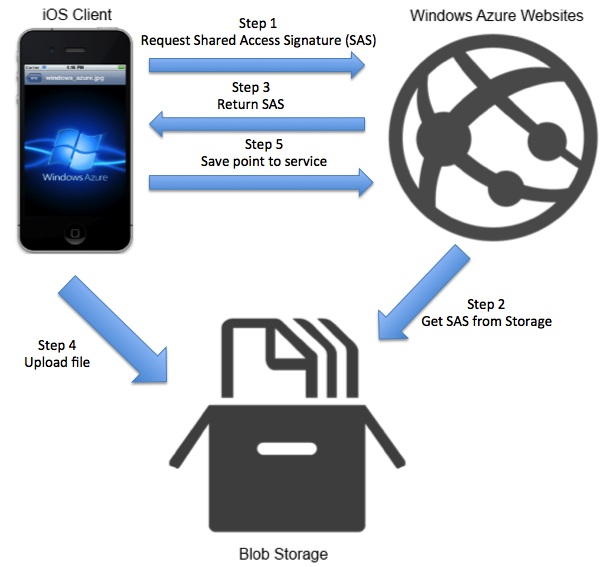
The first thing we need to do is have our client app communicate with our service running in Windows Azure Website and request a Shared Access Signature (SAS).
A SAS is a way around needing to have the account name and key of our storage account on the local device. If you were to put the account name and key in your client app and someone was able to pull those details out, they could then upload and access whatever they wanted in your storage account. The way around this is by using the SAS. A SAS is created to give an application the ability to upload a file to a storage account without having the name or key. Instead, a server side component has the name and key and requests the SAS from the storage account. This SAS is a URL which expires after a certain period of time (chosen by the server side component) and gives a client application the ability to upload a single file.
So, our client app requests the SAS from our website. The website talks to our storage account and gets the SAS. The SAS is then returned to the client application. The client app can then use the SAS URL to upload a file. After that is done, we save the point of interest (with a reference to the URL of the item uploaded to storage) inside that point of interest. Let’s get to our code and see how we can accomplish this.
Let’s code
Open back up Xcode and your solution we left off with the last article. As a reminder, right now the app is capable of showing the user’s current location (on a device, on the simulator you need to fake your location using the Debug menu) and the points of interest in the area of the user. As we did before, we’re going to do some plumbing to start. Open up the Constants.h file and we’re going to add some new constants for the URLs for fetching the SAS and uploading the POI in addition to a container name which we’ll also use for uploading the file to storage:
Now let’s switch over to Constants.m and define these values:
Make sure you replace the “yoursubdomain” with the site URL you set up when you uploaded your PHP service in the first article. The container name corresponds to a test container we created in that same article. Now, add a new Objective-C class to your project named StateObject. The header file for this new object just has two properties:
The first is for a callback block and the second is a data object to contain retrieved data. In the implementation file, we just synthesize these properties:
This class will be used to help us with our HTTP requests in just a moment. Let’s add a new Objective-C class named ServiceCaller. This class is going to be used to perform any HTTP requests we’ll be doing in the rest of our application. It’s going to wrap to do any wrap calls to NSURLRequest (really NSMutableURLRequest). Let’s look at the header file:
First we have a private variable which will keep track of different StateObjects for multiple requests. Next we have an init method and a method to handle starting and performing any HTTP requests. The implementation file, ServiceCaller.m, has a lot of code to go through:
First the init method which initializes the callbacks object. Next is postToUrl. This method acts as a catch all for any sort of HTTP request (yes we could pass in other optional parameters and expand this, but for today’s work, it will do). As parameters, we can specify the URL to connect to, the data to post (optional), the type of HTTP request, the content type (optional), and a callback block. We generate our NSMutableURLRequest and set any necessary parameters. Then we start a NSUrlConnection. Lastly, we save this information to a StateObject and put that in the callbacks object. The reason we’re using the StateObject and saving it like so is that it makes this class capable of handling multiple requests at the same time. The key we use in the callbacks object is the hash of the connection. So later in the file, when we receive data back, we can tie that back to the StateObject specific to the request by using the hash.
The next few methods are all part of the NSUrlConnectionDelegate protocol. First in didReceiveReponse we just check the response code for an error and log it. In didReceiveData, we pull out the StateObject using the connection’s hash and then append the data that was received. In didFailWithError, we log the error and then remove the StateObject from callbacks so we’re not leaving memory out there and the connection is now dead. Lastly, in connectionDidFinishLoading, we pull out the StateObject and call it’s callback block before removing the StateObject from callbacks.
Also, add a new Objective-C class to your project, make it subclass UIViewController and name it NewPOIViewController. We won’t edit that file now but need it for part of our UI work.
Changing the UI
Now that we’re done with the plumbing, let’s alter our UI so we can add a new point of interest. Open up MainStoryboard.storyboard. We left off with a single view tied to ViewController. Go ahead and select that view and go to the Editor menu and choose Embed In and Navigation Controller. You should see your storyboard change so now there is a Navigation Controller which points right to your view controller. A NavBar has also been added to your view controller. Zoom back into your view controller and drag a Bar Button Item from the UI element selector in the bottom right panel to the top right of your view controller’s navbar. This button will by default have the title “Item”. In the Attributes Inspector at the top right of the utilities pane, choose the Identifier drop down and select “Add”. You should see the button change to having a Plus in it.
Find the View Controller in the UI elements panel and drag one onto your storyboard. This is what we’re going to use to handle adding a point of interest. Make sure your new view controller is selected in the storyboard editor and go to the Identity Inspector in the Utilities pane. In the Class dropdown, select NewPOIViewController. Now we’ve connected the view controller in the storyboard to the controller we created in our code. Control + Click and drag from the Plus button in your original view controller’s navbar and drag over to your new view controller and release. In the dialog that pops up, choose Push. If you run your app now and tap on that button, you should see the second view controller show up. Let’s set up our UI on that view controller now. Drag the following UI elements onto your view in this order: a Round Rect Button, an Image View, another Round Rect Button, a Label, and another Round Rect Button. For the first button, make it’s title “Select image”. The second button’s title should be “Get SAS URL”. The third button’s title should be “Post POI”. The text of the label can be “SAS URL:”. When you’re done, your storyboard will look something like this:

Now select your NewPOIViewController in the storyboard and open the Assistant Editor. You’re going to want to Control + Click and drag from the buttons, image, and label to your code and generate Outlets for the ImageView, label, and the Get SAS and Post POI buttons. You also want to create Actions for all three buttons. Creating outlets and actions for the buttons will require doing the Control + Click and drag twice for these elements. When you’re done, close the Assistant Editor and open the NewPOIViewController.h file in the normal editor. On top of what you’ve already added, we’re going to make the class implement the UIImagePickerControllerDelegate protocol and add private variables for an instance of ServiceCaller and a NSString to store the SAS URL. When you’re done, you’re class will look like this:
Now it’s time to do all the implementation.
Implementing the New POI View Controller
Open up NewPOIViewController.m and let’s start connecting to our service. In the viewDidLoad method we’re going to disable the Get SAS and Post POI buttons so the user can’t tap them until we want them to and we’ll also initialize the ServiceCaller object we’ll use for all our web requests:
Next we’ll handle tapping on the select image button as well as the image picker callback:
When the user taps select image, we create a new UIImagePickerController, tell it to look at the photo library, and set it’s delegate to be the NewPOIViewController. Finally we present the picker to the user. In the callback, we are setting the ImageView’s image to whatever the user selected, dismissing the picker, and enabling the get SAS button. Next we handle when the user taps get SAS:
First we are generating a NSString with the current time in ticks. This is used as a unique name for the SAS URL file we’ll upload. We then use ServiceCaller to post to our PHP service and request a SAS URL. We pass in the code that should be executed when that request to the server is finished. In that code block, we are setting the label to whatever the URL that came back is, saving the URL locally into the sasUrl variable (after we remove the quotes), disabling the get SAS button, and enabling the post POI button. The last thing we need to do is handle posting a POI:
This looks more complicated than it is. First we get an instance of UIImage to store the image and get a NSData object with a PNG representation of the data in it. We then use ServiceCaller to post the image data to Windows Azure Blog Storage using the SAS URL we got in the previous step. The callback for that will set the label to be that call’s response first. We then get the URL string with out the SAS specific stuff and store it into poiUrl (this is the public URL of the object that we can go to in a browser to view our image). Then we build a NSDictionary with all of the data for our point of interest: the image name (defaulted to “My Image”), a UUID (dynamically generated by the method at the bottom), the latitude and longitude (fetched from NSPreferences), a type (defaulted to “1” for image), and the URL to the image in blob storage. We then use NSJSONSerialization to serialize the data into an NSData object. We use ServiceCaller again, but, we’re posting to our PHP service this time with the JSON data describing our point of interest. Finally in that post’s callback, we are popping the view controller so the user will return to the map view.
Running the App
When I ran the app yesterday, my current location was in downtown Seattle, Washington. I’ve altered that today to be just east of that position. Now when we run the app and tap the Add button in our NavBar, we can follow this flow:
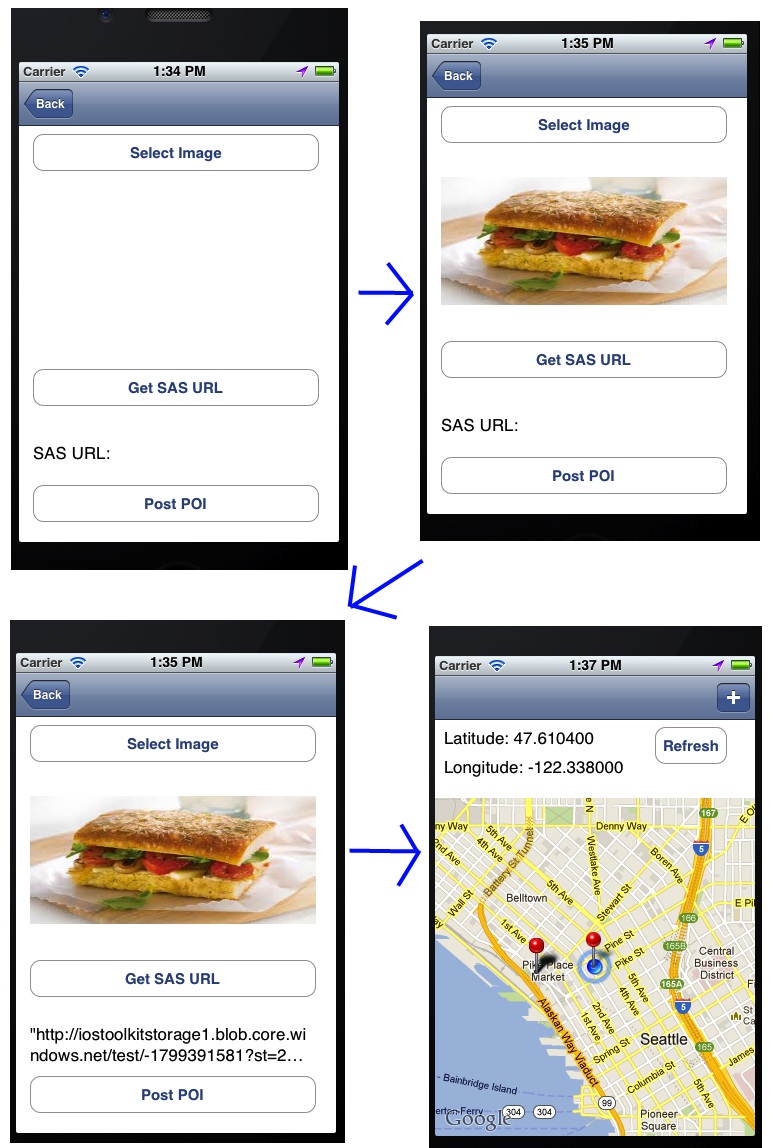
We select an image first. Then we get the SAS URL. Finally we post it (which handles both uploading the image to blob storage and the point of interest data to our service). With that done we return the user to the map and refresh the points of interest near our current location. Now we see that the original point from yesterday and our new point are showing up.
Conclusion
Today we finished our iOS Geolocation app. In doing so, we made more connections to our PHP service running in Windows Azure Websites in addition to using Windows Azure Blob Storage for storing images. We also saw a fairly nifty way to handle doing web requests that will handle their own callback code without continually having to implement NSUrlConnectionDelegate. I hope this has proved informative and has given you some solid understanding of how to create iOS applications with geolocation components powered by Windows Azure. As mentioned at the top, you can access the source code for the full version of this app on GitHub. Remember to configure the subdomains in the Constants.m file before trying to run it.
