READ THIS FIRST
Update: 3-4-2016: If you're finding this blog and looking for information related to Azure Mobile Services, I'd strongly recommend checking out Azure Mobile Apps. Azure Mobile Apps is a new version (consider it a v2) of Azure's mobile backend support. All of the same features of Azure Mobile Services are there, with a lot of other very cool features to go along. You can read more about Azure Mobile Apps, and how to transition from Azure Mobile Services, here. With all the excitement over Windows Azure Mobile Services, one of the questions we get frequently is how to connect Mobile Services to an existing database. It turns out that this isn’t very hard to do but may require some changes to your database. Today I’ll walk you through taking a database hosted locally in SQL Server, pushing into Windows Azure SQL Database, and connecting it using a Mobile Service. If you’d like the quick explanation with out all the pretty pictures and moving from a local DB to Windows Azure, you can check out Paul Batum’s answer on the MSDN forums (I didn’t find this until after I had figured out all of the below).
In order to use Mobile Services, you’ll need a Windows Azure account. You can sign up for a free trial here. While in preview, Mobile Services stay free even when the 3 month trial of the other features of Windows Azure expires.
Changing our Local Database
Let’s start by loading our local database and looking at the changes necessary. You can follow along by creating our sample database on your own server. You can use this script to do so. This database is meant to store the data for a blog website. Specifically, it has a table to store Users and a table to store entries. It’s a very simple database but it will suffice for what we want to do.
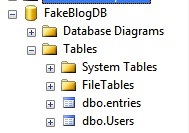
Notice that the tables begin with “dbo”. This is the schema of our database. When a table is created in Mobile Services, it sets the schema to be the name of the mobile service. Later in this walkthrough, we’ll create a mobile service named “fakeblog” so we’ll create a new schema here to match that. We can accomplish this in two ways: through the UI of SQL management Studio, or executing a query. I’ve linked to instructions for creating the schema through the UI. Once that is done you’ll need to go into design mode on each table and change it’s Schema property. Alternatively, you can execute this SQL script:
One thing to point out is that you’ll need to have CREATE SCHEMA permissions for this to work. With that done, there is one more change we need to make to both tables. If you look at the tables, you’ll see that both of them have a column named “id”.
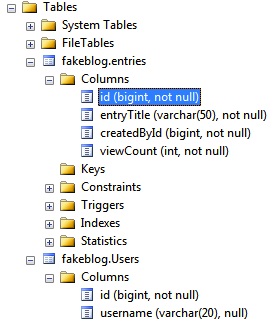
This is great because Mobile Services REQUIRES that each table have a column named “id”. However, we also need this column to be a Primary Key column (in addition to it being a non-null Identity) field. We can solve this with a quick script:
Now our DB is ready to be ported to Windows Azure SQL Database.
Moving the database to the cloud
Thankfully, SQL Server Management Studio 2012 has a wizard to easily make this happen. In SQL Server Management Studio, right click on your database and Tasks and select Deploy Database to SQL Azure. The first screen that will appear (if this is the first time you’ve used it) will be informational and will explain what you’re doing. The next screen will look like this:
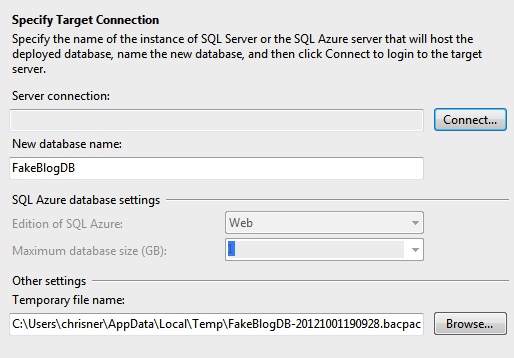
Clicking the “Connect” button will launch the usual connection wizard you see when first launching SQL Server Management Studio. For this to work, you’ll need to have already created a database in the Windows Azure portal as well as granting firewall access. Once in the portal, select your database and click the “Manage” button at the bottom:

When you do that, the first thing that happens is the server checks your IP address to see if it’s on the list of IPs that are allowed. You’ll see two popups show up at the bottom of the screen to add your current IP, go ahead and click yes on each.

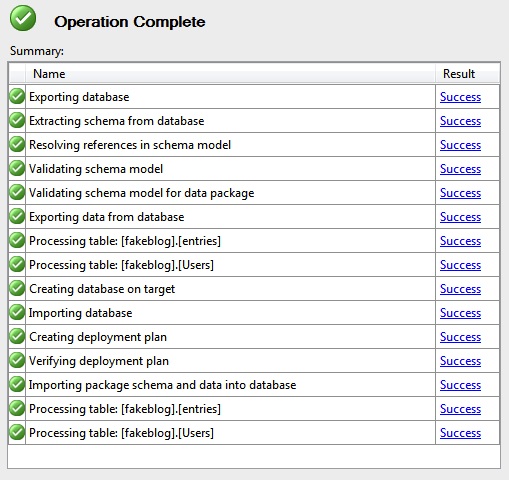
Once you’ve done that, you’ll be able to connect to your SQL Database server from your local SQL Server Management Studio client. Go back to the Deploy Database to SQL Azure wizard and connect to the server (you can click a link to view the credentials in the same screen in the portal). When you tap through, you should see the operation start and after a few seconds it should complete.
Connecting your mobile service
Now let’s return to the Windows Azure portal and set up our new mobile service. Once you’re in, go to + New at the bottom and select Compute -> Mobile Service -> Create. Make sure you enter a name that matches the schema you created for your database tables earlier (in our case fakeblog):
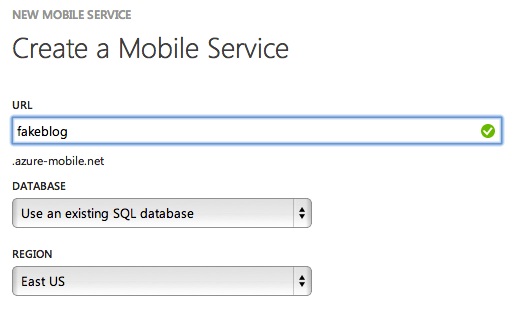
At the next screen in the wizard, select the database you uploaded and enter the credentials for it (these will be the creds for the database server):
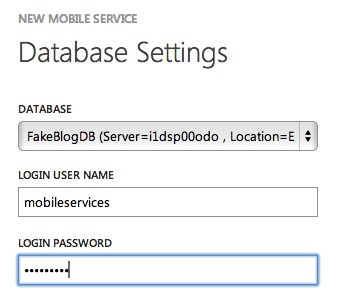
Now, go into your mobile service and select the Data tab at the top. When you do so, you’ll see that you don’t have any tables. This happens because we need to “tell” mobile services about the tables we already have. Go to the + Create button at the bottom when on the Data tab and enter the names of your tables (Users and Entries for our fakeblog db). After you create the tables, they will initially show up in your table list and it will show 0 records:
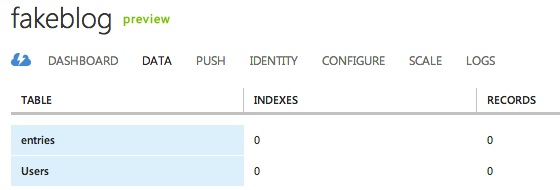
However, if you click into a table you’ll see the records that were previously inserted (by the create script) into your database:
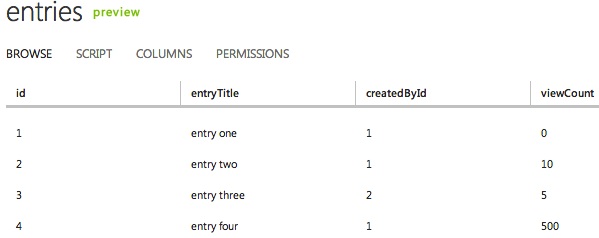
Now you can access your database from anything connected to mobile services.
Conclusion
Today we saw that it isn’t that difficult to put an existing database into a Mobile Service. This can also be done if you already had a database in SQL Database as well as long as you keep in mind the changes necessary for a table to work with Mobile Services (the id column and the schema). Additionally, not every data type is supported in Mobile Services at this time. For example as we saw when uploading images into Mobile Services, binary data types don’t currently work. For more information on the supported data types, take a look at the CUD section of this article on Dinesh’s website.
14 Comments
Saira
Quite informative article on how to connect Mobile Services to an existing database! Windows Azure Mobile Services provide backend solutions and accelerate client applications development. However, integration of Windows Azure with other cloud-based solutions such as GroupDocs has proved valuable return for users of both platforms. You can go through the blog below for further details.
http://groupdocs.com/blog/g...
Dave Iffland
Thanks for this post. I had totally missed the part about the id column. Had to go through some renames to get my existing tables since, of course, I named it TableId. Figures.
Chris
Happy to help. Yeah, using an existing DB can be a little tricky.
Mosib
Awesome! This is exactly what i have been looking for! thanks!
Chris
Great to hear!
Saad Galib
Hey, thanks for this awesome tutorial. I have successfully executed all the steps. But the problem is after i have done this my scripts that i write with the table are not working(no logs are being listed). Can you please help? Thanks in advance.
Chris
Sorry to hear that Saad. Are you sure you're hitting the REST API for the table? Are you actually getting data back when you hit them but the scripts aren't running or is nothing working? I would first make sure you're able to hit the table. I would then put a "console.log('test');" statement at the beginning of the request and check the Logging tab in the portal to see if it's being hit.
Matt GC
This helped a lot in porting an existing database over. Thanks!
Where is it documented that a database has to have a column of name "id"? A team member keeps asking for a documentation.
Chris
Happy this helped. I'm not sure it's properly documented everywhere YET but the assumption today is that you are creating tables and performing CRUD through your Mobile Service which will automatically add the iD column (which is now a String). Once there is a better story around importing / connecting to existing databases (what this article describes isn't exactly "turn key"), the ID column should be better documented.
Amit Singh
sir when i select deploy to azure database after right clicking on database name and selecting tasks , in the opened wizard i further get an exception of sql tansact or batch
could u plzz help me with that
Plamen 태권도 Yovchev
Hi Chris,
I want to ask is it possible to use Azure Mobile App back-end services with an instance of SQL Server which is not hosted in Azure ?
I have my own servers and SQL Server but I want my Mobile Services to be hosted on Azure to take advantage of the offline sync ?
Chris
Yes, take a look at Hybrid Connections: https://docs.microsoft.com/...
Plamen 태권도 Yovchev
Actually I was able to do that only by changing the connection string. The case is that our users can use different databases. I think of something like a table with client codes and connections strings. And on login dynamically to decide which connection string to use (for the different databases).
Do you think that this will work for us ?
Chris
Using a Hybrid connection will be safer than just exposing your on-premises SQL Server to the world for what it's worth. Out of the box Azure Mobile Apps doesn't really support switching connection strings on demand. You could build this out but you'd need to extend the server side SDK you're using.