 Today’s entry in 31 Days of Android will cover two important topics. Our primary focus will be on the WebView and the second is something we have to do to make make the WebView work, permissions. The WebView can be used to either present a web page within your application or to create a web application. In addition, you can show online web sites or use the WebView to display static HTML resources that you package as part of your app. Let’s dig in and implement this in an application right now. You can grab the code we’ll start with here.
Getting Permissions Added
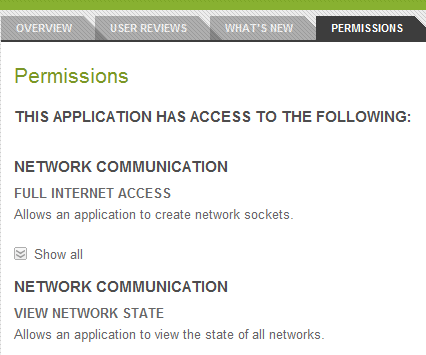
We might as well get this part out of the way or our WebView won’t work down the road. One thing we haven’t looked at in this Android series so far has been application permissions. Whenever you install an application from the Marketplace, there is an area that says “this app requires these permissions” and then lists those permissions:

These are things like ACCESS_FINE_LOCATION for checking the location using GPS, CALL_PHONE for starting phone calls without going through the dialer, REBOOT to be able to reboot the device, and many more. The one we’re interested in is INTERNET. All permissions are defined in the manifest file. Open the AndroidManifest.xml file in the root of your application. Permissions can be added anywhere within the manifest node. For now we can just add it in at the top:
<manifest xmlns:android="http://schemas.android.com/apk/res/android"
package="com.dayeighteen"
android:versionCode="1"
android:versionName="1.0" >
<uses-permission android:name="android.permission.INTERNET"/>
Now when users install your app, they would be able to see that your app requires internet access. It’s important to note that this permission is also required to do any sort of backend HTTP connections such as connected to a web service or doing a HTTP post.
Adding a WebView to your Layout
To use a WebView you need to add it to a layout. Open up the res/layout/second_layout.xml file and remove the LinearLayout that is there right now. You could put the WebView in your layout with other elements but for today, you’ll just use the WebView. For now, add a WebView to your XML and set the layout_width and layout_height to fill_parent. When you’re done, the layout XML should look like this:
<?xml version="1.0" encoding="utf-8"?>
<WebView xmlns:android="http://schemas.android.com/apk/res/android"
android:id="@+id/webView1"
android:layout_width="fill_parent"
android:layout_height="fill_parent" />
Now open src/com.dayeighteen/ActivityTwo.java. In the onCreate method after you’ve called setContentView and set it to the layout you just added the WebView to, you need to get a reference to the WebView using findViewById. Then you can calll the loadUrl method on that and pass in a web URL. Here’s the code for loading www.google.com:
WebView webView1 = (WebView) findViewById(R.id.webView1);
webView1.loadUrl("http://www.google.com");
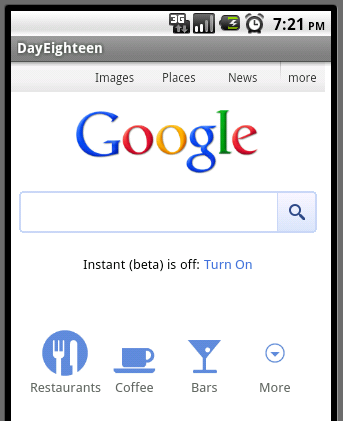
Now when you run your app and tap the second Button it will launch ActivityTwo and after a moment of loading, you should see Google appear:

That’s all you need to do to get a simple WebView in your app. There are a couple key things to notice / remember about this. First, when the WebView first loads, there is no address bar or navigation buttons. As soon as you click on a link or change the web page you’re on, you’ll notice that your app title (DayEighteen in the image above) disappears. This is because the default behavior of a WebView is to launch something that can handle URLs whenever you click a link or change pages. In most cases this means the default browser will launch. If you back out of that browser you’ll return to the WebView in your app. If you hit back from your WebView you’ll get back to the calling Activity. You won’t notice it loading Google but if you were to change the URL that you’re loading in your WebView to a page that uses JavaScript, you’d see that by default JavaScript is not enabled. Let’s take a look at how to deal with some of these issues.
WebSettings for WebViews
WebViews have a set of settings attached to them called WebSettings. Once you’ve gotten a reference to them, you can then alter those settings. Getting access is done via a call to getSettings like this:
WebSettings settings = webView1.getSettings();
There are a mess of things you can configure using this variable including the following. What may be the most important setting is enabling JavaScript which can be done via the setJavaScriptEnabled method. Also important are setSaveFormData which enables you to save user entered form data, setSavePassword which allows saving passwords users enter into web sites, and setUserAgentString which allows you to pass a custom UserAgent over to any web sites you visit. Go ahead and enable JavaScript for the WebView you created earlier. This is the code you should end up with:
WebView webView1 = (WebView) findViewById(R.id.webView1);
WebSettings settings = webView1.getSettings();
settings.setJavaScriptEnabled(true);
webView1.loadUrl(http://www.google.com);
Triggering Java Code from JavaScript
A useful capability that the WebView gives you is the ability to call back into your Java code from the JavaScript. If you wanted to create a web application that runs locally, you could make use of this functionality in order to tie your app’s web code into the hardware and Android specific functionality. In fact, this is how cross platform mobile development frameworks like PhoneGap work. In order to demonstrate this, there are a few steps you’ll need to take.
First let’s add a local HTML file that you can render to your WebView. To do so, right click on the assets folder and choose New—>File. This will open a wizard for adding a new file. You can name your file webapp.html for now. Once you’ve created the file, it is opened in a web browser in Eclipse. Go back to Package Explorer and right click on your new file, webapp.html and choose Open With -> Text Editor. Now you can edit the HTML source. We just want a simple demonstration so let’s add an input button and then the script to call into Android:
<html>
<body>
<input type="button" value="Say something" onClick="showToast('Say something!')" />
<script type="text/javascript">
function showToast(toast) {
Android.showToast(toast);
}
</script>
</body>
</html>
The input button is connected to the JavaScript showToast method via the onClick. Android is an interface that the WebView has access to naturally. However, the showToast method that we’re calling on the Android object is something we need to create. Go back to Package Explorer and right click on the src/com.dayeighteen folder and choose New—>Class. Name your class AppJavaScriptInterface and click Finish. Your class needs a constructor that will take in an android.content.Context and sets a private variable so you will have access to that context later. Now you just need to create a showToast method that matches up with the one we called above from JavaScript. When you’re done, your class should resemble this:
public class AppJavaScriptInterface {
private Context context;
public AppJavaScriptInterface(Context context) {
this.context = context;
}
public void showToast(String text) {
Toast.makeText(context, text, Toast.LENGTH_SHORT).show();
}
}
Now all you need to do is connect your WebView to your AppJavaScriptInterface. This is done via the addJavascriptInterface method on the WebView. Lastly, you need to load your local html file and not www.google.com like you were before. Your new code should look like this:
WebView webView1 = (WebView) findViewById(R.id.webView1);
WebSettings settings = webView1.getSettings();
settings.setJavaScriptEnabled(true);
webView1.addJavascriptInterface(new AppJavaScriptInterface(this), "Android");
webView1.loadUrl("file:///android_asset/webapp.html");
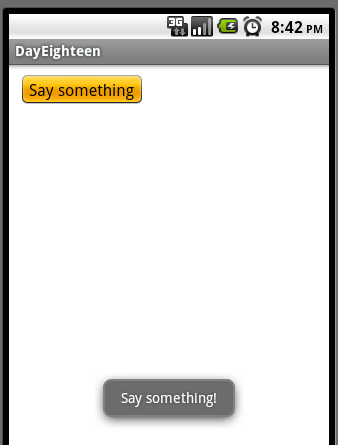
It’s important to remember to enable JavaScript in your WebView. Even though you’re loading a local file, it’s still using JavaScript. Now when you run your application and launch the WebView, you’ll see the HTML file you added locally to your project. When you tap the button you’ll see the Toast that you called from JavaScript into your Java code:

You’re just doing a simple toast but you could expand this idea and make a full fledged locally running web application that hooks into any of Android specific functionality. A scenario where this might make sense is if you have a team of people that are great at making good looking web sites but don’t have the skills to make a good looking Android app.
Overriding the Default Click Behavior
As mentioned above, when the user clicks on a link in the WebView the default behavior is to load whatever default app can handle the link. So if you click on a web URL, the browser will open to handle it. If you were trying to navigate between locally built web pages, you’d need to override this functionality. Luckily this is not difficult to handle. You can do it super quick by setting the WebViewClient of your WebView to a new instance of WebViewClient like so:
WebView webView1 = (WebView) findViewById(R.id.webView1);
webView1.setWebViewClient(new WebViewClient());
webView1.loadUrl("http://www.google.com");
Now when your app runs and you click on any of the links on the Google home page, you’ll stay in your WebView. Now if you hit the back button, you’ll notice that your WebView doesn’t handle moving back through the page stack like the default browser does. Fortunately, the WebView class exposes a way to handle this using a goBack method. You can handle the back button in two different ways. If you’re developing for pre 2.0, you need to override onKeyDown like this:
@Override
public boolean onKeyDown(int keyCode, KeyEvent event) {
WebView webView1 = (WebView) findViewById(R.id.webView1);
// If the key was back and there is history in the web view, go back
if ((keyCode == KeyEvent.KEYCODE_BACK) && webView1.canGoBack()) {
webView1.goBack();
return true;
}
//Handle anything else
return super.onKeyDown(keyCode, event);
}
If you’re developing for 2.0 and later, you can use the onBackPressed method:
@Override
public void onBackPressed() {
WebView webView1 = (WebView) findViewById(R.id.webView1);
// If there is history in the web view, go back
if (webView1.canGoBack()) {
webView1.goBack();
return;
}
//Handle anything else
super.onBackPressed();
}
The last thing to go over is overriding the WebViewClient. If you only want your WebView to handle specific URLs, this is how you would do it. Your custom WebViewClient should implement shouldOverrideUrlLoading which is called whenever a URL is trying to be loaded. In this method you can do whatever custom logic you want based off the URL:
private class AppWebViewClient extends WebViewClient {
@Override
public boolean shouldOverrideUrlLoading(WebView view, String url) {
if (Uri.parse(url).getHost().equals("www.google.com")) {
// This is a google site, keep it in the web view
return false;
}
// If we're not going to google, launch whatever activity will handle this url
Intent urlIntent = new Intent(Intent.ACTION_VIEW, Uri.parse(url));
startActivity(urlIntent);
return true;
}
}
Here if the site is Google, you’ll load it using your WebView and if not, it will fire an intent to try handling the URL. In order to make use of it, you’ll set your WebView’s webViewClient to your custom class instead of a new instance of the standard:
WebView webView1 = (WebView) findViewById(R.id.webView1);
webView1.setWebViewClient(new AppWebViewClient());
webView1.loadUrl("http://www.google.com");
Now you’re running URL clicks through your custom AppWebViewClient. One caveat to handling links using a custom WebViewClient are anchor tags that have non web URIs. For example, if this is in the HTML and is tapped, it fires the shouldOverrideUrlLoading method:
<a href="tel:8887676424">(888) 767-6424</a>
However, your app would crash as coded above if this was sent to the method. It’s important to make sure you’re handling these sort of links as well if you’re overriding things.